1. Pendahuluan
This manual provides detailed instructions for the installation, operation, maintenance, and troubleshooting of the ASRock H81M-HDS R2.0 Micro ATX Motherboard. Please read this manual thoroughly before installing or using your motherboard to ensure proper functionality and to prevent damage.
The ASRock H81M-HDS R2.0 is designed for Intel LGA 1150 processors, supporting DDR3 memory and offering essential connectivity for a reliable computing experience.
2. Produk Lebihview
The ASRock H81M-HDS R2.0 motherboard features the Intel H81 chipset, providing a stable platform for your system. Key features include:
- Tipe Soket: LGA1150
- Chipset: Intel H81
- Ingatan: 2x DDR3/DDR3L-1600/1333/1066 DIMM Slots, Dual Channel, Non-ECC, Unbuffered, Max Capacity of 16GB
- Slot Ekspansi: 1x PCI Express 2.0 x16 Slot, 1x PCI Express 2.0 x1 Slot
- Penyimpanan: 2x Port SATA3, 2x Port SATA2
- Suara: CODEC Audio Definisi Tinggi 5.1-Saluran Realtek ALC662
- Port USB: 4x USB 3.0 Ports (2 rear, 2 via header), 8x USB 2.0 Ports (4 rear, 4 via headers)
- Keluaran Video: 1x VGA Port, 1x DVI-D Port, 1x HDMI Port
- Jaringan: 1x RJ45 LAN Port
- Faktor Bentuk: MikroATX
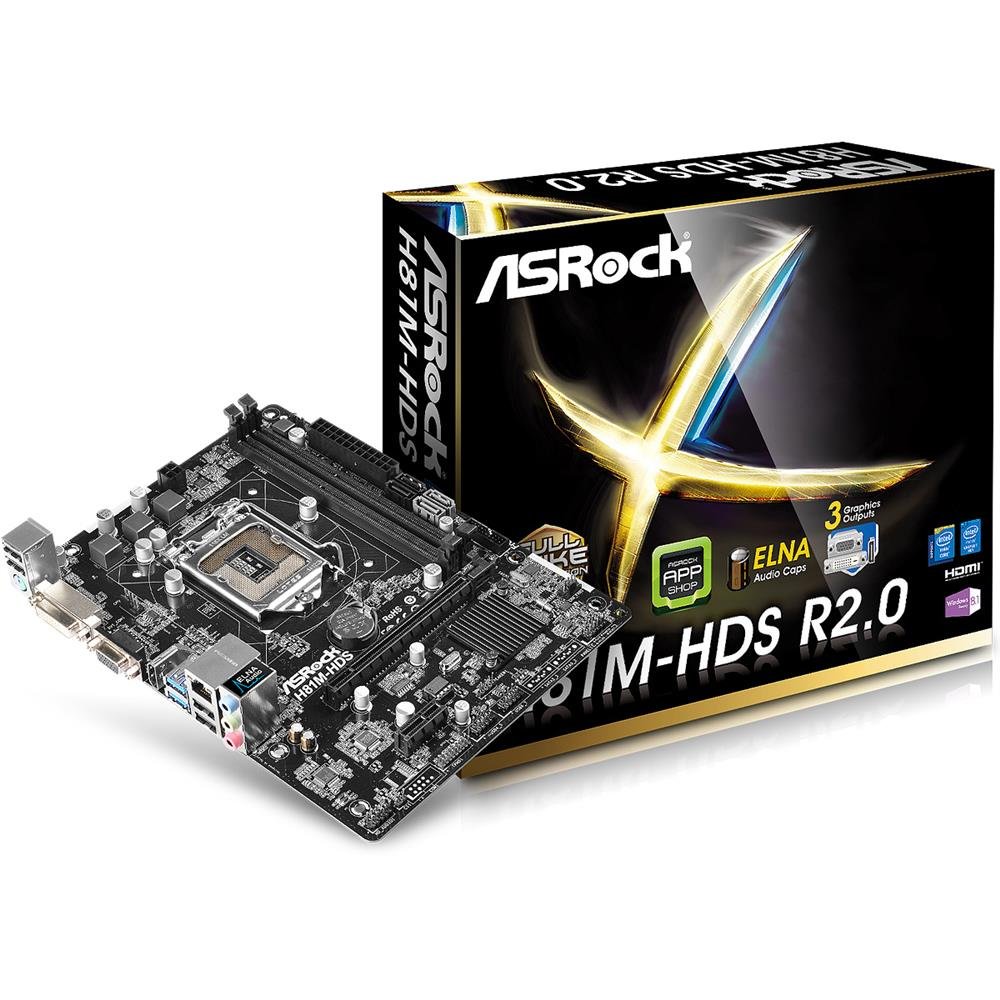
Gambar 2.1: ASRock H81M-HDS R2.0 Micro ATX Motherboard. This image displays the overall layout of the motherboard, including the CPU socket, RAM slots, PCIe slots, and various connectors.
3. Pengaturan dan Instalasi
Sebelum memulai pemasangan, pastikan sistem Anda dimatikan dan dicabut dari stopkontak. Kenakan gelang anti-statis untuk mencegah kerusakan akibat pelepasan muatan elektrostatik (ESD) pada komponen.
3.1. Memasang CPU
- Temukan soket CPU LGA 1150 pada motherboard.
- Tekan tuas pemuat perlahan ke bawah dan tarik keluar untuk membuka penutup soket CPU.
- Sejajarkan tanda segitiga pada CPU dengan tanda pada soket. Pasang CPU dengan hati-hati ke dalam soket tanpa memaksanya.
- Tutup pelat penahan beban dan dorong tuas penahan beban kembali ke tempatnya hingga berbunyi klik.
3.2. Memasang Pendingin CPU
Follow the instructions provided with your CPU cooler for proper installation. Ensure thermal paste is applied correctly between the CPU and the cooler's base.
3.3. Memasang Memori (RAM)
- Buka klip di kedua ujung slot DDR3 DIMM.
- Sejajarkan takik pada modul memori dengan kunci di slot DIMM.
- Insert the memory module firmly into the slot until the clips snap into place. For dual-channel operation, install modules in matching colored slots (if applicable, refer to motherboard diagram for specific slots).
3.4. Memasang Motherboard
- Pasang pelindung I/O ke lubang belakang casing komputer Anda.
- Place the motherboard into the case, aligning the screw holes with the standoffs.
- Kencangkan motherboard dengan sekrup, pastikan terpasang dengan kuat tetapi jangan terlalu kencang.
3.5. Menghubungkan Daya
- Hubungkan konektor daya ATX 24-pin dari catu daya Anda ke header yang sesuai pada motherboard.
- Connect the 4-pin ATX 12V power connector (CPU power) to its header.
3.6. Menghubungkan Perangkat Penyimpanan
Connect your SATA hard drives or SSDs to the SATA3 (6Gb/s) or SATA2 (3Gb/s) ports using SATA data cables. Connect power cables from the power supply to each drive.
3.7. Connecting Front Panel and USB Headers
Connect the front panel connectors (power button, reset button, HDD LED, power LED) and USB headers from your case to the corresponding pins on the motherboard. Refer to the motherboard's detailed diagram for correct pin assignments.
4. Petunjuk Pengoperasian
4.1. Pengaturan BIOS/UEFI
Upon initial boot, press Menghapus or F2 during the POST (Power-On Self-Test) to enter the UEFI Setup Utility. Here you can configure system settings such as boot order, date/time, and hardware parameters. The ASRock UEFI is designed to be user-friendly.
4.2. Instalasi Driver
After installing your operating system, install the necessary drivers for the motherboard's components (chipset, audio, LAN, graphics if using integrated) from the ASRock support website or the provided driver CD (if applicable). Ensure all drivers are up-to-date for optimal performance and stability.
5. Pemeliharaan
Perawatan rutin membantu memastikan umur panjang dan pengoperasian yang stabil dari motherboard dan sistem Anda.
- Penghilangan Debu: Periodically clean dust from inside your computer case, especially from CPU coolers, case fans, and heatsinks, using compressed air. Ensure the system is powered off and unplugged before cleaning.
- Manajemen Kabel: Ensure internal cables are neatly routed to improve airflow and prevent obstruction of components.
- Pembaruan BIOS/UEFI: Periksa ASRock website for BIOS/UEFI updates. Updates can improve compatibility, stability, and performance. Follow ASRock's specific instructions for BIOS flashing carefully to avoid damaging the motherboard.
- Pembaruan Driver: Keep your system drivers updated to ensure compatibility and optimal performance with your operating system and applications.
6. Penyelesaian masalah
If you encounter issues with your ASRock H81M-HDS R2.0 motherboard, refer to the following common troubleshooting steps:
6.1. Tidak Ada Daya / Tidak Bisa Booting
- Pastikan semua kabel daya (24-pin ATX, 4-pin ATX 12V) terhubung dengan aman ke motherboard dan catu daya.
- Pastikan sakelar catu daya berada pada posisi 'ON'.
- Periksa sambungan tombol daya panel depan ke motherboard.
- Jika memungkinkan, coba uji dengan catu daya yang berbeda.
6.2. Tidak Ada Output Tampilan
- Ensure your monitor is connected to the correct video output (VGA, DVI-D, or HDMI) on the motherboard or discrete graphics card.
- Pastikan monitor menyala dan diatur ke sumber input yang benar.
- Reseat the RAM modules. Faulty or improperly seated RAM is a common cause of no display.
- If using a discrete graphics card, ensure it is properly seated in the PCIe slot and has adequate power connected.
6.3. RAM Issues (e.g., one slot not working)
- Pastikan modul RAM terpasang sepenuhnya pada slotnya.
- Test each RAM module individually in each slot to identify a potentially faulty module or slot.
- Check the motherboard's QVL (Qualified Vendor List) for compatible memory modules.
6.4. Ketidakstabilan Sistem / Kerusakan Acak
- Periksa suhu CPU dan GPU untuk memastikan keduanya berada dalam batas pengoperasian yang aman.
- Verify all drivers are correctly installed and up-to-date.
- Jalankan alat diagnostik memori untuk memeriksa kesalahan RAM.
- Ensure your power supply provides sufficient and stable power to all components.
7. Spesifikasi
Detailed technical specifications for the ASRock H81M-HDS R2.0 Motherboard:
| Merek | ASRock |
| Nomor Model | H81M-HDS R2.0 |
| Soket CPU | LGA1150 |
| Jenis Chipset | Intel H81 |
| Teknologi Memori RAM | DDR3 |
| Slot Memori Tersedia | 2 |
| Ukuran Maksimum Memori RAM | 16 GB |
| Kecepatan Jam Memori | 1333 MHz (Mendukung hingga 1600 MHz) |
| Antarmuka Kartu Grafis | PCI Ekspres |
| Port SATA | 2x SATA3, 2x SATA2 |
| Port USB | 4x USB 3.0 (2 di belakang, 2 melalui header), 8x USB 2.0 (4 di belakang, 4 melalui header) |
| Keluaran Video | 1x VGA, 1x DVI-D, 1x HDMI |
| Suara | Realtek ALC662 5.1-Saluran HD Audio |
| Bahasa Indonesia: Bahasa Lokal | Ethernet Gigabit |
| Faktor Bentuk | MikroATX |
| Berat Barang | 0.6 Kilogram |
8. Garansi dan Dukungan
ASRock provides a limited warranty for its products. For specific warranty terms and conditions, please refer to the warranty card included with your product or visit the official ASRock websitus. Simpan bukti pembelian Anda untuk klaim garansi.
For technical support, driver downloads, and BIOS updates, please visit the official ASRock support weblokasi:
When contacting support, please have your motherboard model (H81M-HDS R2.0) and serial number ready.