1. Petunjuk Keselamatan Penting
To reduce the risk of fire, electric shock, or injury, always follow these basic safety precautions when using your Arctic-Pro Portable Digital Ice Maker Machine:
- Baca semua petunjuk sebelum digunakan.
- Jangan sentuh permukaan yang panas. Gunakan gagang atau kenop.
- To protect against electrical hazards, do not immerse cord, plug, or any part of the appliance in water or other liquids.
- Pengawasan ketat diperlukan saat peralatan apa pun digunakan oleh atau di dekat anak-anak.
- Cabut steker dari stopkontak saat tidak digunakan dan sebelum membersihkan. Biarkan dingin sebelum memasang atau melepas komponen, dan sebelum membersihkan alat.
- Jangan mengoperasikan alat apa pun dengan kabel atau steker yang rusak, atau setelah alat tersebut mengalami malfungsi atau kerusakan apa pun. Hubungi layanan pelanggan untuk pemeriksaan, perbaikan, atau penyesuaian.
- Penggunaan aksesori tambahan yang tidak direkomendasikan oleh produsen alat dapat menyebabkan bahaya.
- Jangan gunakan di luar ruangan.
- Jangan biarkan kabel menggantung di tepi meja atau meja dapur, atau menyentuh permukaan panas.
- Jangan menaruhnya di atas atau di dekat kompor gas atau listrik yang panas, atau di dalam oven yang sedang dipanaskan.
- Selalu pasang steker ke alat terlebih dahulu, lalu colokkan kabel ke stopkontak. Untuk melepas, putar kontrol ke posisi "off", lalu cabut steker dari stopkontak.
- Jangan gunakan alat untuk tujuan selain penggunaan rumah tangga.
- Peralatan ini hanya untuk penggunaan rumah tangga.
- Jangan gunakan bahan kimia korosif atau uap dalam alat ini.
- This ice maker must be grounded.
- Jangan menusuk pipa refrigeran.
2. Produk Lebihview
The Arctic-Pro Portable Digital Ice Maker Machine is designed to produce ice quickly and efficiently. It features a compact design suitable for various settings.
2.1 Komponen
- Unit Pembuat Es
- Keranjang Es yang Dapat Dilepas
- Sendok es
- Power Cord (3-prong plug)
2.2 Fitur
- Layar Digital: An easy-to-read LCD control panel for selecting ice size, setting timers, and controlling cleaning functions.
- Jernih View Window Lid: Allows observation of the ice making process.
- Fill Sensor: Detects water level to ensure proper operation.
- Sensor Cerdas: Prevents the ice basket from overfilling.
- Dua Ukuran Es Batu: Choose between small (0.75 x 0.75 inches) and large (1 x 0.75 inches) ice cubes.
- Produksi Es Cepat: Produces first batch of ice in 6-8 minutes.
- Kapasitas Harian: Capable of producing up to 26 pounds of ice per day.
- Enhanced Cooling System: Features a fan for efficient heat dissipation.

Figure 1: Key features and components of the ice maker.
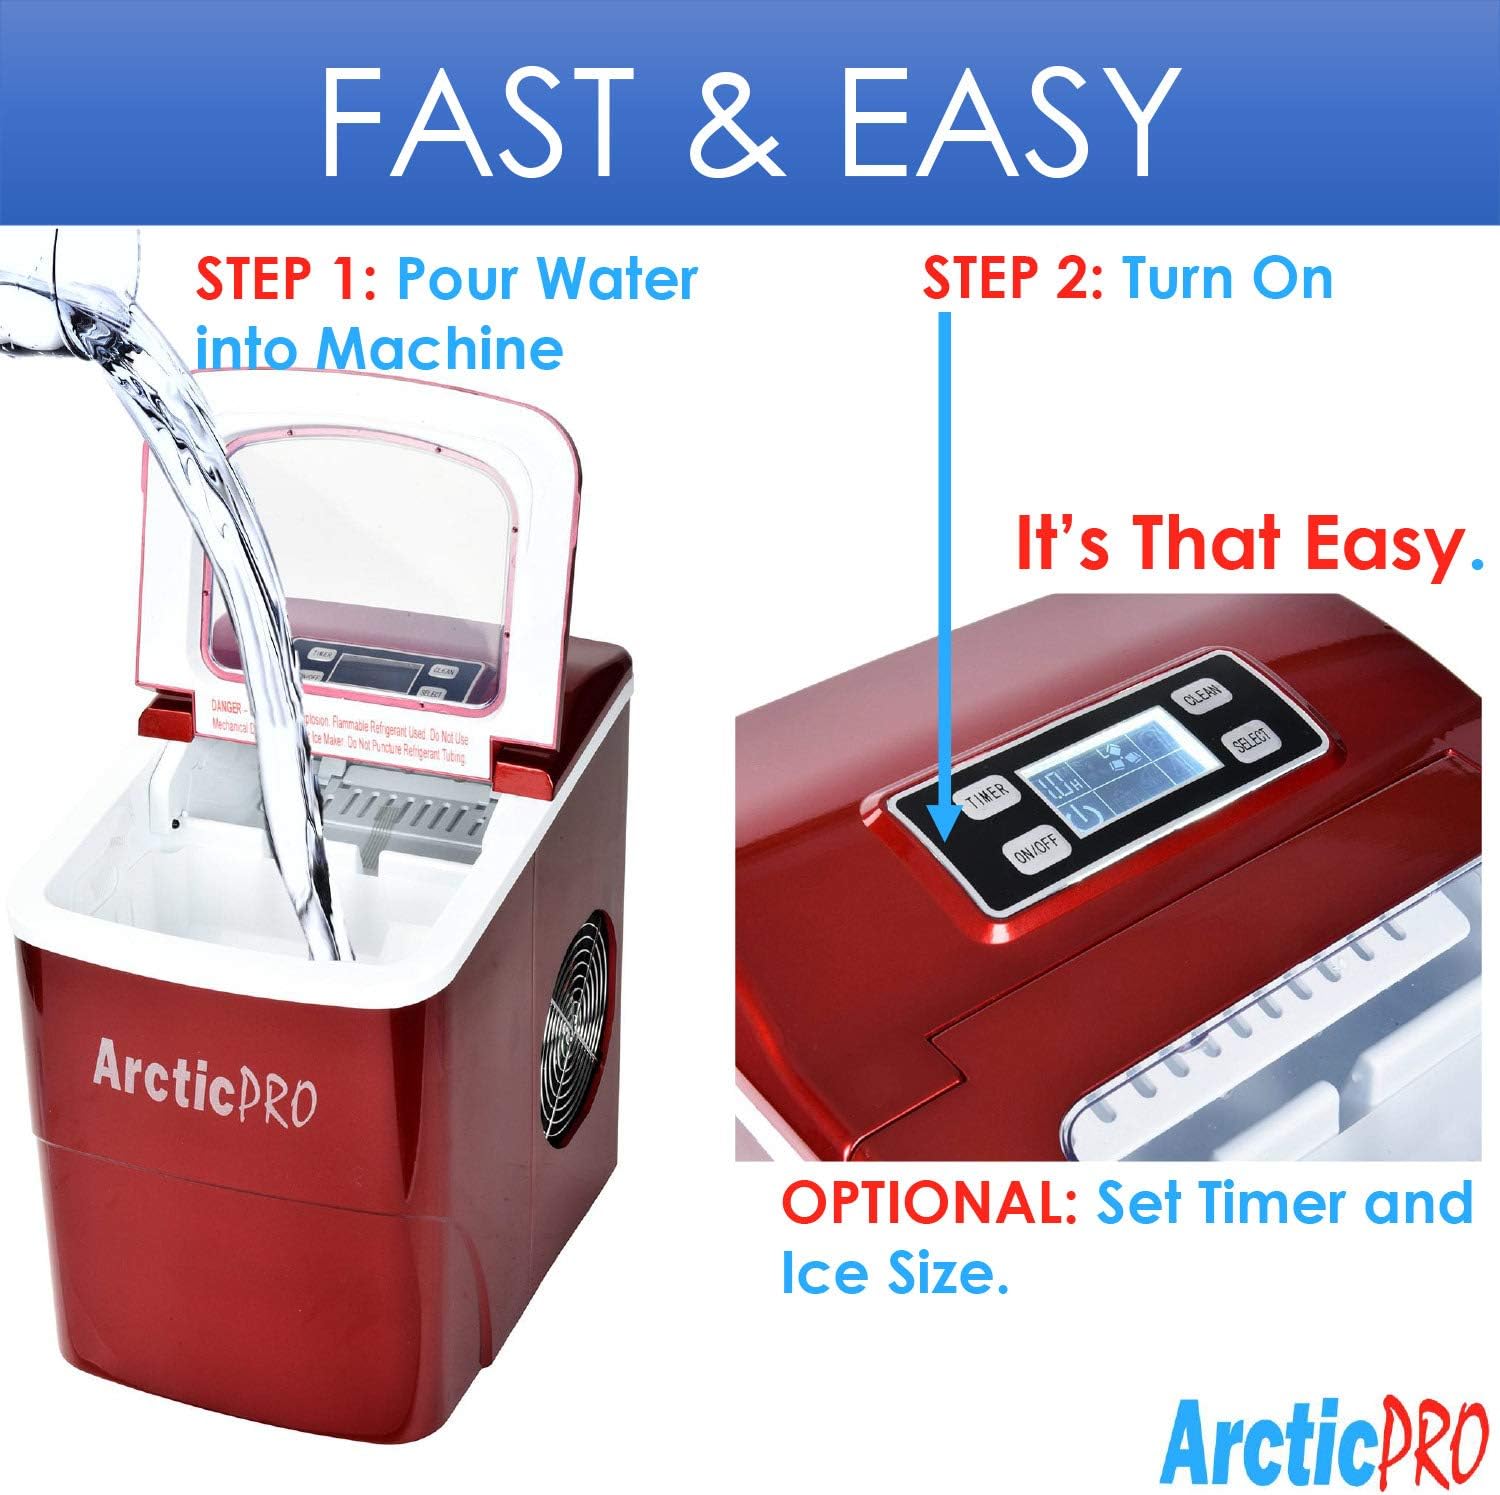
Figure 2: Ice production capabilities.
3. Petunjuk Penyiapan
3.1 Membongkar
- Lepaskan semua bahan kemasan dari unit.
- Inspect the ice maker for any damage. If damaged, do not operate and contact customer service.
- Remove the ice basket and ice scoop from inside the unit.
3.2 Pembersihan Awal
Before first use, clean the interior of the ice maker:
- Wash the ice basket and ice scoop with warm water and mild detergent. Rinse thoroughly.
- Bersihkan bagian dalam pembuat es dengan kain lembut dampened with warm water and a small amount of vinegar or mild detergent. Rinse with clean water and drain.
- Pastikan semua bagian kering sebelum dipasang kembali.
3.3 Penempatan
- Place the ice maker on a stable, level surface away from direct sunlight and heat sources.
- Ensure there is adequate ventilation around the unit, especially at the back and sides where the cooling fan is located.
- Berikan ruang setidaknya 4 inci di sekitar unit untuk sirkulasi udara yang baik.
3.4 Sambungan Daya
- Plug the 3-prong power cord into a grounded electrical outlet (115V, 60Hz).
- Allow the unit to rest for at least one hour before adding water and operating, especially if it was tilted during transport.
4. Petunjuk Pengoperasian
Operating your Arctic-Pro ice maker is a simple two-step process:

Figure 3: Simple operating steps.
4.1 Menambahkan Air
- Buka penutup mesin pembuat es.
- Pour potable water into the water reservoir. Do not exceed the 'MAX FILL LINE' indicated inside the reservoir.
- Tutup penutupnya.

Video 1: Demonstrates adding water to the ice maker. Note: This video is a customer-generated preview and may not represent official instructions.
4.2 Memulai Produksi Es
- Tekan tombol AKTIF/NONAKTIF button on the digital control panel to turn on the unit.
- Gunakan MEMILIH button to choose your desired ice cube size: Small (S) or Large (L). The selected size will be indicated on the digital screen.
- The ice maker will begin its cycle. The first batch of ice cubes will typically be ready in 6-8 minutes.
4.3 Indikator
- ES PENUH: An indicator light or message on the digital screen will illuminate when the ice basket is full. The unit will automatically pause ice production. Remove ice from the basket to resume production.
- TAMBAHKAN AIR: An indicator light or message will illuminate when the water reservoir is low. Add water to the reservoir to resume ice production.
4.4 Timer Function (Optional)
The digital screen allows you to set a timer for operation. Refer to the specific instructions in your product packaging for detailed timer setup.
5. Perawatan dan Pembersihan
Pembersihan dan perawatan rutin memastikan kinerja optimal dan umur pakai yang lebih lama untuk mesin pembuat es Anda.
5.1 Pembersihan Harian
- After each use, unplug the unit.
- Remove the ice basket and empty any remaining ice.
- Buang sisa air yang ada di dalam wadah menggunakan sumbat pembuangan yang terletak di bagian bawah unit.
- Bersihkan bagian dalam dengan kain lembut.
5.2 Pembersihan Mingguan
- Lakukan langkah-langkah pembersihan harian.
- Prepare a solution of warm water and a small amount of white vinegar or a food-grade ice maker cleaner.
- Pour the solution into the water reservoir and allow it to sit for 10-15 minutes.
- Tiriskan larutan hingga benar-benar kering.
- Rinse the reservoir thoroughly with clean water multiple times to remove any residue.
- Bersihkan bagian luar dengan kain lembut dan kering.amp kain.
5.3 Penyimpanan
Jika menyimpan mesin pembuat es untuk jangka waktu yang lama:
- Ensure the unit is thoroughly cleaned and completely dry.
- Leave the lid slightly ajar to prevent mold and mildew growth.
- Simpan di tempat sejuk dan kering.
6. Penyelesaian masalah
Review Perhatikan masalah umum dan solusinya sebelum menghubungi layanan pelanggan.
| Masalah | Kemungkinan Penyebab | Larutan |
|---|---|---|
| Pembuat es tidak menyala | Tidak ada pasokan daya | Check if the power cord is securely plugged into a grounded outlet. Test the outlet with another appliance. |
| Tidak ada produksi es | Lack of water in reservoir | Add water to the reservoir up to the MAX FILL LINE. |
| Suhu lingkungan terlalu tinggi | Ensure the ice maker is in a cool environment and not exposed to direct sunlight or heat sources. | |
| Air circulation blocked | Ensure adequate space around the unit for ventilation. Clean any dust from the fan vents. | |
| Ice cubes are too small or cloudy | Suhu air terlalu tinggi | Use colder water when filling the reservoir. |
| Penumpukan mineral | Perform a thorough cleaning and descaling as per maintenance instructions. Use filtered water. | |
| "ICE FULL" indicator is on, but basket is not full | Ice blocking sensor | Rearrange ice in the basket or remove some ice to clear the sensor path. |
| Kebisingan yang tidak biasa selama pengoperasian | Suara operasi normal | Some gurgling or fan noise is normal. If the noise is excessive or unusual, contact customer service. |
7. Spesifikasi
| Fitur | Spesifikasi |
|---|---|
| Nama Model | Mesin Pembuat Es Portabel |
| Nomor Model | 21738 |
| Dimensi (P x L x T) | 11.5" x 8.75" x 12.5" |
| Kapasitas Produksi Es Harian | Hingga 26 Pound |
| Waktu Produksi Es Pertama | 6-8 menit |
| Ukuran Es Batu | Kecil (0.75"x0.75"), Besar (1"x0.75") |
| Apatage | 100 watt |
| Jil.tage | 115 Volt |
| Tingkat Kebisingan | 45 Desibel |
| Bahan | Plastik |
| Komponen yang Termasuk | Ice Maker, Ice Basket, Small Ice Scoop |

Gambar 4: Dimensi produk.
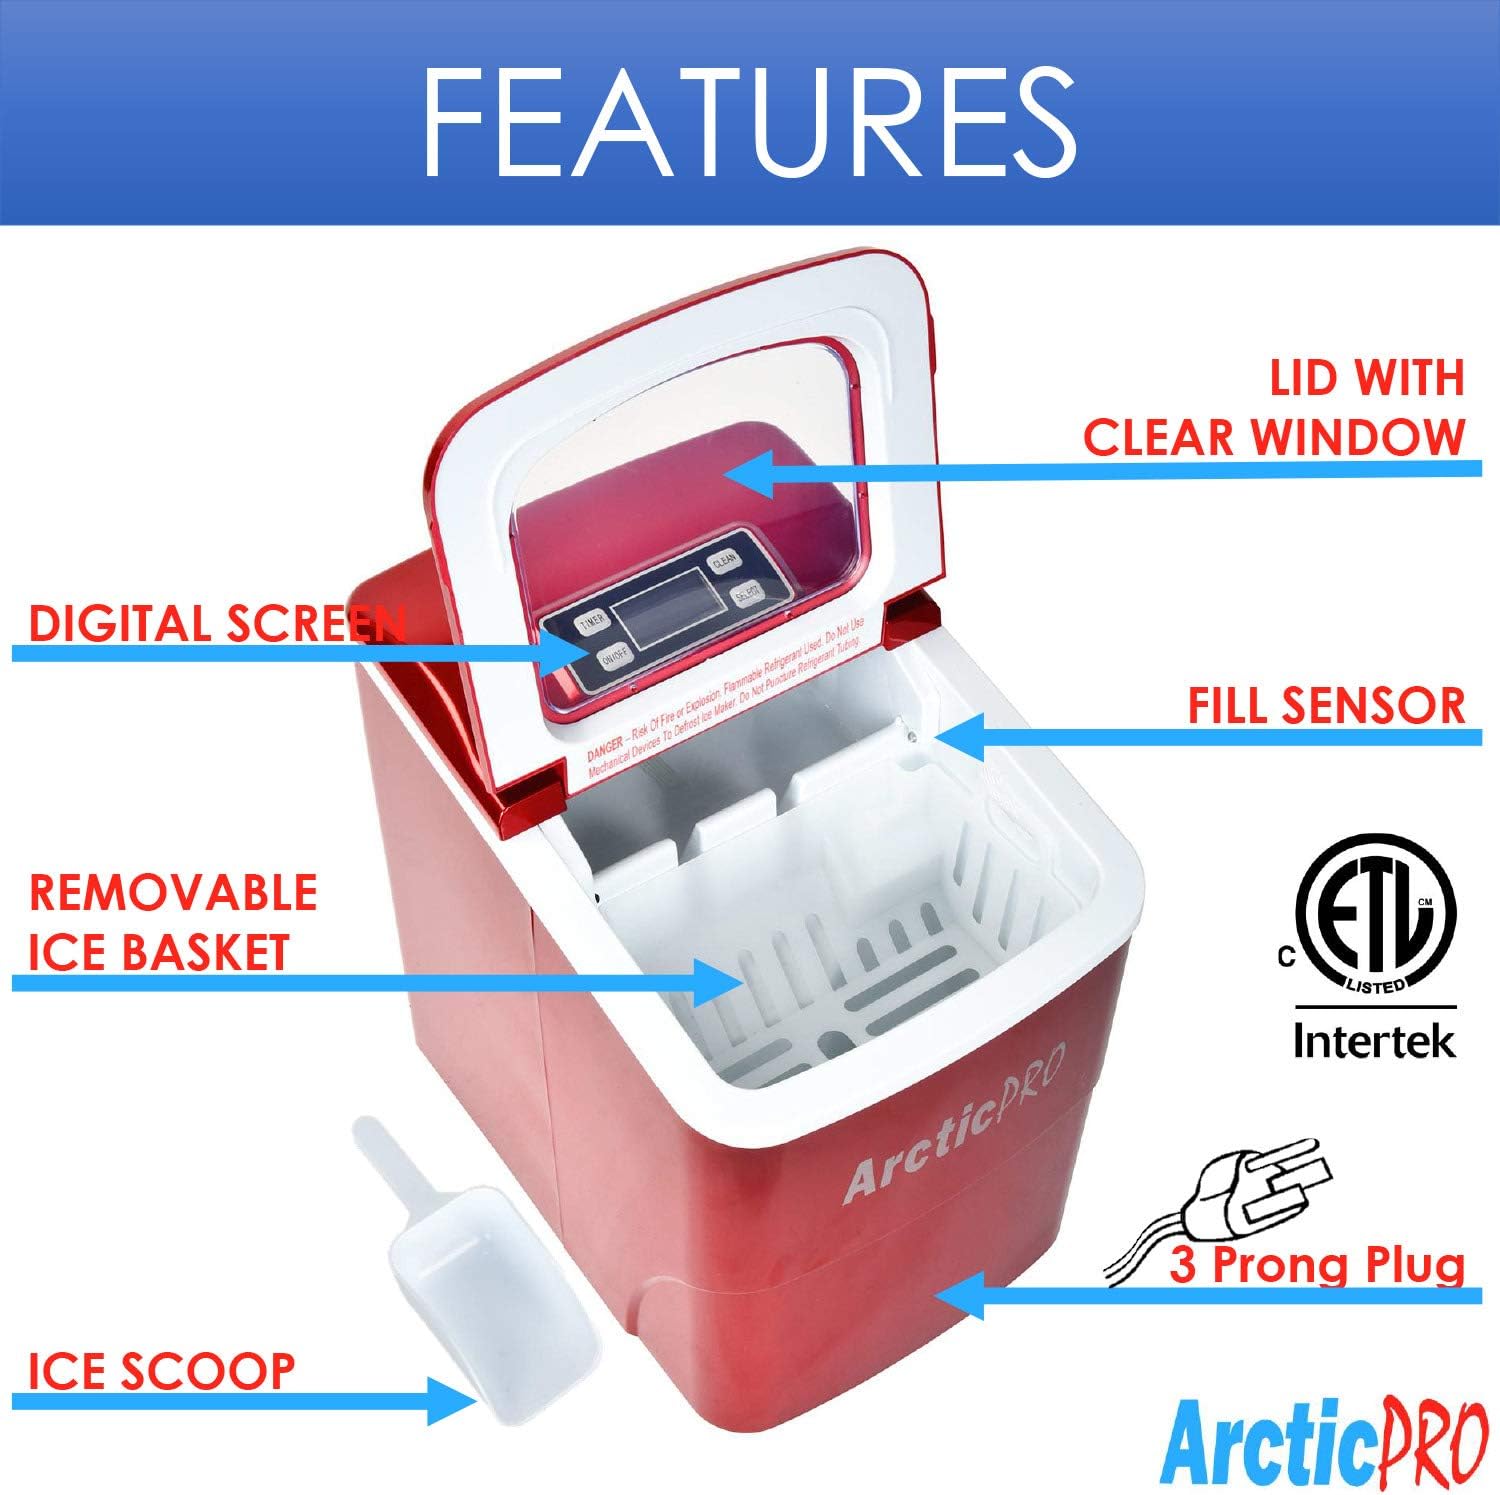
Figure 5: Ice cube size comparison.
8. Garansi dan Dukungan Pelanggan
Arctic-Pro products are manufactured to high-quality standards. For warranty information, product registration, or technical assistance, please refer to the warranty card included with your purchase or visit the official Arctic-Pro weblokasi.
If you encounter any issues not covered in this manual, please contact Arctic-Pro customer support for further assistance.