RYOBI TSS121
Buku Panduan Pengguna Gergaji Miter Geser Kompon RYOBI 12 Inci dengan LED (Model TSS121)
Perkenalan

Figure 1: The RYOBI 12-Inch Sliding Compound Miter Saw with LED.
This manual provides essential instructions for the safe operation, assembly, maintenance, and troubleshooting of your RYOBI 12-Inch Sliding Compound Miter Saw with LED, Model TSS121. Please read and understand all instructions before operating the tool to ensure personal safety and proper function.
Informasi Keselamatan Umum
Always wear appropriate personal protective equipment, including safety glasses, hearing protection, and a dust mask. Ensure the work area is clean, well-lit, and free from obstructions. Disconnect the saw from the power source before making any adjustments, changing accessories, or performing maintenance. Keep hands clear of the blade path at all times. Refer to the specific safety warnings provided with the product packaging.
Komponen yang Termasuk
The RYOBI 12-Inch Sliding Compound Miter Saw (Model TSS121) typically includes the following items:
- 12-Inch Sliding Compound Miter Saw with LED
- 40-Tooth Carbide-Tipped Blade (12 inches)
- kunci pas pisau
- Kantong Debu
- Pekerjaanamp
- Table Extensions (2)
- Kunci Allen
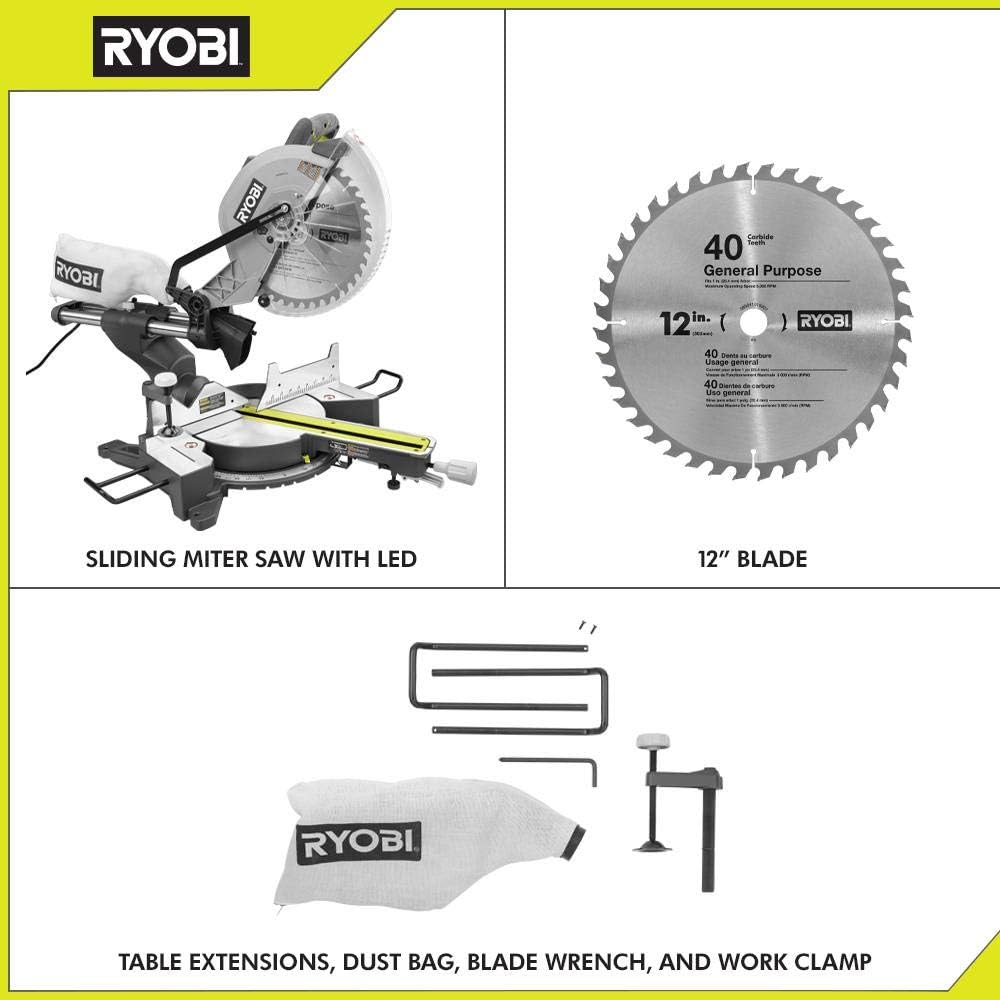
Figure 2: The RYOBI 12-Inch Sliding Compound Miter Saw with its standard accessories, including the 12-inch blade, table extensions, dust bag, blade wrench, and work clamp.

Gambar 3: Gambaran detail view of the included accessories: two table extensions, a dust bag, a blade wrench, and a work clamp.
Pengaturan dan Perakitan
Pembongkaran dan Pemeriksaan
Carefully remove all components from the packaging. Inspect the saw and all accessories for any damage that may have occurred during shipping. Do not operate the saw if any parts are damaged or missing. Contact customer support for assistance.
Memasang Gergaji
For stable and safe operation, the miter saw should be securely mounted to a workbench or a dedicated miter saw stand. Use appropriate bolts and washers to fasten the saw through the mounting holes in its base. Ensure the mounting surface is level and capable of supporting the saw's weight and operational forces.
Pemasangan Blade
- Putuskan sambungan gergaji dari sumber listrik.
- Lift the lower blade guard and locate the arbor bolt.
- Press the arbor lock button to prevent the blade from rotating.
- Using the provided blade wrench, loosen and remove the arbor bolt and outer washer.
- Carefully place the new 12-inch carbide-tipped blade onto the arbor, ensuring the teeth are pointing downwards towards the front of the saw.
- Reinstall the outer washer and arbor bolt. Tighten the arbor bolt securely with the blade wrench while holding the arbor lock button.
- Release the arbor lock and check that the blade rotates freely.

Figure 4: A close-up of the 12-inch carbide-tipped blade and the transparent blade guard, highlighting the blade's orientation.
Dust Bag and Table Extensions
- Attach the dust bag to the dust port at the rear of the blade guard assembly. Ensure it is securely fastened to collect sawdust during operation.
- Insert the table extensions into the designated slots on either side of the saw's base. These provide additional support for longer workpieces.
Petunjuk Pengoperasian
Koneksi Daya
Connect the saw to a grounded 120V AC power outlet. Ensure the power cord is routed safely to avoid tripping hazards or interference with the saw's operation.
Adjusting Miter Angle
Untuk menyesuaikan sudut mitra:
- Loosen the miter lock handle located at the front of the saw base.
- Depress the miter detent override lever (if applicable) and pivot the turntable to the desired angle. The saw features 9 positive miter stops for common angles.
- Once the desired angle is set, tighten the miter lock handle firmly.

Figure 5: Demonstrating the adjustment of the miter angle using the front lock handle.
Menyesuaikan Sudut Bevel
Untuk menyesuaikan sudut kemiringan:
- Loosen the bevel lock knob, typically located at the rear of the saw.
- Miringkan kepala gergaji ke sudut kemiringan yang diinginkan.
- Kencangkan kenop pengunci bevel dengan erat.
Using the EXACTLINE™ Laser
The integrated EXACTLINE™ laser provides a visual guide for your cut line. Activate the laser by pressing the dedicated button (refer to your saw for exact location). The laser can be adjusted for accuracy if needed (consult the full product manual for adjustment procedures).
Membuat Potongan
- Place the workpiece firmly against the fence and on the saw table. Use the work clamp untuk mengamankan potongan-potongan yang lebih kecil.
- Pastikan mata pisau tidak menyentuh benda kerja sebelum menghidupkan motor.
- Depress the trigger to start the saw. Allow the blade to reach full speed (3,800 RPM) before beginning the cut.
- For sliding cuts, pull the saw head forward, then push it slowly and steadily through the workpiece. For non-sliding cuts, simply lower the saw head through the material. The saw offers up to a 13-1/2 inch cross-cut capacity.
- Once the cut is complete, release the trigger and allow the blade to stop completely before raising the saw head. The electric brake will stop the blade quickly.
- Remove the workpiece only after the blade has stopped.

Figure 6: An operator making a precise cut on a piece of trim using the miter saw, demonstrating proper technique and safety.

Figure 7: An operator cutting a larger piece of lumber, highlighting the use of the work clamp untuk stabilitas.
Pemeliharaan
Pembersihan
Regularly clean the saw to ensure optimal performance and longevity. Disconnect from power before cleaning. Use a brush or compressed air to remove sawdust and debris from the motor vents, blade guard, and table. Do not use solvents or harsh chemicals that could damage plastic parts.
Penggantian pisau
Replace dull or damaged blades promptly. Refer to the "Blade Installation" section under Setup for detailed instructions. Always use 12-inch blades designed for miter saws with a 5/8-inch arbor hole.
Pelumasan
Periodically apply a light coat of silicone spray or dry lubricant to the sliding rails to ensure smooth operation. Avoid over-lubrication, which can attract dust.
Penyelesaian Masalah
| Masalah | Kemungkinan Penyebab | Larutan |
|---|---|---|
| Gergaji tidak menyala | No power, faulty switch, tripped circuit breaker | Check power connection, test outlet, reset circuit breaker, contact service if switch is faulty. |
| Blade mengikat atau merokok | Dull blade, incorrect blade for material, workpiece not secured, excessive feed rate | Replace blade, use appropriate blade, secure workpiece with clamp, reduce feed rate. |
| Potongan yang tidak akurat | Miter/bevel not locked, fence not square, laser misaligned, blade wobble | Ensure locks are tight, check fence squareness, adjust laser, inspect blade for damage. |
| Getaran berlebihan | Loose blade, damaged blade, saw not securely mounted | Tighten arbor bolt, replace damaged blade, secure saw to workbench. |
If you encounter issues not listed here or if solutions do not resolve the problem, please contact RYOBI customer support.
Spesifikasi
- Model: TSS121
- Motor: 15 Amp
- Kecepatan Tanpa Beban: 3,800 putaran/menit
- Diameter bilah: 12 inci
- Ukuran Punjung: 5/8 inci
- Cross Cut Capacity: Up to 13-1/2 Inches
- Miter Stops: 9 Pemberhentian Positif
- Panduan Laser: EXACTLINE™ Laser
- Rem: Listrik
- Sumber Daya: Listrik Kabel
- Berat Barang: Sekitar 45 pon
- Dimensi Produk: 36.93x50x20.87 inci
- Bahan Pisau: Karbit
- Rekomendasi Permukaan: Kayu
Informasi Garansi
The RYOBI 12-Inch Sliding Compound Miter Saw (Model TSS121) is covered by a Garansi Terbatas Tiga Tahun. This warranty covers defects in material and workmanship from the date of purchase. For full details regarding warranty coverage, limitations, and how to make a claim, please refer to the warranty card included with your product or visit the official RYOBI weblokasi.

Figure 8: RYOBI's Three-Year Limited Warranty badge, indicating the warranty period for the product.
Dukungan Pelanggan
For technical assistance, parts, or warranty service, please contact RYOBI customer support. Have your model number (TSS121) and serial number ready when contacting support.
- Weblokasi: www.ryobitools.com
- Telepon: Refer to the official RYOBI webKunjungi situs web atau kemasan produk untuk melihat nomor kontak terbaru.

Figure 9: The official RYOBI brand logo.
Dokumen Terkait - TSS121
 |
Delta 12-inch Sliding Compound Miter Saw Instruction Manual Comprehensive instruction manual for the Delta 12-inch Sliding Compound Miter Saw (Model 26-2312), covering features, safety instructions, operation, maintenance, and troubleshooting. |
 |
HOTECHE 15A 10-Inch Sliding Miter Saw with Laser - Model P805218A - User Manual Comprehensive user manual and safety instructions for the HOTECHE 15A 1800W 255mm (10-inch) Sliding Miter Saw with Laser, Model P805218A. Covers safety precautions, specifications, operating procedures, maintenance, and parts list. |
 |
ADMIRAL 12" Dual-Bevel Sliding Compound Miter Saw Owner's Manual & Safety Instructions Comprehensive owner's manual and safety instructions for the ADMIRAL 12" Dual-Bevel Sliding Compound Miter Saw (Model 57839). Covers setup, operation, maintenance, safety warnings, troubleshooting, and warranty information. |
 |
Buku Panduan Pengguna Gergaji Miter Geser Gabungan Ronix 5404 Buku panduan pengguna komprehensif untuk gergaji miter geser gabungan Ronix 5404, yang mencakup spesifikasi, daftar suku cadang, pedoman keselamatan, dan informasi perlindungan lingkungan. |
 |
Buku Panduan Penggunaan Gergaji Miter Geser Ganda DeWALT DW717-XE 10 Inci Buku panduan instruksi lengkap untuk gergaji miter geser ganda DeWALT DW717-XE 10 inci, yang mencakup pedoman keselamatan, pengoperasian, penyesuaian, perawatan, aksesori, dan pemecahan masalah. |
 |
DEWALT DW718 Miter Saw Manual: Operation, Safety, and Specifications This instruction manual provides detailed information on the safe operation, maintenance, and specifications for the DEWALT DW718 (230 Volt) 305mm (12") Double Bevel Sliding Compound Miter Saw. Includes safety guidelines, troubleshooting tips, and warranty information. |
Ask a question about this manual
Ask about setup, troubleshooting, compatibility, parts, safety, or missing instructions. Manuals+ will review the question and use this page’s manual context to help answer it.