1. Pendahuluan
This manual provides comprehensive instructions for the installation, operation, and maintenance of your OAE 60A MPPT Solar Charge Controller. This device is designed to efficiently manage power flow from your solar panels to various battery types, including Lithium, Sealed, Gel, and Flooded batteries, ensuring optimal charging and system longevity.
2. Informasi Keselamatan
Harap baca semua petunjuk keselamatan dengan saksama sebelum pemasangan dan pengoperasian. Kegagalan mengikuti petunjuk ini dapat mengakibatkan sengatan listrik, kebakaran, atau cedera serius.
- Ensure all power sources are disconnected before installing or servicing the controller.
- Gunakan alat pelindung diri (APD) yang sesuai, seperti sarung tangan berinsulasi dan pelindung mata.
- Verify correct polarity for all connections (solar panel, battery, load) to prevent damage.
- Pasang pengontrol di area yang berventilasi baik, jauhkan dari bahan yang mudah terbakar dan sinar matahari langsung.
- Do not disassemble or attempt to repair the controller yourself. Refer to qualified personnel.
- Pastikan pentanahan sistem benar.
3. Fitur Produk
The OAE 60A MPPT Solar Charge Controller offers advanced features for efficient solar power management:
- Auto 12/24/36/48V Battery System: Automatically detects and adapts to your battery voltage.
- Kompatibilitas Baterai Serbaguna: Supports 4 charging options: Sealed, Gel, Flooded, and User-defined, compatible with lithium batteries.
- High Efficiency MPPT Technology: Creative maximum power point tracking technology significantly increases energy utilization rate (up to 97% transfer efficiency). Quickly scans the entire I-V curve to track the maximum power point within seconds.
- Layar LCD Informatif: Clear display of operating data and working conditions. Features real-time energy statistics, Chinese and English language options, and a multi-function LCD screen with operation menu. Displays daily power generation and current curves, and fault records for timely troubleshooting.
- Comprehensive Protection Functions: Built-in protections ensure system safety and longevity.
- Komunikasi RS485: Capable of Wi-Fi remote monitoring (additional purchase required) for real-time wireless monitoring via APP (Android & iOS compatible). Simple and convenient to set, with one-key factory settings restore.
4. Isi Paket
Setelah membuka paket, pastikan semua barang lengkap dan tidak rusak:
- OAE 60A MPPT Solar Charge Controller (Blue)
- Mounting Bracket
- Panduan Pengguna
- Kabel Sensor Suhu
- Sekrup untuk pemasangan

Figure 1: OAE 60A MPPT Solar Charge Controller (Blue model).
5. Pengaturan dan Instalasi
Follow these steps for proper installation of your MPPT solar charge controller. For a visual guide, please refer to the installation video below.
Video 1: OAE 60A MPPT Solar Charge Controller Installation Guide. This video demonstrates the unboxing, physical setup, and wiring connections for the solar charge controller.
5.1 Instalasi Fisik
- Membuka Kotak dan Inspeksi: Carefully remove the controller from its packaging. Inspect for any visible damage. The package typically includes the controller, mounting bracket, and user manual.

Figure 2: The OAE MPPT Solar Charge Controller as packaged in its box.
- Memasang Pengontrol: Loosen the four screws on the bottom of the MPPT controller to detach the mounting bracket. Secure the bracket to a stable, vertical surface in a well-ventilated area, then reattach the controller to the bracket using the screws.

Gambar 3: Sisi view of the controller showing dimensions and mounting points.
5.2 Koneksi Kabel
Before making any connections, ensure all power sources are OFF. Connect the wires in the following order:
- Koneksi Baterai: Connect the battery wires to the "BATTERY" terminals on the controller. Ensure correct polarity (positive to positive, negative to negative). Loosen the terminal screws, insert the wires, and tighten securely.

Figure 4: Connection diagram illustrating solar panel, battery, and DC load connections.
- Koneksi Panel Surya: Connect the solar panel wires to the "SOLAR PANEL" terminals. Observe correct polarity. The controller supports a maximum PV input of 150V.

Figure 5: Close-up of the controller's terminal block, showing connections for solar panel, battery, and DC load.
- DC Load Connection (Optional): If using a DC load directly from the controller, connect the load wires to the "DC LOAD" terminals, ensuring correct polarity.
- Koneksi Sensor Suhu: Connect the temperature sensor cable to the designated "TEMPERATURE INTERFACE" port. This ensures accurate battery temperature compensation for optimal charging.
6. Petunjuk Pengoperasian
Once all connections are secure, the controller will boot up automatically. The LCD display provides real-time system information and allows for configuration.
6.1 Layar LCD Berakhirview
The multi-function LCD screen displays various parameters and allows access to settings. Use the MENU, DOWN, UP, and ENTER buttons to navigate and adjust settings.
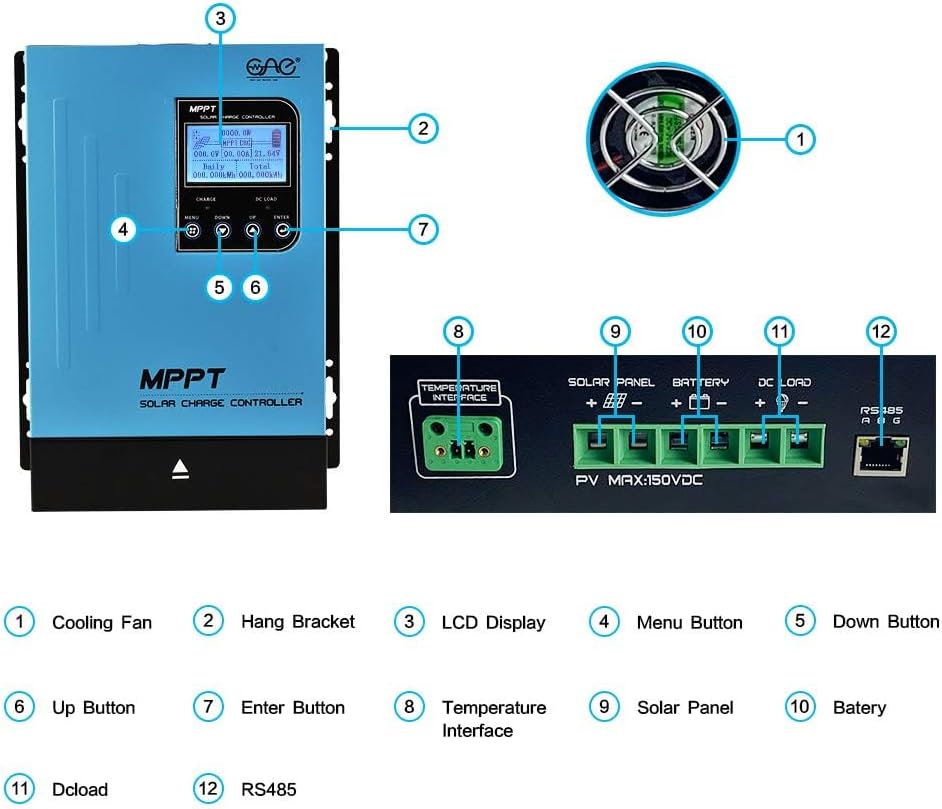
Figure 6: Detailed description of the main interface and display parameters.
6.2 Operasi Dasar
- Nyalakan: After connecting the battery, the controller will automatically power on. The display will show "Boot up, please wait..."
- Pemantauan: The main interface displays PV module voltage, daily power generation, charging power, charging current, battery capacity indication, battery voltage, total power generation, date, time, charging state (MPPT tracking, floating charge, stop charge), external temperature, and internal temperature.
- Menavigasi Menu: Use the "MENU" button to cycle through different display screens and settings options. Use "UP" and "DOWN" to change values or navigate within a menu. Press "ENTER" to confirm selections.
- DC Load Control: The DC load output can be configured for automatic operation (e.g., time control) or manual ON/OFF. This is accessed via the "DC Output Setting" menu.
7. Pemeliharaan
Regular maintenance ensures the longevity and optimal performance of your solar charge controller:
- Kebersihan: Jaga agar kontroler tetap bersih dan bebas dari debu dan kotoran. Gunakan kain kering untuk membersihkannya.
- Ventilasi: Ensure the cooling fan and ventilation holes are not obstructed. Periodically check for dust buildup in the fan.


Figure 7: Cooling fan and ventilation holes for proper airflow.
- Koneksi: Periodically check all wiring connections for tightness and corrosion. Loose connections can lead to overheating and poor performance.
- Kesehatan Baterai: Memantau volume bateraitage and health regularly. Ensure the battery type setting on the controller matches your battery.
8. Penyelesaian masalah
Bagian ini membahas masalah umum yang mungkin Anda temui dengan pengontrol pengisian daya surya Anda.
| Masalah | Kemungkinan Penyebab | Larutan |
|---|---|---|
| Pengontrol tidak menyala. | Tidak ada baterai yang terhubung atau tegangan bateraitage terlalu rendah. | Ensure battery is connected with correct polarity and has sufficient voltage (above minimum operating voltagdan). |
| No charging current from solar panels. | Solar panels not connected, insufficient sunlight, or incorrect panel voltage. | Check solar panel connections and polarity. Ensure adequate sunlight. Verify panel voltage is within controller's input range. |
| DC load not working. | Load output disabled, overloaded, or incorrect wiring. | Check DC output settings on the LCD. Reduce load if overloaded. Verify load wiring and polarity. |
| Unusual noise from controller (e.g., fan). | Normal operation (fan activates under load) or obstructed fan. | Ensure proper ventilation. Clean fan if obstructed. If noise is excessive or unusual, contact support. |
9. Spesifikasi
Key technical specifications for the OAE 60A MPPT Solar Charge Controller:
- Nomor Model: MP-60A
- Merek: OAE
- Peringkat saat ini: 60A
- Sistem Baterai Voltage: Auto 12V/24V/36V/48V
- Tegangan Masukan PV Makstage: 150V
- Tipe Tampilan: DIPIMPIN
- Bahan: Logam
- Dimensi Produk: 7.9x3.5x12.4 inci
- Berat Barang: 7.96 pon (3.62 Kilogram)
- Jenis Baterai yang Kompatibel: Sealed, Gel, Flooded, Lithium, and User-defined
10. Garansi dan Dukungan
For warranty information, technical support, or to purchase additional accessories, please visit the official OAE store or contact their customer service.
Rencana perlindungan tersedia untuk cakupan yang diperluas:
- Rencana Perlindungan 3 Tahun
- Rencana Perlindungan 4 Tahun
- Perlindungan Lengkap (paket bulanan yang mencakup pembelian yang memenuhi syarat)
Untuk detail lebih lanjut, kunjungi OAE Store on Amazon.