1. Pendahuluan
This manual provides essential instructions for the safe installation, operation, and maintenance of your OOYCYOO 100A MPPT Solar Charge Controller. Please read this manual thoroughly before installation and use to ensure optimal performance and longevity of the product. Keep this manual for future reference.
Tindakan pencegahan keamanan
- Pastikan semua kabel tersambung dan diamankan dengan benar untuk mencegah korsleting atau kerusakan.
- Selalu sambungkan baterai terlebih dahulu, kemudian panel surya, dan terakhir beban. Lepaskan sambungan dengan urutan terbalik.
- Do not attempt to repair or modify the controller yourself. Contact qualified personnel for service.
- Pasang pengontrol di area yang berventilasi baik, jauhkan dari bahan yang mudah terbakar dan sinar matahari langsung.
- Wear appropriate personal protective equipment (PPE) during installation, including eye protection and insulated gloves.
2. Produk Lebihview
The OOYCYOO 100A MPPT Solar Charge Controller is designed to efficiently manage power from your solar panels to charge various battery types, including 12V, 24V, 36V, and 48V systems. It features advanced Maximum Power Point Tracking (MPPT) technology for high conversion efficiency.
Fitur Utama:
- Automatic identification of 12V/24V/36V/48V DC system voltage.
- High maximum power tracking rate (≥99%) and conversion rate (>99%).
- Compatible with multiple battery types: USER (customizable), Flooded, Sealed, Gel, and Lithium (LiFePO4, Li(NiCoMn)O2).
- Programmable settings for absorption voltage, vol mengambangtage, dan volume rendahtage putuskan.
- Integrated LCD display showing charge amount (KWH) and other operational data.
- Comprehensive protection functions: PV over current/power, PV short circuit, PV reverse polarity, night reverse charging, battery reverse polarity, battery over voltage, battery over discharge, battery overheating, controller overheating, lithium battery low temperature, load short circuit, load overload, TVS high voltage transien.
- Built-in cooling fan for efficient heat dissipation, activating when temperature >45℃ and deactivating when <40℃.
- USB 5V 2A charging ports.
Identifikasi Komponen:

Gambar 1: Depan dan belakang view of the OOYCYOO 100A MPPT Solar Charge Controller, showing the LCD display and connection terminals.

Gambar 2: Terperinci view of the controller's connection terminals, including Solar Panel, Battery, Load, Remote Temp Sensor, and USB ports.
3. Spesifikasi
| Parameter | Nilai |
|---|---|
| Arus Pengisian Terukur | 100A |
| Nominal Sistem Voltage | 12V/24V/36V/48V DC Auto Identifying |
| Maks. PV Sirkuit Terbuka Voltage | Tegangan 150VDC |
| 12V System Max. PV Input Power | 1300W (Voc ≤96V) |
| 24V System Max. PV Input Power | 2600W (Voc ≤112V) |
| 36V System Max. PV Input Power | 3800W |
| 48V System Max. PV Input Power | 5000W (Voc ≤150V) |
| MPPT Best Working Voltage Range (12V) | DC18V-DC96V |
| MPPT Best Working Voltage Range (24V) | DC36V-DC112V |
| MPPT Best Working Voltage Range (48V) | DC72V-DC150V |
| Maximum DC/DC Transfer Efficiency | 98.7% |
| Power Terminal Wire Gauge | 10 AWG |
| Dimensi (P x L x T) | 12" x 7.8" x 3.2" (30.5cm x 19.8cm x 8.1cm) |
| Berat | 9.5 pon (4.3 kg) |
| Suhu Operasional | Up to 40℃ (Fan operates above 45℃) |
| Bahan | Logam |
| Jenis Tampilan | Layar LCD |
| Keluaran USB | Tegangan 5V 2A |
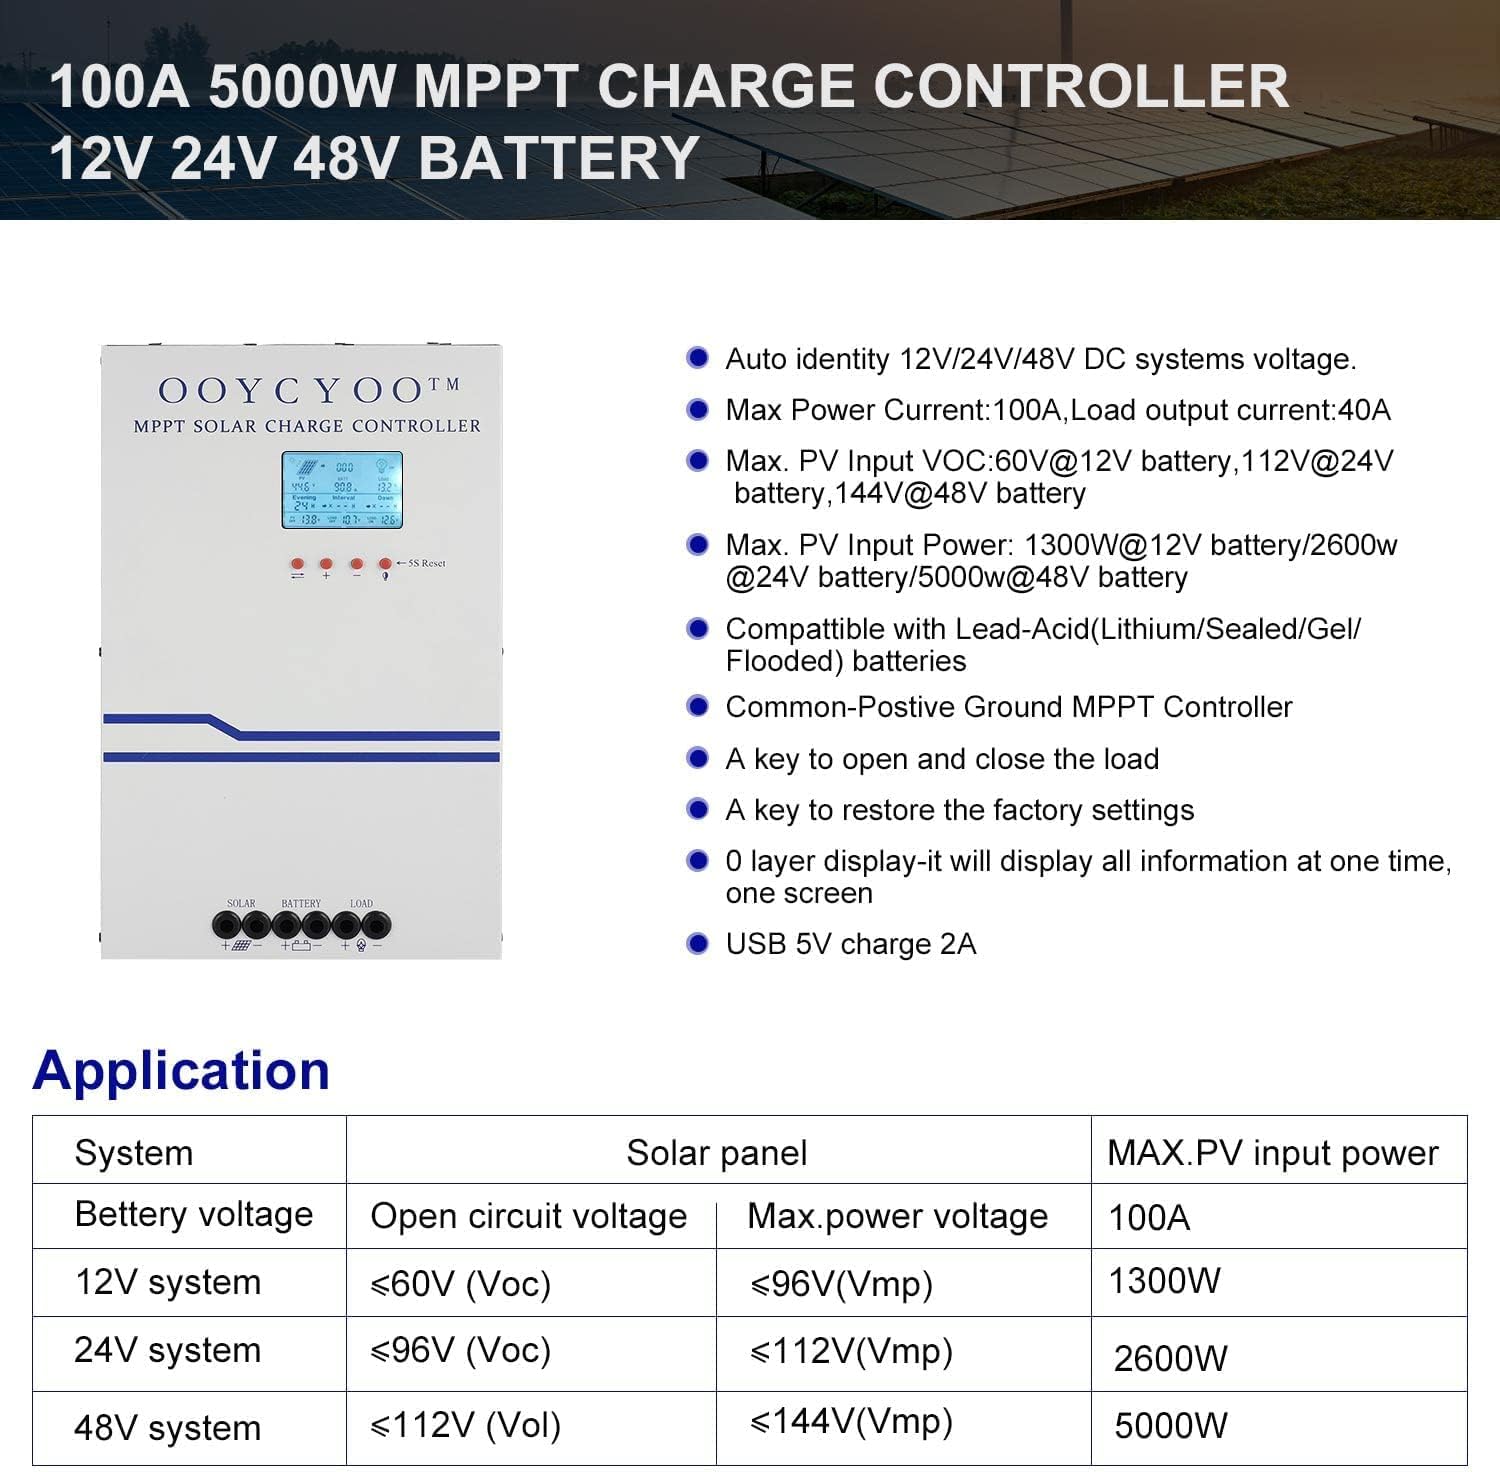
Gambar 3: Application table detailing solar panel input requirements for different system voltagyaitu.
4. Pengaturan dan Instalasi
Proper installation is crucial for the safe and efficient operation of your solar charge controller. Refer to Figure 2 for terminal identification.
Langkah-langkah Instalasi:
- Pemasangan: Choose a dry, well-ventilated location, protected from direct sunlight, high temperatures, and moisture. Ensure adequate clearance around the controller for air circulation, especially for the cooling fan. Use the mounting holes provided to secure the controller to a stable surface.
- Koneksi Baterai: Connect the battery cables to the battery terminals on the controller (marked with '+' and '-'). Ensure correct polarity. Connect the other end of the cables to your battery bank. Selalu sambungkan baterai terlebih dahulu.
- Koneksi Panel Surya: Connect the solar panel cables to the PV terminals on the controller (marked with '+' and '-'). Ensure correct polarity. Connect the other end of the cables to your solar panel array.
- Koneksi Beban (Opsional): If you are connecting a DC load directly to the controller, connect the load cables to the load terminals (marked with '+' and '-'). Ensure correct polarity.
- Koneksi Sensor Suhu: Connect the included temperature sensor to the designated 'TEMP SENSOR' port. Place the sensor near the battery to ensure accurate temperature compensation for charging.
- Nyalakan: Once all connections are secure and verified for correct polarity, the controller will power on and display information on the LCD screen.
Jenis Baterai yang Kompatibel:
The controller supports various battery types. Ensure you select the correct battery type in the controller settings for proper charging and protection.

Gambar 4: The controller is compatible with AGM, Sealed, Gel, Flooded, and Lithium-Iron Phosphate batteries.
5. Petunjuk Pengoperasian
Layar LCD dan Navigasi:
The backlit LCD display provides real-time operational data. It directly shows the amount of charge in KWH, eliminating the need for external measuring instruments. Use the buttons below the display to navigate through menus and adjust settings.
- Tombol Navigasi: Typically, there are buttons for 'Up', 'Down', 'Enter', and 'Escape' or similar functions to browse and confirm settings.
- 5S Reset: A dedicated button or combination of buttons may be available for a 5-second reset, which can be used to restart the controller or clear certain errors.
Pengaturan Parameter:
The controller allows user-programmable settings for various parameters, especially for the 'USER' battery type. Consult the on-screen menu for specific options.
- Pilihan Jenis Baterai: It is critical to select the correct battery type (AGM, Sealed, Gel, Flooded, or Lithium) to ensure proper charging algorithms and prevent battery damage. For Lithium batteries, specific voltage parameters may need to be set.
- Pengisian Voltagadalah: For 'USER' battery types, you can customize absorption voltage, volume mengambangtage, dan volume rendahtage disconnect (LVD) thresholds. Refer to your battery manufacturer's specifications for recommended values.
- Load Timer: If a DC load is connected, you may be able to set a timer for its operation.
- Pengaturan pabrik: A key is available to restore the factory settings if needed.
6. Pemeliharaan
Regular maintenance ensures the long-term reliability and performance of your solar charge controller.
- Pembersihan: Periodically clean the exterior of the controller with a dry cloth. Ensure the ventilation openings are free from dust and debris to maintain proper airflow for cooling.
- Pemeriksaan Koneksi: Annually, inspect all wiring connections for tightness and corrosion. Loose connections can cause overheating and power loss.
- Inspeksi Lingkungan: Ensure the installation environment remains dry and free from excessive dust or extreme temperatures.
- Pembaruan Firmware: Periksa pabrikannya website periodically for any available firmware updates, though this controller may not support user updates.
7. Penyelesaian masalah
Bagian ini membahas masalah umum yang mungkin Anda temui. Untuk masalah yang tidak tercantum di sini, silakan hubungi dukungan pelanggan.
| Masalah | Kemungkinan Penyebab | Larutan |
|---|---|---|
| Controller not powering on / No display | Baterai tidak terhubung atau polaritas terbalik; Tegangan bateraitage terlalu rendah; Koneksi baterai longgar. | Periksa sambungan dan polaritas baterai. Pastikan tegangan bateraitage is above the minimum operating threshold. Tighten connections. |
| Tidak ada pengisian daya dari panel surya. | PV panels not connected or reverse polarity; PV voltage too low/high; Shading on panels; PV short circuit. | Check PV connections and polarity. Ensure PV voltage is within the controller's operating range. Remove shading. Check for PV short circuit. |
| Baterai tidak terisi penuh | Incorrect battery type setting; Insufficient solar input; Battery degradation. | Verify battery type setting. Increase solar panel capacity or reduce load. Test battery health. |
| Pemuatan tidak berfungsi | Load not connected or reverse polarity; Load short circuit; Load overload; Battery low voltage disconnect (LVD) activated. | Check load connections and polarity. Check for short circuits or overloads. Charge battery. |
| Kontroler terlalu panas | Ventilasi buruk; Suhu lingkungan yang berlebihan; Beban berlebih. | Ensure adequate airflow around the controller. Reduce load if possible. Relocate to a cooler environment. |
8. Garansi dan Dukungan
OOYCYOO products are manufactured to high-quality standards. Specific warranty terms and conditions are typically provided with your purchase documentation or can be found on the official OOYCYOO weblokasi.
For technical support, troubleshooting assistance, or warranty claims, please contact OOYCYOO customer service through the retailer where you purchased the product or visit the official OOYCYOO websitus untuk informasi kontak.
Please have your product model number (100A 12V 24V 36V 48V) and purchase date available when contacting support.