KIDOMO F02
KIDOMO F02 Mini Drone User Manual
Model: F02
Your comprehensive guide to operating and maintaining your F02 Mini Drone.
1. Tindakan pencegahan keselamatan
To ensure safe operation and prevent damage, please read and follow these precautions carefully:
- Lingkungan: Fly in open, clear areas away from people, animals, buildings, and power lines. Avoid flying in strong winds or rain.
- Pemeriksaan Pra-Penerbangan: Always ensure propellers are securely attached and undamaged. Check battery levels for both drone and remote control before each flight.
- Pelindung Baling-Baling: Utilize the included propeller protection covers, especially for beginner pilots, to prevent accidental injury and damage.
- Pemberhentian darurat: Familiarize yourself with the emergency stop function. The drone is designed to automatically stop rotating when it hits a wall or object.
- Keamanan Baterai: Use only original or approved batteries. Do not overcharge or short-circuit batteries. Store batteries in a cool, dry place.
- Pengawasan: Children should operate the drone under direct adult supervision.
2. Isi Paket
Saat membuka kotak, harap verifikasi bahwa semua item yang tercantum di bawah ini ada:
- KIDOMO F02 Mini Drone x 1
- Pengendali Jarak Jauh x 1
- Rechargeable Drone Batteries x 4
- Kabel Pengisian USB x 1
- Baling-Baling Cadangan x 4
- Propeller Protection Covers x 4
- Obeng x 1
- Panduan Pengguna x 1
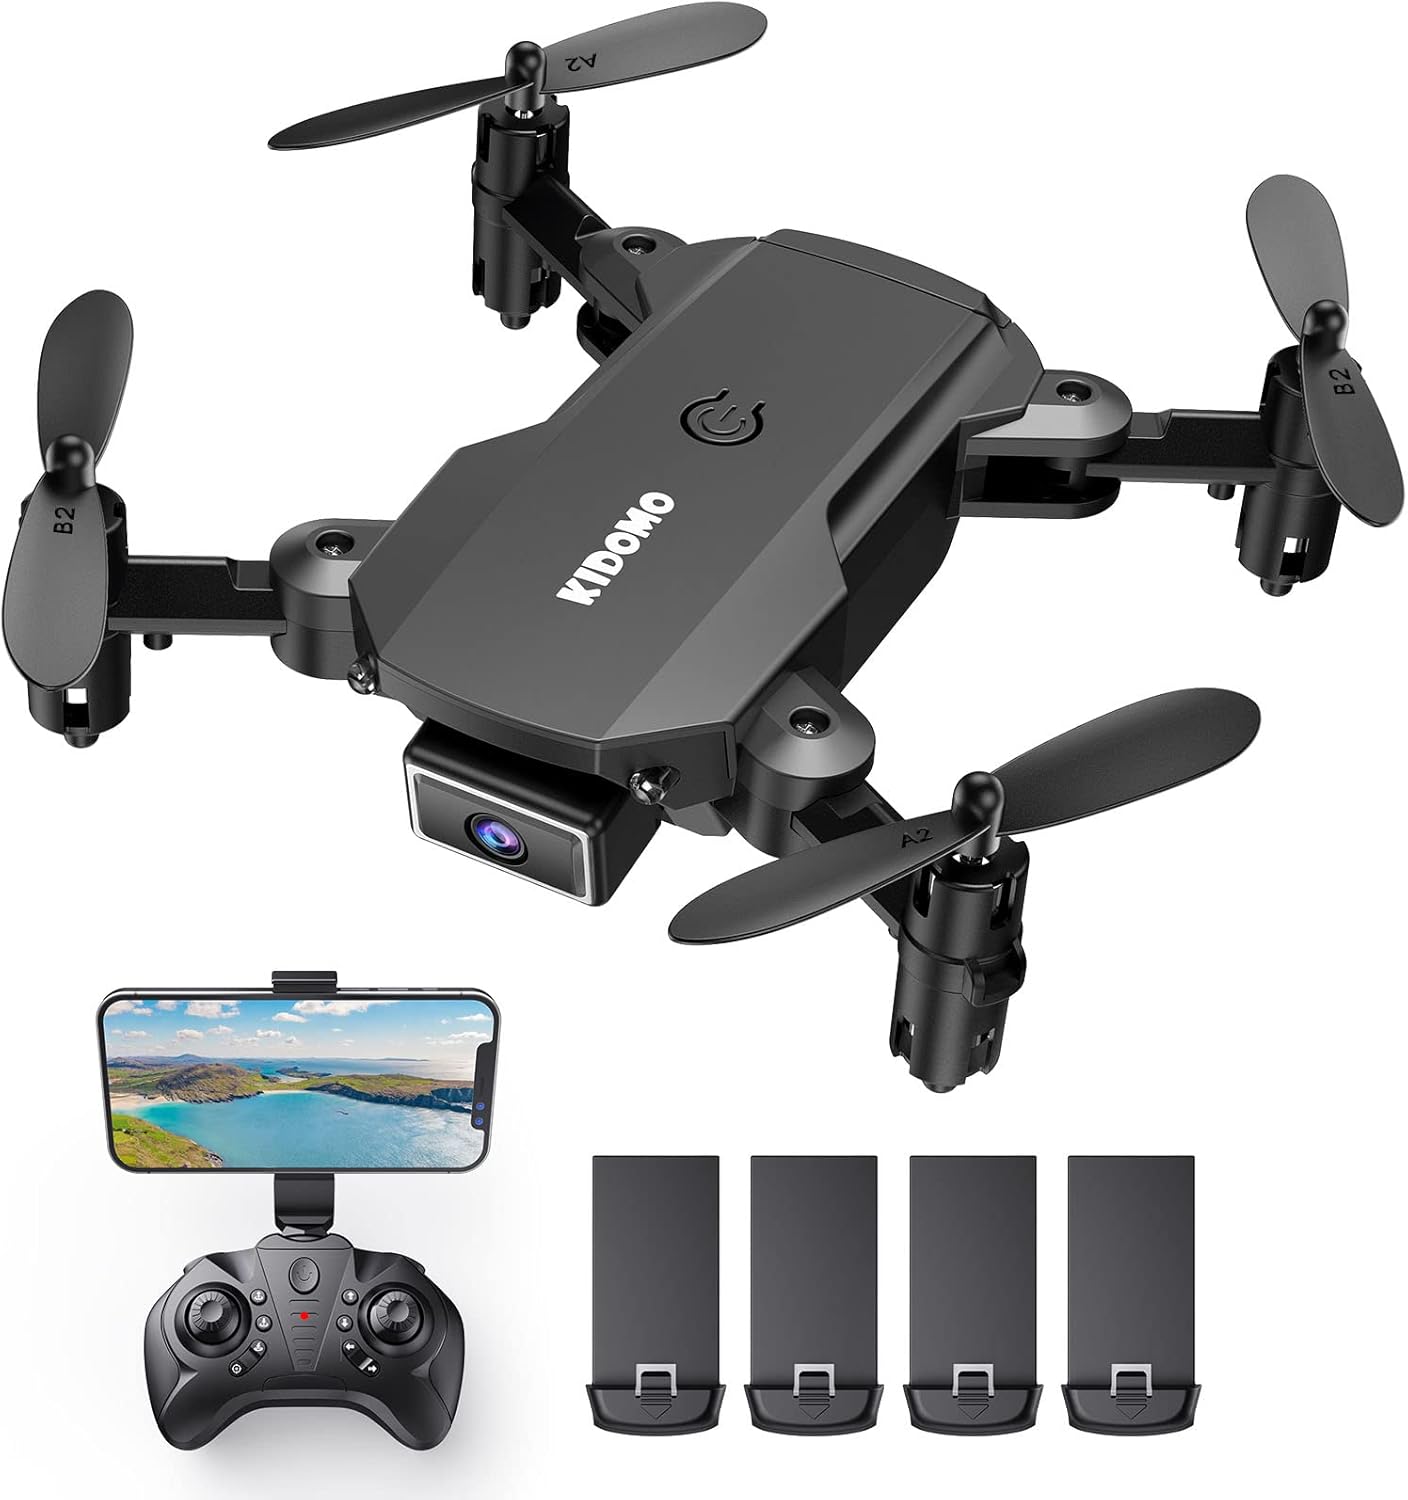
Image: Contents of the KIDOMO F02 Mini Drone package, including the drone, remote, and four batteries.
3. Produk Lebihview
3.1 Komponen Drone
The F02 Mini Drone features a compact, foldable design for easy portability.

Image: The F02 Mini Drone held in a hand, illustrating its small, portable size (less than 7.05 ounces) and folded dimensions (3.15"L x 2.56"W x 1.18"H).
- Lengan yang dapat dilipat: For compact storage and transport.
- Kamera 1080P HD: Located at the front for capturing photos and videos.
- Propeller: Four propellers (two A-type, two B-type) for flight.
- Kompartemen Baterai: Located at the rear/bottom of the drone.
- Tombol Daya: On top of the drone.
3.2 Pengendali Jarak Jauh
The remote controller allows for precise control of the drone.
- Joystick kiri: Mengontrol ketinggian (atas/bawah) dan rotasi (kiri/kanan).
- Joystik Kanan: Mengontrol gerakan maju/mundur dan kiri/kanan.
- One Key Take-off/Landing Button: For simplified flight initiation and termination.
- Sakelar Kecepatan: Adjusts flight speed (beginner/intermediate/advanced).
- Dudukan Telepon: Untuk memasang smartphone Anda untuk FPV viewing.
4. Pengaturan
4.1 Pengisian Baterai
The drone comes with 4 rechargeable batteries. Ensure all batteries are fully charged before first use.
- Hubungkan kabel pengisi daya USB ke baterai drone.
- Plug the other end of the USB cable into a USB power adapter (e.g., phone charger, computer USB port).
- Lampu indikator pada kabel USB akan menunjukkan status pengisian daya (misalnya, merah untuk mengisi daya, mati untuk daya penuh).
- Charging time is approximately 60-90 minutes per battery. Each battery provides 8-12 minutes of flight time.

Image: Visual representation of the drone batteries, indicating 8-12 minutes of flight per battery and 25-30 minutes with two batteries.
4.2 Pemasangan Baterai
- Baterai Drone: Insert the charged drone battery into the battery compartment at the rear of the drone until it clicks into place.
- Baterai Pengendali Jarak Jauh: Open the battery cover on the back of the remote controller and insert 3 x AAA batteries (not included), ensuring correct polarity. Close the cover.
4.3 Propeller Installation/Check
Ensure propellers are correctly installed and free from damage. Each propeller is marked 'A' or 'B' and must match the corresponding motor arm.
- If replacing, use the screwdriver to remove the screw holding the old propeller.
- Align the new propeller (A or B) with the motor shaft and secure it with the screw.
- Attach the propeller protection covers by snapping them onto the motor arms.
4.4 Pairing the Drone and Remote
- Tempatkan drone di permukaan yang rata dan rata.
- Nyalakan drone dengan menekan tombol daya. Lampu indikator drone akan berkedip.
- Nyalakan pengontrol jarak jauh.
- Dorong joystick kiri (throttle) sepenuhnya ke atas, lalu sepenuhnya ke bawah. Lampu drone akan berhenti berkedip dan menyala stabil, menandakan pemasangan berhasil.
4.5 Kalibrasi Giroskop
Setelah melakukan pemasangan, kalibrasi giroskop untuk penerbangan yang stabil.
- Dengan drone berada di permukaan yang datar, tekan kedua joystick ke bawah dan ke kanan secara bersamaan.
- Lampu drone akan berkedip cepat lalu menyala terus, menandakan kalibrasi berhasil.
5. Mengoperasikan Drone
5.1 Kontrol Penerbangan Dasar

Image: Depiction of the drone's three simple operation modes: One Key Start/Landing, Headless Mode, and Altitude Hold.
- Satu Kunci Awal/Pendaratan: Press the dedicated button on the remote to automatically take off or land.
- Tahan Ketinggian: The drone will automatically maintain a certain height, making it easier to control.
- Take-off (Manual): Slowly push the left joystick up.
- Landing (Manual): Slowly pull the left joystick down.
- Maju mundur: Gerakkan joystick kanan ke atas/bawah.
- Left/Right Sideways Flight: Gerakkan joystick kanan ke kiri/kanan.
- Rotasi: Gerakkan joystick kiri ke kiri/kanan.
5.2 Fitur Lanjutan
- Mode Tanpa Kepala: Press the Headless Mode button. In this mode, the drone's orientation is relative to the pilot, regardless of the drone's front direction. This simplifies control for beginners.
- 360° 3D Flip: Fly the drone to a height of at least 2 meters. Press the 3D Flip button, then push the right joystick in any direction to perform a flip.

Image: The F02 Mini Drone executing a 360° 3D flip, adding dynamic maneuvers to flight.
- Kontrol Suara: After enabling voice control via the app, you can give commands like "Take off," "Land," "Forward," etc.
- Kontrol Gerakan: Specific hand gestures can trigger photo or video capture (refer to app instructions for details).
- Penerbangan Lintasan: Open the app and draw a flight path on your smartphone screen. The drone will follow the designated route automatically.

Image: A smartphone displaying a custom flight trajectory drawn by the user, which the drone will follow.
5.3 Camera Operation (1080P HD FPV)
The F02 drone is equipped with a 1080P HD camera for capturing high-quality aerial footage.

Image: Visual comparison demonstrating the superior clarity of 1080P HD footage captured by the drone's FPV camera compared to 720P.
- Koneksi Aplikasi: Download the dedicated drone app (check manual for QR code or app name). Connect your smartphone to the drone's Wi-Fi network.
- Hidup View: Once connected, you will see a live feed from the drone's camera on your smartphone screen.
- Ambil Foto: Tap the photo icon in the app or use the designated button on the remote (if available).
- Rekam Video: Ketuk ikon video di aplikasi untuk memulai/menghentikan perekaman.
- Penyimpanan: Photos and videos are typically saved directly to your smartphone's gallery.
6. Pemeliharaan
Perawatan yang tepat memastikan umur panjang dan kinerja optimal drone Anda.
- Pembersihan: Gunakan kain lembut dan kering untuk membersihkan bodi drone dan lensa kamera. Hindari penggunaan cairan atau pelarut.
- Pemeriksaan Baling-Baling: Periksa baling-baling secara berkala untuk melihat adanya retak, bengkok, atau kerusakan. Segera ganti baling-baling yang rusak menggunakan suku cadang yang telah disediakan.
- Perawatan Motorik: Keep motors free from dust, hair, or debris. Do not attempt to lubricate the motors.
- Penyimpanan Baterai: If storing the drone for an extended period, charge batteries to about 50% and remove them from the drone and remote. Store in a cool, dry place.
- Penyimpanan Umum: Simpan drone dalam kemasan aslinya atau kotak pelindung untuk mencegah kerusakan.
7. Penyelesaian masalah
If you encounter issues with your F02 Mini Drone, refer to the following common problems and solutions:
| Masalah | Kemungkinan Penyebab | Larutan |
|---|---|---|
| Drone tidak merespon remote. | Not paired; low battery; remote off. | Ensure drone and remote are on. Re-pair the drone and remote (Section 4.4). Charge batteries. |
| Drone terbang tidak menentu atau melayang. | Gyroscope not calibrated; damaged propeller; strong wind. | Perform gyroscope calibration (Section 4.5). Check and replace damaged propellers. Fly in calm conditions. |
| Drone crashes immediately after take-off or flies into objects. | Improper calibration; propeller issue; environmental interference. | Ensure drone is on a flat surface for calibration. Check propellers for correct installation (A/B) and damage. Ensure sufficient clear space for flight. |
| Camera feed is blurry or not showing. | App not connected to drone Wi-Fi; dirty lens. | Ensure your phone is connected to the drone's Wi-Fi network. Clean the camera lens gently. |
| Waktu penerbangan singkat. | Baterai tidak terisi penuh; baterai lama. | Pastikan baterai terisi penuh. Pertimbangkan untuk mengganti baterai lama jika kinerjanya menurun secara signifikan. |
8. Spesifikasi
| Fitur | Detil |
|---|---|
| Merek | KIDOMO |
| Nama Model | F02 |
| Warna | Hitam |
| Resolusi Pengambilan Video | 1080p |
| Teknologi Konektivitas | Remote, Wi-Fi (for FPV) |
| Tingkat Keterampilan | Pemula |
| Berat Barang | 0.43 pon (sekitar 6.9 ons) |
| Kapasitas Baterai | 650 mAh (per battery) |
| Waktu Penerbangan | 8-12 minutes per battery (up to 50 minutes with 4 batteries) |
| Fitur Khusus | Voice Control, Gesture Control, Foldable Design, One Key Start/Landing, Altitude Hold, Headless Mode, 360° Flip, Trajectory Flight |
| Dimensi Produk | 3.14"P x 2.5"L x 1.18"T (terlipat) |
| UPC | 860009191877 |
9. Garansi dan Dukungan
KIDOMO products are designed for quality and reliability. For warranty information or technical support, please refer to the contact details provided with your purchase documentation or visit the official KIDOMO weblokasi.
Always ensure you have your product model number (F02) and purchase date available when contacting support.
Ask a question about this manual
Ask about setup, troubleshooting, compatibility, parts, safety, or missing instructions. Manuals+ will review the question and use this page’s manual context to help answer it.