WAVLINK WL-NU516U1
Buku Panduan Penggunaan Server Cetak Nirkabel USB WAVLINK
Model: WL-NU516U1
Merek: WAVLINK
1. Produk Lebihview
The WAVLINK USB Wireless Print Server transforms traditional USB printers into network-accessible devices, allowing multiple users to share a single printer wirelessly or via a wired connection. This compact and lightweight device supports various operating modes and offers broad compatibility with different printer types and operating systems.

Gambar 1: Produk Berakhirview with labeled components including USB 2.0 port, LAN/Bridge ports, DC 5V IN, WPS button, Reset button, and LED indicators for SYS, Bridge, LAN, and WLAN.
Fitur Utama:
- Berbagi Printer: Allows up to 4 printers to be shared across a network using a USB-A hub (not included), significantly improving printing efficiency for multiple users.
- Beberapa Mode Pengoperasian: Supports Wired Mode, 2.4G Wireless Network Mode, and Standalone Mode to convert your USB printer into a network printer.
- Manajemen Jaringan yang Mudah: Setup and configuration can be done via a web interface, eliminating the need for complex driver installations for the print server itself.
- Kompatibilitas Luas: Compatible with Windows 7/8/10/11/XP and Mac OS. Works with most USB printers supporting RAW protocol, including inkjet, laser, receipt, stylus, and barcode printers.
- Kompak dan Portabel: Measures 7.5x5.4x1.8cm and weighs 43g, making it easy to place anywhere. Features a high-speed 480Mbps USB 2.0 port and 100Mbps bridge/LAN port.
2. Pengaturan dan Instalasi
Follow these steps to set up your WAVLINK USB Wireless Print Server:
- Hubungkan Daya: Connect the provided power adapter to the print server's DC 5V IN port and plug it into a power outlet.
- Hubungkan Printer: Connect your USB printer to the USB 2.0 port on the print server using a USB cable.
- Koneksi jaringan:
- Mode Berkabel: Connect the print server's LAN port to your router or network switch using an Ethernet cable.
- Mode Nirkabel: The print server will connect to your Wi-Fi network. Configuration will be done via the web antarmuka.
- Modus Mandiri: The print server broadcasts its own Wi-Fi signal. No connection to an existing router is required for this mode, but network access will not be available.
- Instal Driver Printer: While the print server itself does not require external drivers, you must download and install the specific printer driver for your USB printer from the printer manufacturer's official website onto each computer that will use the shared printer.
- Configure Print Server: Access the print server's web antarmuka untuk mengonfigurasi pengaturan jaringan.
- Ensure your computer is connected to the WAVLINK device's Wi-Fi signal (if setting up wirelessly) or directly via Ethernet.
- Buka sebuah web peramban dan masukkan http://usblogin.link di bilah alamat.
- Follow the on-screen instructions to complete the setup, including connecting to your main Wi-Fi network if using Wireless Mode.

Figure 2: Basic Installation Steps.

Gambar 3: Isi Paket.
3. Mode Operasi
The WAVLINK USB Wireless Print Server supports three primary operating modes:
- Mode Berkabel: In this mode, the print server connects to your router via an Ethernet cable. Computers on the same network can then access the connected USB printer. This mode provides a stable and reliable connection.
- Mode Nirkabel: The print server connects to your existing Wi-Fi network. This allows for flexible placement of the print server and printer within your Wi-Fi coverage area, enabling wireless printing from any device on the same Wi-Fi network.
- Modus Mandiri: The print server creates its own Wi-Fi signal, allowing devices to connect directly to it for printing. In this mode, the print server does not connect to your main router, and devices connected to the print server's Wi-Fi will not have internet access. This is useful for dedicated printing setups where network access is not required.

Figure 4: Operating Mode Diagrams.
4. Pemeliharaan
To ensure optimal performance and longevity of your WAVLINK USB Wireless Print Server, consider the following maintenance tips:
- Pembaruan Firmware: Periodically check the official WAVLINK website for the latest firmware updates. Updating the firmware can improve performance, add new features, and resolve potential issues. Refer to the troubleshooting section for steps on upgrading firmware.
- Pembersihan Fisik: Jaga kebersihan perangkat dan bebas dari debu. Gunakan kain lembut dan kering untuk menyeka bagian luarnya. Pastikan lubang ventilasi tidak terhalang.
- Kondisi Lingkungan: Operate the device within recommended temperature and humidity ranges. Avoid exposing it to extreme temperatures, direct sunlight, or moisture.
- Manajemen Kabel: Ensure all cables (power, USB, Ethernet) are securely connected and not under strain. Avoid bending cables sharply.
5. Penyelesaian masalah
This section addresses common issues and provides solutions for your WAVLINK USB Wireless Print Server.
Issue 1: Cannot log in to the WAVLINK device management interface using usblogin.link.
- Ensure you are connected to the WAVLINK device's Wi-Fi signal. Then, enter http://usblogin.link di peramban Anda.
- If using a mobile phone, temporarily turn off mobile data and VPN first.
- If using a computer, temporarily disable other network connections and VPN, connect only to the WAVLINK Wi-Fi signal, and then try to access the WAVLINK device management interface again.
- Try logging into the product management interface using another client, such as a mobile phone.

Figure 5: Wi-Fi Settings Interface.
Issue 2: Cannot connect to the WAVLINK device's Wi-Fi signal.
- Try resetting the device by pressing and holding the reset button for 6 seconds. Then, try connecting to the WAVLINK device's Wi-Fi signal again.
- Connect the WAVLINK device to your computer using a network cable and enter the management interface. If the WAVLINK device is set to Wired Relay Mode, try changing the WAVLINK device's channel. You can try channels 1, 6, or 11.
- Connect the WAVLINK device to your computer using a network cable and try upgrading the WAVLINK device's firmware. After the upgrade is complete, press and hold the reset button for 6 seconds to reset the device, then try connecting to the device's Wi-Fi signal again to see if the same problem persists. The latest device firmware can be found on the WAVLINK official weblokasi.

Figure 6: Channel Selection in Web Antarmuka.
Issue 3: When setting the WAVLINK device to Wireless Relay Mode, I cannot connect the WAVLINK device to the main router.
- During the relay entry process, ensure you are entering the correct Wi-Fi password for the upstream router. (Pay attention to case sensitivity).
- Ensure the upstream router's DHCP is on (so the WAVLINK device can obtain an IP address correctly) and MAC address filtering is off. (This will prevent the WAVLINK device from being blocked).
- If possible, move the WAVLINK device closer to the main router. Also, avoid obstacles between the WAVLINK device and the main router.
- Press and hold the reset button for 6 seconds to initiate reconfiguration of the WAVLINK device.
Issue 4: I have set the WAVLINK device to Wireless Relay Mode, but the WAVLINK device keeps disconnecting from the main router.
- Try changing the main router's 2.4GHz channel. For 2.4GHz, you can choose from 1, 6, or 11.
- If possible, try setting the WAVLINK device to Wired AP Mode and connect it to the main router using a network cable.
- If possible, change the location of the WAVLINK device to avoid obstacles between it and the host router, or try moving the WAVLINK device closer to the upstream router.
6. Spesifikasi
| Fitur | Detil |
|---|---|
| Merek | TAUTAN WAV |
| Nomor Model | WL-NU516U1 |
| Dimensi Produk | 7.5 x 5.4 x 1.8 cm (Pocket size) |
| Berat Produk | 43 gram |
| Port USB | USB2.0 (480Mbps) |
| LAN/Bridge Port | Kecepatan 10/100Mbps |
| Standar nirkabel | Wi-Fi 2.4G |
| Compatibility (OS) | Windows 7/8/10/11/XP, Mac OS |
| Kompatibilitas Pencetak | Almost all USB printers supporting RAW protocol (Inkjet, Laser, Receipt, Stylus, Barcode printers) |
| Masukan Daya | Tegangan DC5V |
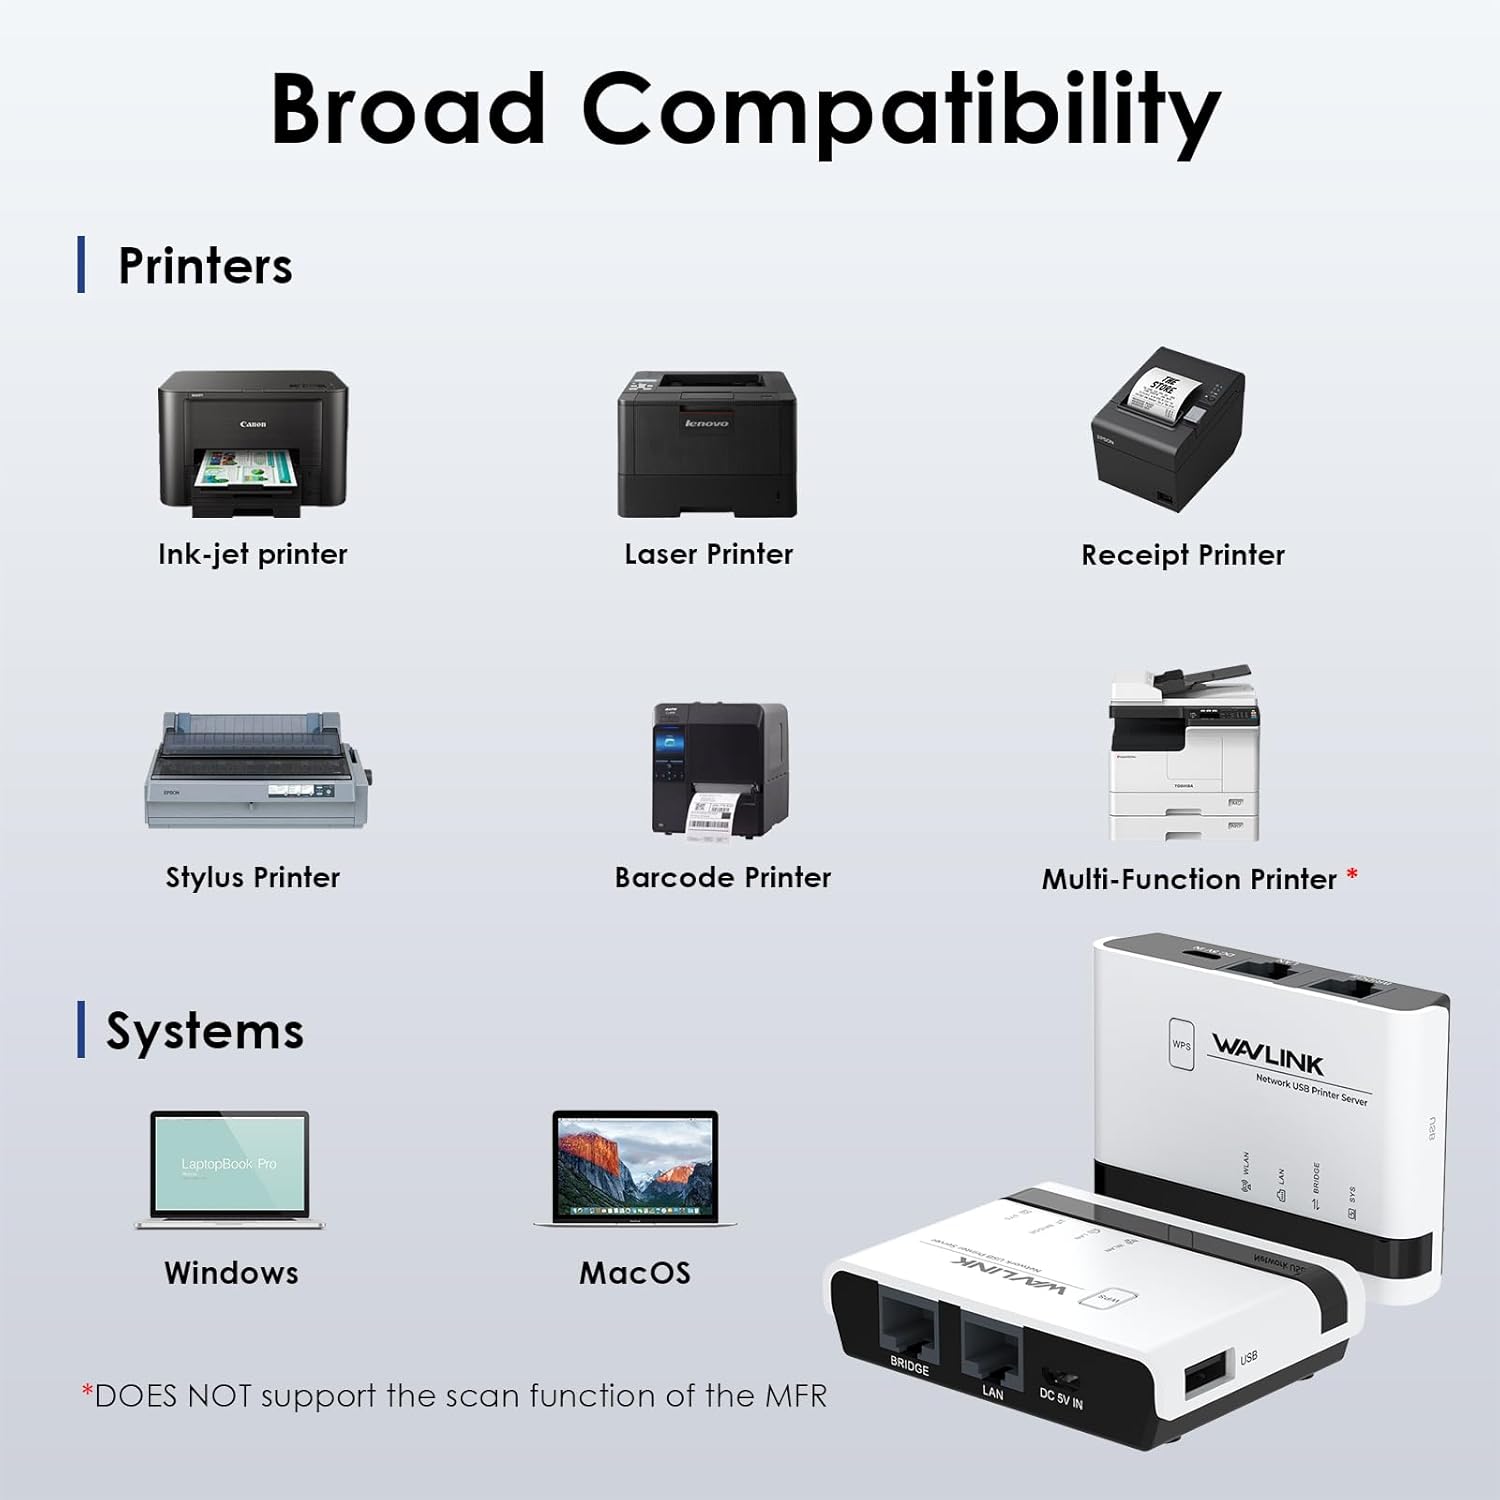
Figure 7: Broad Compatibility Overview.

Figure 8: Extended Connections via USB Hub.
7. Garansi dan Dukungan
WAVLINK products are designed for reliability and performance. For any technical assistance, warranty claims, or product inquiries, please contact WAVLINK customer service. It is recommended to consult customer service if you are unsure about your printer's RAW protocol support.
Silakan merujuk ke situs resmi WAVLINK. website for the most up-to-date support information, FAQs, and contact details.
Dokumen Terkait - WL-NU516U1
 |
Panduan Memulai Cepat Server Printer USB Nirkabel WAVLINK Panduan memulai cepat untuk Server Printer USB Nirkabel WAVLINK (WL-NU516U1), yang merinci lebih dariview, parameter default, indikator LED, instalasi produk, koneksi Wi-Fi, konfigurasi wizard, pengaturan jaringan, penambahan printer untuk Windows dan Mac, pengelola perangkat, manajemen penyimpanan, dan peningkatan firmware. |
 |
Panduan Memulai Cepat Server Cetak Jaringan USB 2.0 WAVLINK WL-NU72P11 Panduan memulai cepat untuk Server Cetak Jaringan USB 2.0 WAVLINK WL-NU72P11, merinci koneksi perangkat keras, persiapan instalasi, konfigurasi printer untuk Windows dan Mac OS, dan pengaturan jaringan. |
 |
WAVLINK Wi-Fi Range Extender Quick Guide A quick guide for setting up and configuring the WAVLINK Wi-Fi Range Extender, covering hardware overview, setup modes (Repeater, Router, AP), and troubleshooting. |
 |
Konfigurasikan dan Gunakan Repéteur WiFi WAVLINK Panduan rinci untuk konfigurasi Anda Repéteur WiFi WAVLINK dalam mode Repéteur atau Point d'Accès (AP). Memperhatikan jaringan nirkabel Anda, mengatasi masalah koneksi dan mengoptimalkan jaringan WiFi. |
 |
Cara Mengatur Mode Repeater WL-WN575A2/WL-WN575A3 melalui Kabel Ethernet Panduan langkah demi langkah tentang cara mengatur repeater Wi-Fi WAVLINK WL-WN575A2/WL-WN575A3 dalam mode repeater menggunakan kabel Ethernet untuk pengaturan awal. Mencakup cara menghidupkan daya, koneksi jaringan, konfigurasi IP, web Login manajemen, pengaturan wizard repeater, dan verifikasi status. |
 |
Panduan Pengaturan Wavlink WL-WN572HG3 AC1200 High Power Outdoor WiFi Extender Panduan ini memberikan instruksi untuk menyiapkan Wavlink WL-WN572HG3 AC1200 High Power Outdoor WiFi Extender, yang mencakup instalasi, konfigurasi, dan pengoperasian dalam berbagai mode. |
Ask a question about this manual
Ask about setup, troubleshooting, compatibility, parts, safety, or missing instructions. Manuals+ will review the question and use this page’s manual context to help answer it.