1. Pendahuluan
Thank you for choosing the VCHICS Digital Audio Amplifier Receiver Module. This device is designed to provide versatile audio playback options, including Bluetooth, USB, TF card, and FM radio, with adjustable bass and treble controls. This manual will guide you through the setup, operation, and maintenance of your ampmodul pengangkat.
2. Fitur Utama
- MP3 music playback from TF card, USB disk, and Bluetooth.
- Adjustable Treble, Bass, and Master Volume controls.
- Integrated Bluetooth receiver for wireless audio streaming.
- Built-in FM radio function.
- AUX port for connection to PC, phone, or CD players.
- Supports AC 110-220V or DC 12-24V input voltage.
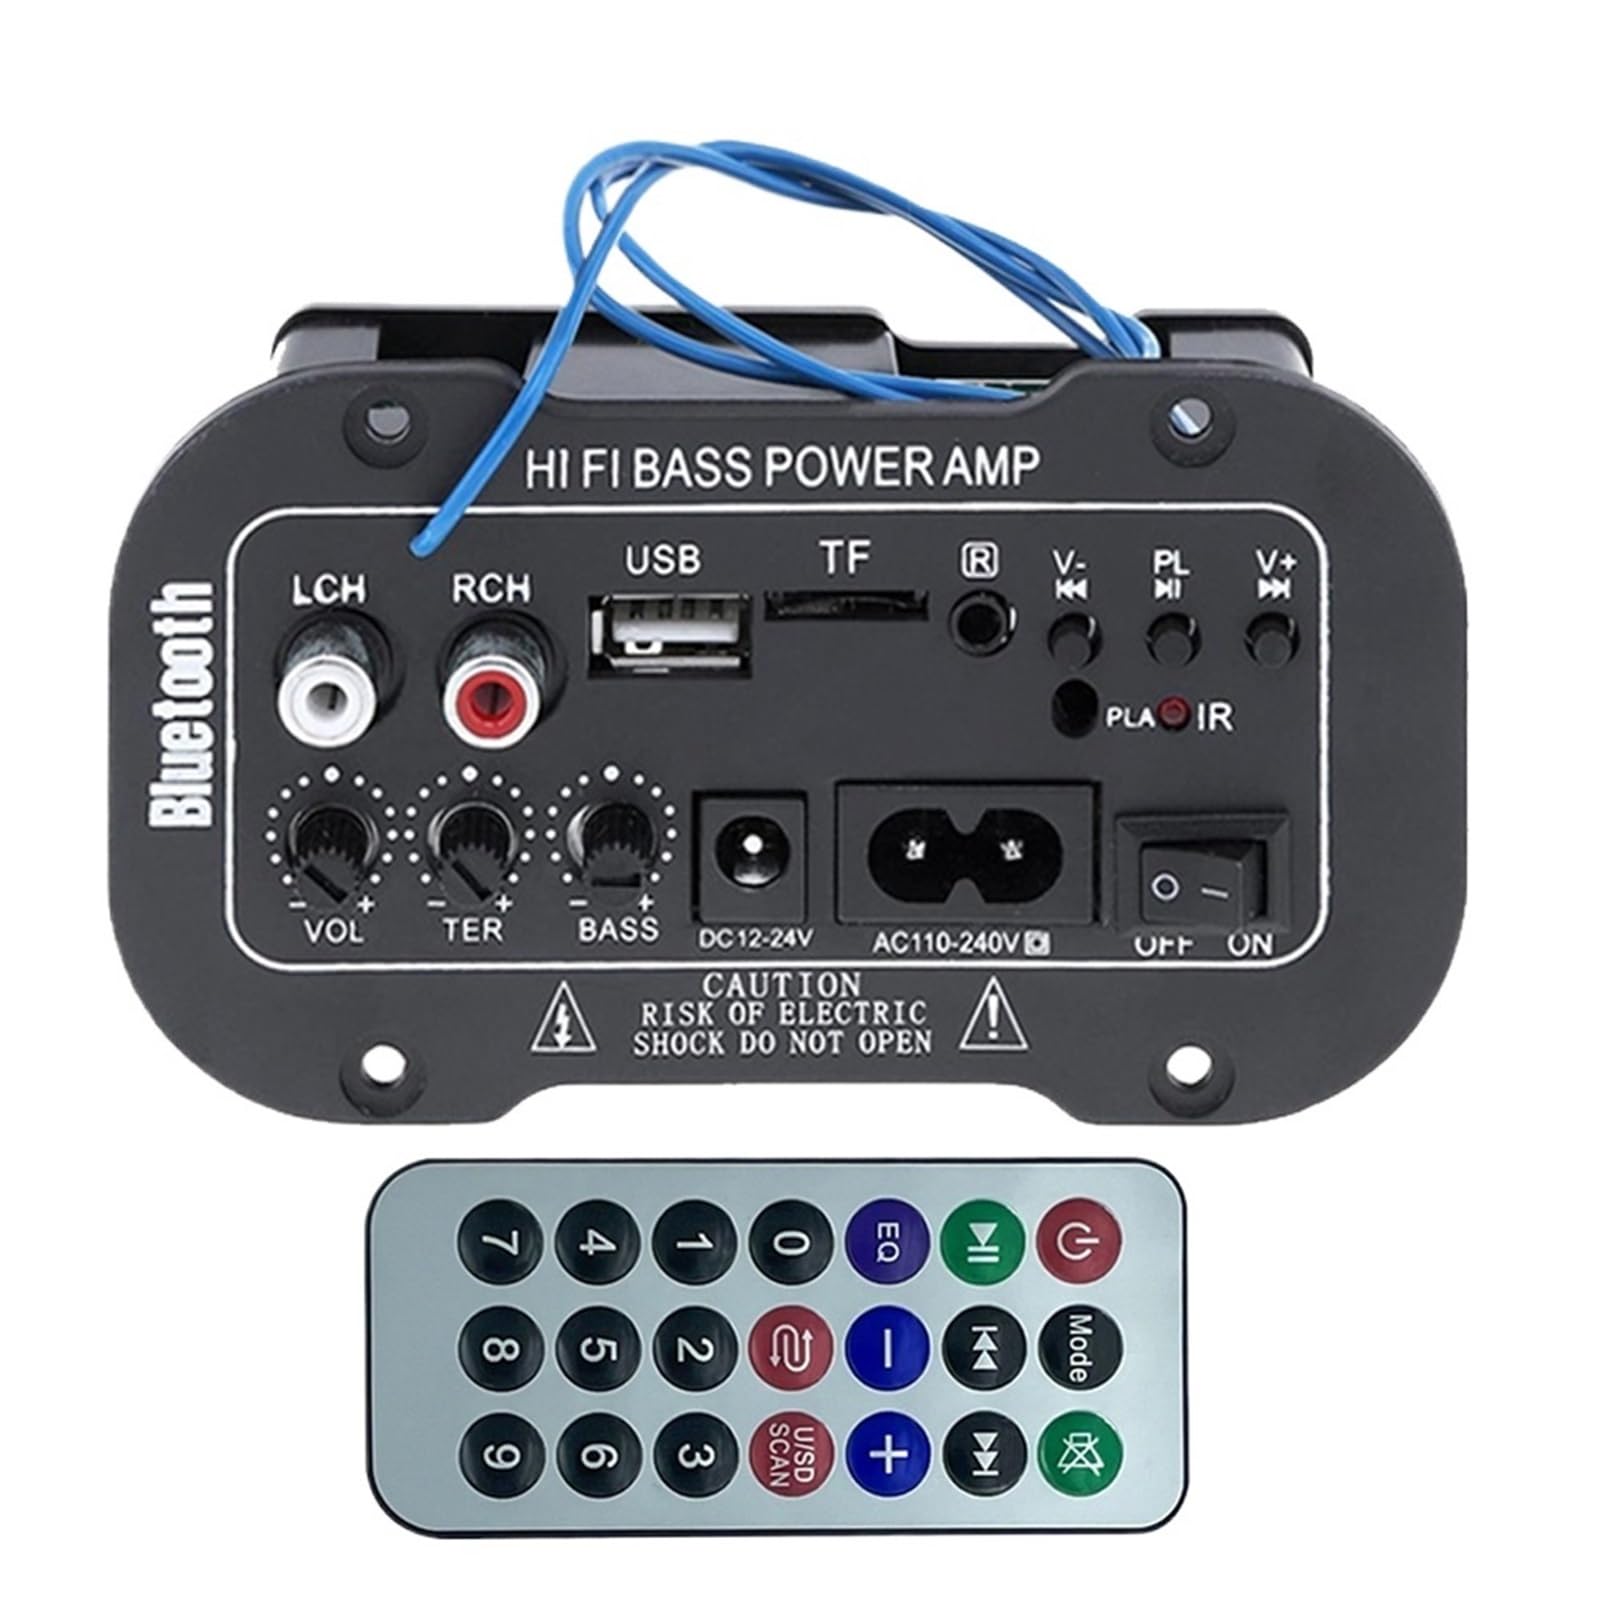
Gambar 1: Lebihview of the VCHICS Digital Audio Amplifier Receiver Module.
3. Spesifikasi
| Spesifikasi | Nilai |
|---|---|
| Versi Bluetooth | 2.1+EDR |
| Volume Operasitage | 9-20 V DC |
| Tenaga Kerja | 25-30W |
| Kodek | SBC |
| Impedansi | 4 Ohm |
| Ukuran Unit Speaker | 133 mm |
| Kepekaan | 200hv |
| Respon Frekuensi | Frekuensi 20-20000Hz |
| Berat Barang | 400 gram |
| Jumlah Saluran | 1 |
| Nomor Model | 1005005454581585 |

Figure 2: Product dimensions (11.7cm x 6.5cm x 4.5cm / 10cm x 4cm).
4. Kontrol dan Koneksi
Familiarize yourself with the various controls and connection ports on your ampModul penguat:

Gambar 3: Rinci view of controls and connection points.
- LCH / RCH (Audio Input): Left and Right channel audio input for external devices.
- Slot USB: Untuk menghubungkan flash drive USB untuk pemutaran MP3.
- Slot TF: For inserting TF (MicroSD) cards for MP3 playback.
- Previous / Next (V- / V+): Navigate tracks or adjust volume in certain modes.
- Play / Pause (PL/IR): Play/pause audio, or initiate FM scan. IR indicates Infrared Sensor for remote control.
- Indikator: Lampu status.
- Sensor inframerah: For receiving signals from a remote control (if included or compatible).
- Mati / Hidup: Power switch for the module.
- AC110-240V: masukan daya AC.
- DC12-24V: Masukan daya DC.
- Penyesuaian Bass: Rotary knob to adjust bass levels.
- Penyesuaian Trebel: Rotary knob to adjust treble levels.
- Penyesuaian Volume: Rotary knob to adjust master volume.
- Tombol Bluetooth: Mengaktifkan mode Bluetooth.
5. Pengaturan
5.1 Sambungan Daya
- Pastikan amplifier module is switched OFF.
- Connect the appropriate power supply to either the Tegangan AC 110-240V masukan atau Arus searah 12-24V input. Use only the specified voltagrentang e untuk mencegah kerusakan.
5.2 Koneksi Speaker
Connect your speakers to the output terminals of the amplifier module. Ensure correct polarity (+/-) for optimal sound quality.
5.3 Antenna Connection (for FM Radio)
If using the FM radio function, connect the provided FM antenna to the designated antenna port for better reception.
6. Petunjuk Pengoperasian
6.1 Daya Hidup/Mati
Alihkan MATI / AKTIF switch to power on or power off the module.
6.2 Koneksi Bluetooth
- Tekan tombol MODE button (or the Bluetooth button if labeled) to switch the amplifier to Bluetooth mode.
- On your mobile phone or Bluetooth device, open the Bluetooth settings and search for available devices.
- Pilih amplifier's Bluetooth device name (usually "Bluetooth" or similar) from the list to connect.
- Once successfully paired, you can play audio from your device through the amppengangkat.
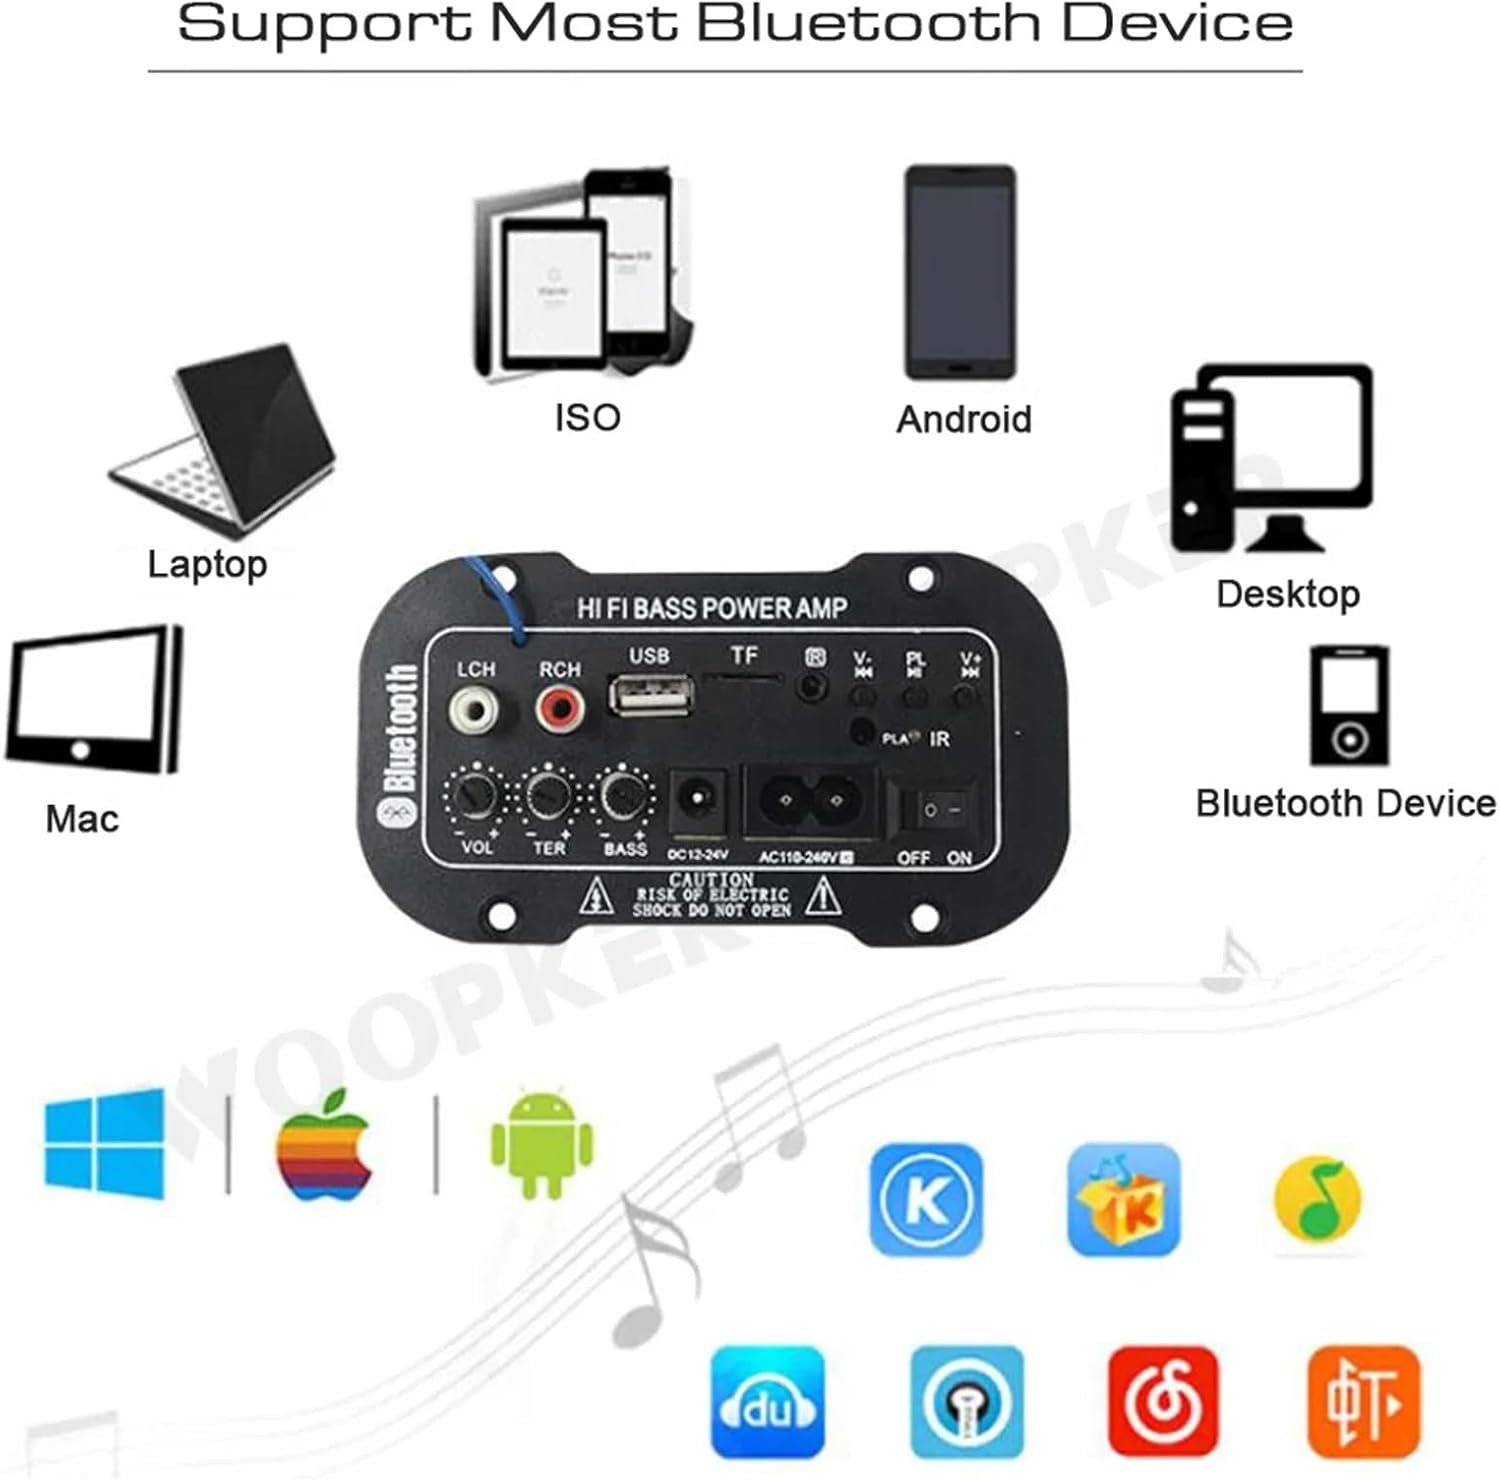
Gambar 4: amplifier module supports various Bluetooth devices including laptops, phones, and desktops.
Operasi Radio FM 6.3
- Ensure the radio antenna is properly connected.
- Tekan tombol MODE tombol untuk mengganti amplifier to FM radio mode.
- Tekan tombol Putar / Jeda button to initiate an automatic scan for all available FM channels. The module will save them automatically.
- Gunakan Sebelumnya Berikutnya buttons to switch between saved radio stations.
Pemutaran USB / Kartu TF 6.4
- Masukkan flashdisk USB ke dalam Slot USB atau kartu TF (MicroSD) ke dalam Slot TF.
- The module should automatically detect the storage device and begin playing MP3 fileJika tidak, tekan tombol MODE button to cycle through input sources until USB or TF mode is active.
- Gunakan Sebelumnya Berikutnya buttons to change tracks and the Putar / Jeda tombol untuk mengontrol pemutaran.
6.5 Masukan AUX
Connect an external audio source (e.g., PC, phone, CD player) to the LCH / RCH (Audio Input) ports using an appropriate audio cable. Press the MODE button to select the AUX input source.
6.6 Menyesuaikan Audio
Gunakan Penyesuaian Volume, Penyesuaian Treble, Dan Penyesuaian Bass rotary knobs to fine-tune your audio output to your preference.
7. Penyelesaian masalah
- Tidak Ada Daya: Ensure the power cable is securely connected and the power switch is in the ON position. Verify the power source is active and providing the correct voltage (AC 110-240V or DC 12-24V).
- Tidak ada suara: Check speaker connections for correct polarity. Ensure the volume is turned up. Verify the correct input mode (Bluetooth, FM, USB, TF, AUX) is selected. Test with a different audio source.
- Bluetooth Tidak Terhubung: Pastikan amplifier is in Bluetooth mode. Ensure your device's Bluetooth is enabled and within range. Try restarting both the amplifier dan perangkat Bluetooth Anda.
- Penerimaan FM yang Buruk: Ensure the FM antenna is properly connected and extended. Try repositioning the antenna or the amppenguat untuk sinyal yang lebih baik.
- USB/TF Card Not Playing: Ensure the USB drive or TF card contains compatible MP3 audio files. Check that the storage device is inserted correctly and not corrupted.
8. Pemeliharaan
- Pertahankan amplifier module clean by wiping it with a soft, dry cloth.
- Hindari memaparkan perangkat pada kelembapan, suhu ekstrem, atau sinar matahari langsung.
- Do not attempt to disassemble or repair the module yourself, as this may void any warranty and cause damage.
9. Garansi dan Dukungan
Untuk informasi garansi dan dukungan teknis, silakan merujuk ke dokumentasi yang diberikan saat pembelian atau hubungi penjual Anda. Simpan bukti pembelian Anda untuk klaim garansi.