Perkenalan
This manual provides essential instructions for the safe operation, setup, and maintenance of your Actualia FLYWING Bell-206-V2 RC Helicopter. Please read this manual thoroughly before operating the helicopter to ensure proper function and to prevent damage or injury.
Pedoman Keselamatan Penting
- Operate the helicopter in open areas, away from people, animals, and obstacles.
- Always maintain a safe distance from the rotating blades.
- Jangan beroperasi saat angin kencang atau kondisi cuaca buruk.
- Ensure all parts are securely fastened before each flight.
- Keep hands and face clear of the helicopter during operation.
- Pengawasan orang dewasa disarankan bagi pengguna di bawah usia 14 tahun.
- Do not attempt to modify the helicopter or its components.
- Use only approved charging equipment and batteries.
Isi Paket
Setelah membuka paket, pastikan semua barang ada dan dalam kondisi baik:
- Assembled Fuselage (1)
- Handcrafted Painted Integrated Shell (1)
- Handcrafted Painted Head Cover (1)
- Baterai (1)
- Digital Display Charger (1)
- Pemancar Kontrol Jarak Jauh (1)
- Spare Main Rotor Blades (1 pair)
- Spare Tail Rotor Blades (1 pair)
- Screwdriver and small parts (for maintenance)
- User Manual (dokumen ini)

Image: The Bell-206-V2 helicopter, remote control, battery, and charger as included in the RTF package.
Identifikasi Komponen
Helicopter Overview

Gambar: Sisi depan view of the Bell-206-V2 RC Helicopter.
The Bell-206-V2 RC Helicopter features a realistic scale design. Key components include:
- Bilah Rotor Utama: Memberikan daya angkat dan kendali.
- Rotor Ekor: Controls yaw (left/right rotation) and counteracts main rotor torque.
- Badan pesawat: The main body, housing electronics and battery.
- Roda Pendaratan: Support the helicopter during takeoff and landing.
- Kompartemen Baterai: Located on the underside of the fuselage.
- H1 Flight Controller: Integrated system for stable flight and advanced features.
- Motor Tanpa Sikat: Provide efficient and powerful propulsion for main and tail rotors.
Pemancar Kontrol Jarak Jauh

Image: The remote control transmitter with various sticks and buttons.
Fitur kendali jarak jauh:
- Tuas Kiri (Gas/Yaw): Controls altitude and left/right rotation.
- Tuas Kanan (Pitch/Roll): Mengontrol gerakan maju/mundur dan kiri/kanan.
- Saklar daya: Menghidupkan/mematikan remote.
- Tombol Trim: For fine-tuning flight stability.
- Tombol Lepas Landas/Pendaratan Satu Tombol: Initiates or concludes flight automatically.
- Sakelar Mode Penerbangan: Selects between different flight modes (e.g., GPS Stabilized, 3D Manual).
- Return-to-Home Button: Activates the automatic return function.
Petunjuk Pengaturan
1. Mengisi Daya Baterai Helikopter
- Connect the provided digital display charger to a power source.
- Connect the helicopter battery to the charger.
- Monitor the digital display for charging status. The battery is fully charged when the indicator shows completion.
- Disconnect the battery once fully charged. Do not overcharge.
2. Memasang Baterai pada Remote Control
- Buka tempat baterai di bagian belakang pengendali jarak jauh.
- Masukkan baterai yang dibutuhkan (biasanya AA, tidak termasuk) sesuai dengan tanda polaritasnya.
- Tutup rapat tempat baterai.
3. Installing the Helicopter Battery
- Locate the battery compartment on the underside of the helicopter.
- Carefully insert the charged battery into the compartment, ensuring a snug fit.
- Connect the battery cable to the helicopter's power port.
- Secure the battery compartment cover if applicable.
4. Pemeriksaan Baling-Baling
Before the first flight, and periodically thereafter, ensure the main and tail rotor blades are securely attached and free from damage. If any blades are damaged, replace them with the provided spares using the screwdriver.
Petunjuk Pengoperasian
1. Power On and Binding
- Letakkan helikopter di permukaan yang datar dan rata.
- Nyalakan sakelar daya helikopter. Lampu indikator akan berkedip.
- Turn on the remote control. The remote will automatically bind with the helicopter. A solid light on both devices indicates successful binding.
2. Kontrol Penerbangan Dasar
- Lepas Landas dengan Satu Tombol: Press the dedicated "Takeoff" button on the remote. The helicopter will automatically ascend to a stable hovering altitude.
- Tuas Gas (Tuas Kiri Naik/Turun): Increases or decreases altitude.
- Yaw (Left Stick Left/Right): Rotates the helicopter left or right on its vertical axis.
- Pitch (Right Stick Up/Down): Menggerakkan helikopter maju atau mundur.
- Roll (Right Stick Left/Right): Moves the helicopter sideways (strafe) left or right.
- Pendaratan Satu Kunci: Press the dedicated "Landing" button. The helicopter will automatically descend and land.
3. Advanced Flight Modes and Features
- GPS Stabilized Mode: Provides automatic and precise hovering, ideal for beginners.
- 3D Manual Mode: Offers high-speed responsiveness for aerobatic maneuvers like flips, rolls, and inverted flight.
- Pengembalian Satu Tombol: Activates automatic return to the takeoff point.
- Pengembalian Baterai Rendah: Helicopter automatically returns to the takeoff point when battery is low.
- Pengembalian Kehilangan Kendali: Helicopter automatically returns if signal is lost.
- One-Key Inverted Flight: Allows for quick inversion for advanced maneuvers.
- Semi-Autonomous Assisted Flight: Supports pre-determined flight paths such as circular motion and figure-8 routes.
4. Flight Tips
- Start with GPS Stabilized Mode for learning.
- Practice hovering and gentle movements before attempting advanced maneuvers.
- Always keep the helicopter within visual range.
- Monitor battery levels to ensure safe return.
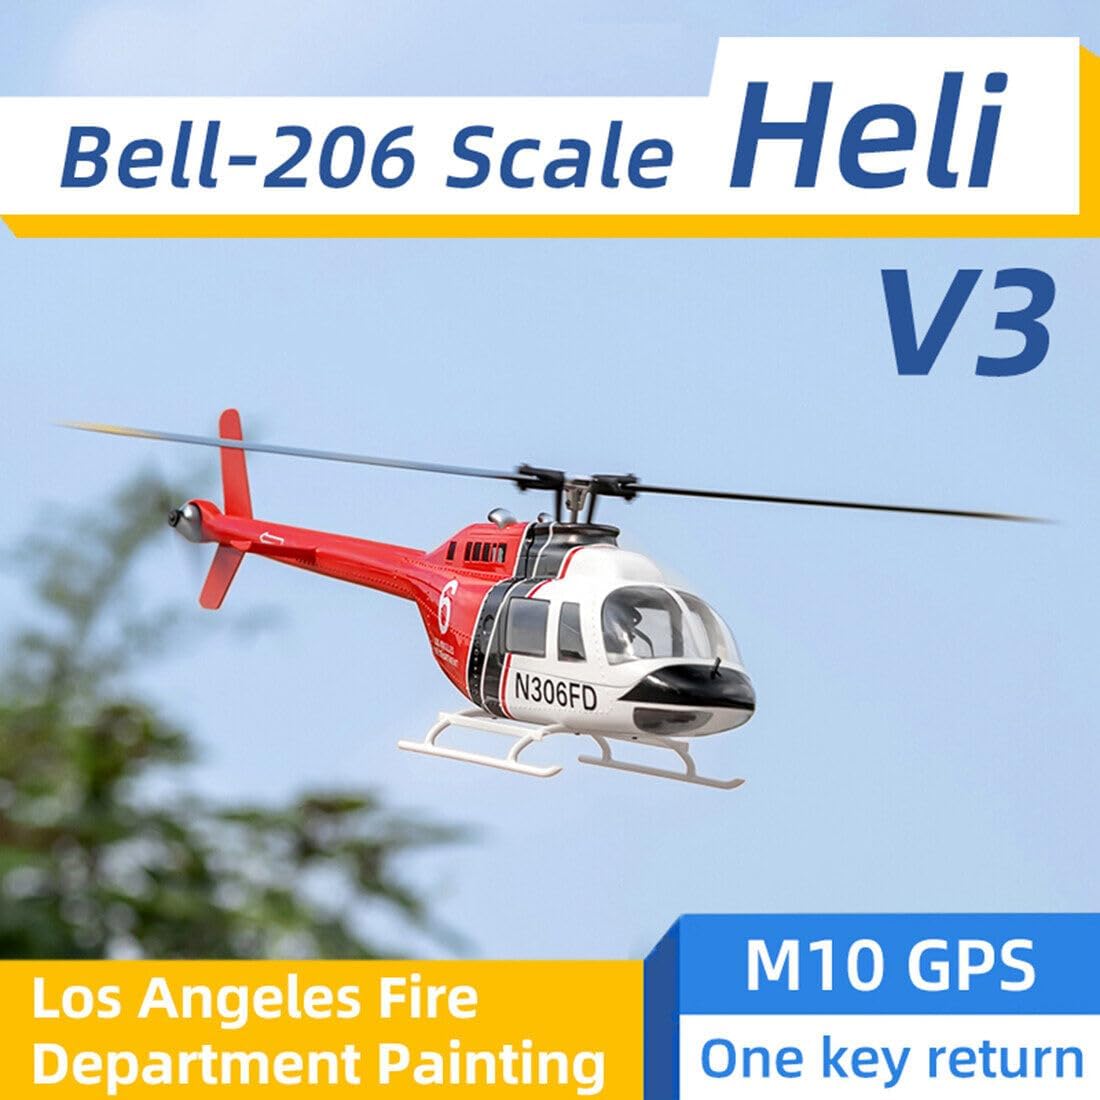
Image: The Bell-206-V2 RC Helicopter flying outdoors.
Pemeliharaan
- Pembersihan: Use a soft, dry cloth to clean the helicopter after each flight. Avoid water or harsh chemicals.
- Inspeksi Pisau: Regularly check main and tail rotor blades for cracks, bends, or damage. Replace damaged blades immediately.
- Kekencangan Sekrup: Periodically inspect all screws, especially those on the main rotor clamp axle and tail rotor, and tighten if necessary.
- Penyimpanan: Store the helicopter and remote control in a cool, dry place, away from direct sunlight and extreme temperatures. Remove batteries from the remote for long-term storage.
Penyelesaian Masalah
| Masalah | Kemungkinan Penyebab | Larutan |
|---|---|---|
| Helikopter tidak merespon perintah dari remote. | Not bound, low remote battery, helicopter battery low. | Ensure proper binding. Replace remote batteries. Charge helicopter battery. |
| Helikopter melayang saat berada di udara. | Improper trim settings, strong wind. | Adjust trim buttons on the remote. Fly in calmer conditions. |
| Helicopter does not take off. | Low helicopter battery, damaged blades. | Charge helicopter battery. Inspect and replace damaged blades. |
| Kebisingan atau getaran yang tidak biasa. | Damaged blades, loose screws. | Inspect and replace damaged blades. Check and tighten all screws. |
Spesifikasi
| Fitur | Detil |
|---|---|
| Fuselage Length (without paddles) | ukuran 700mm |
| Tinggi Badan Pesawat | ukuran 195mm |
| Lebar Badan Pesawat | ukuran 120mm |
| Berat (tanpa baterai) | 790 gram |
| Main Rotor Diameter (Wingspan) | ukuran 805mm |
| Main Rotor Length (Single) | ukuran 360mm |
| Tail Rotor Diameter (Wingspan) | ukuran 164mm |
| Gear Spec | Motor Gear: 13T, Transmission Main Gear: 8T |
| Tail Drive Motor | Motor Tanpa Sikat 2008 |
| Motor | Motor Tanpa Sikat 2816 |
| Bahasa Inggris | 60A Dual Brushless ESC |
| Mode Penerbangan | GPS Stabilized Mode, 3D Manual Mode, One-Key Return, Low Battery Return, Loss of Control Return, One-Key Inverted Flight, Semi-Autonomous Assisted Flight (Circular Motion, Figure-8 Route) |
| Modul Pemosisian Satelit | GPS/GLONASS with Omni-Directional Positioning |
| Akurasi Melayang | Horizontal: ±1.5m, Vertical: ±0.5m (under normal GPS positioning mode) |
| Berat Produk | 2000g (4.41 pon) |
| Dimensi Produk | 70x12x19.5cm (27.56x4.72x7.68 inci) |
| Usia yang Direkomendasikan | 14+ tahun |
Garansi dan Dukungan
For warranty information, technical support, or replacement parts, please refer to the manufacturer's official websitus web atau hubungi layanan pelanggan mereka. Simpan struk pembelian Anda sebagai bukti pembelian.