1. Produk Lebihview
The Riokko YM119 OBD2 Scanner is a diagnostic tool designed for car owners to easily read and clear engine fault codes. It provides real-time data, freeze frame information, and supports various diagnostic functions for OBDII/EOBD compliant vehicles manufactured since 1996. Its intuitive interface and compact design make it suitable for both professional technicians and home users.

Figure 1.1: Riokko YM119 OBD2 Scanner. This image shows the main diagnostic tool with its color screen, control buttons, and the attached OBDII connector cable.
2. Pengaturan dan Penggunaan Awal
2.1 Isi Paket
- Riokko YM119 OBD2 Scanner Unit
- User Manual (dokumen ini)
2.2 Menghubungkan Pemindai
- Locate the vehicle's Data Link Connector (DLC). This is typically located under the dashboard on the driver's side.
- Pastikan kunci kontak kendaraan dalam keadaan menyala. ON (engine can be off or running, depending on the test).
- Plug the OBDII connector of the YM119 scanner firmly into the vehicle's DLC. The scanner will power on automatically.
2.3 Pemilihan Bahasa
The YM119 supports 13 national languages. To change the language:
- From the main menu, navigate to "Setting" using the arrow keys.
- Tekan tombol OK button to enter the Setting menu.
- Select "Language" and choose your preferred language from the list.
- Tekan OK untuk mengonfirmasi pilihan Anda.
3. Mengoperasikan Pemindai
3.1 Tombol Navigasi
- KELUAR: Returns to the previous screen or main menu.
- Panah ATAS/BAWAH: Navigasi melalui opsi menu.
- Panah KIRI/KANAN: Navigate through data screens or adjust settings.
- BAIK: Mengkonfirmasi pilihan atau masuk ke submenu.
- KELELAWAR: Initiates the battery voltagtes.

Figure 3.1: Main Menu and Professional Functions. This image illustrates the scanner's main menu interface and highlights its key diagnostic capabilities such as Engine Fault Diagnostics, Quick Clear Fault Code, Real-time Data Stream, and Battery Life Test.
3.2 Fungsi Diagnostik
From the main menu, select "Diagnosis" to access the primary diagnostic functions.

Figure 3.2: OBD II Diagnostic Test Items. This image shows the comprehensive list of diagnostic tests available on the scanner, from reading and erasing codes to advanced sensor and component tests.
3.2.1 Baca Kode
This function retrieves Diagnostic Trouble Codes (DTCs) from the vehicle's computer. These codes indicate specific issues detected by the vehicle's onboard diagnostic system.
- Select "Read Codes" from the Diagnosis menu.
- The scanner will display any stored, pending, or permanent DTCs.
- Gunakan ATAS/BAWAH arrows to scroll through the codes.
- For detailed information on a specific code, use the "DTC Lib" function or refer to a reliable automotive repair database.
3.2.2 Hapus Kode
This function erases DTCs from the vehicle's computer and turns off the Malfunction Indicator Lamp (MIL), also known as the Check Engine Light. Note: Clearing codes does not fix the underlying problem. The MIL will illuminate again if the fault persists.

Figure 3.3: Check and Turn Off Engine Light. This image demonstrates the scanner's ability to diagnose and clear engine fault codes, effectively turning off the Check Engine Light on the vehicle's dashboard.
- Select "Erase Codes" from the Diagnosis menu.
- Konfirmasikan tindakan ketika diminta.
- The MIL should turn off.
3.2.3 Real-time Data (Live Data Stream)
View real-time sensor data from the vehicle's engine control unit (ECU). This data can be displayed in text or graphical format, allowing for dynamic monitoring of vehicle performance.
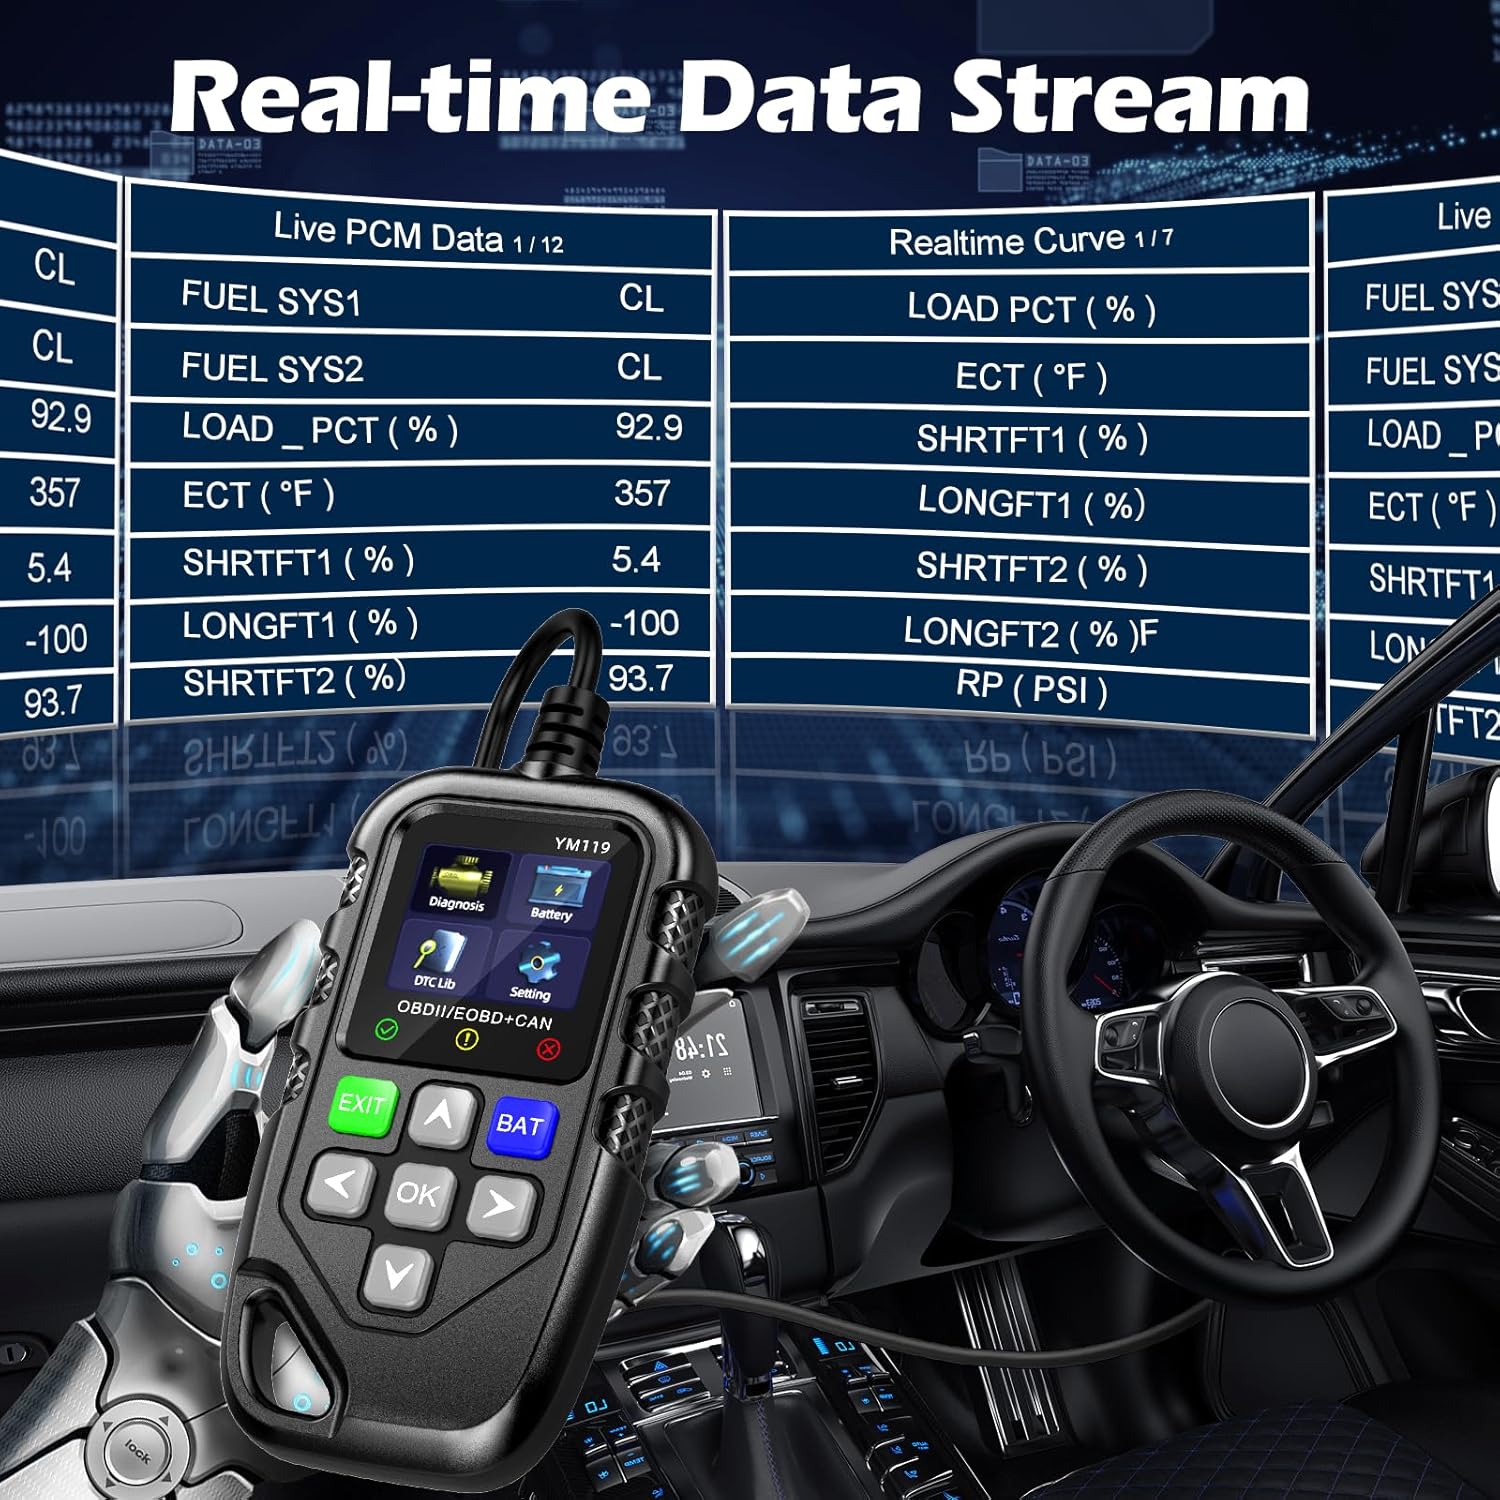
Figure 3.4: Real-time Data Stream. This image shows the scanner's capability to display live engine data, including various sensor readings and their corresponding real-time curves, aiding in dynamic vehicle diagnostics.
- Select "Live Data" or "Realtime Curve" from the Diagnosis menu.
- Gunakan ATAS/BAWAH arrows to scroll through different data parameters.
- Gunakan KIRI/KANAN arrows to switch between text and graph views (if available for the parameter).
3.2.4 Data Bingkai Beku
When an emission-related fault occurs, the vehicle's computer records a snapshot of operating conditions at the time of the fault. This "freeze frame" data helps in diagnosing intermittent problems.
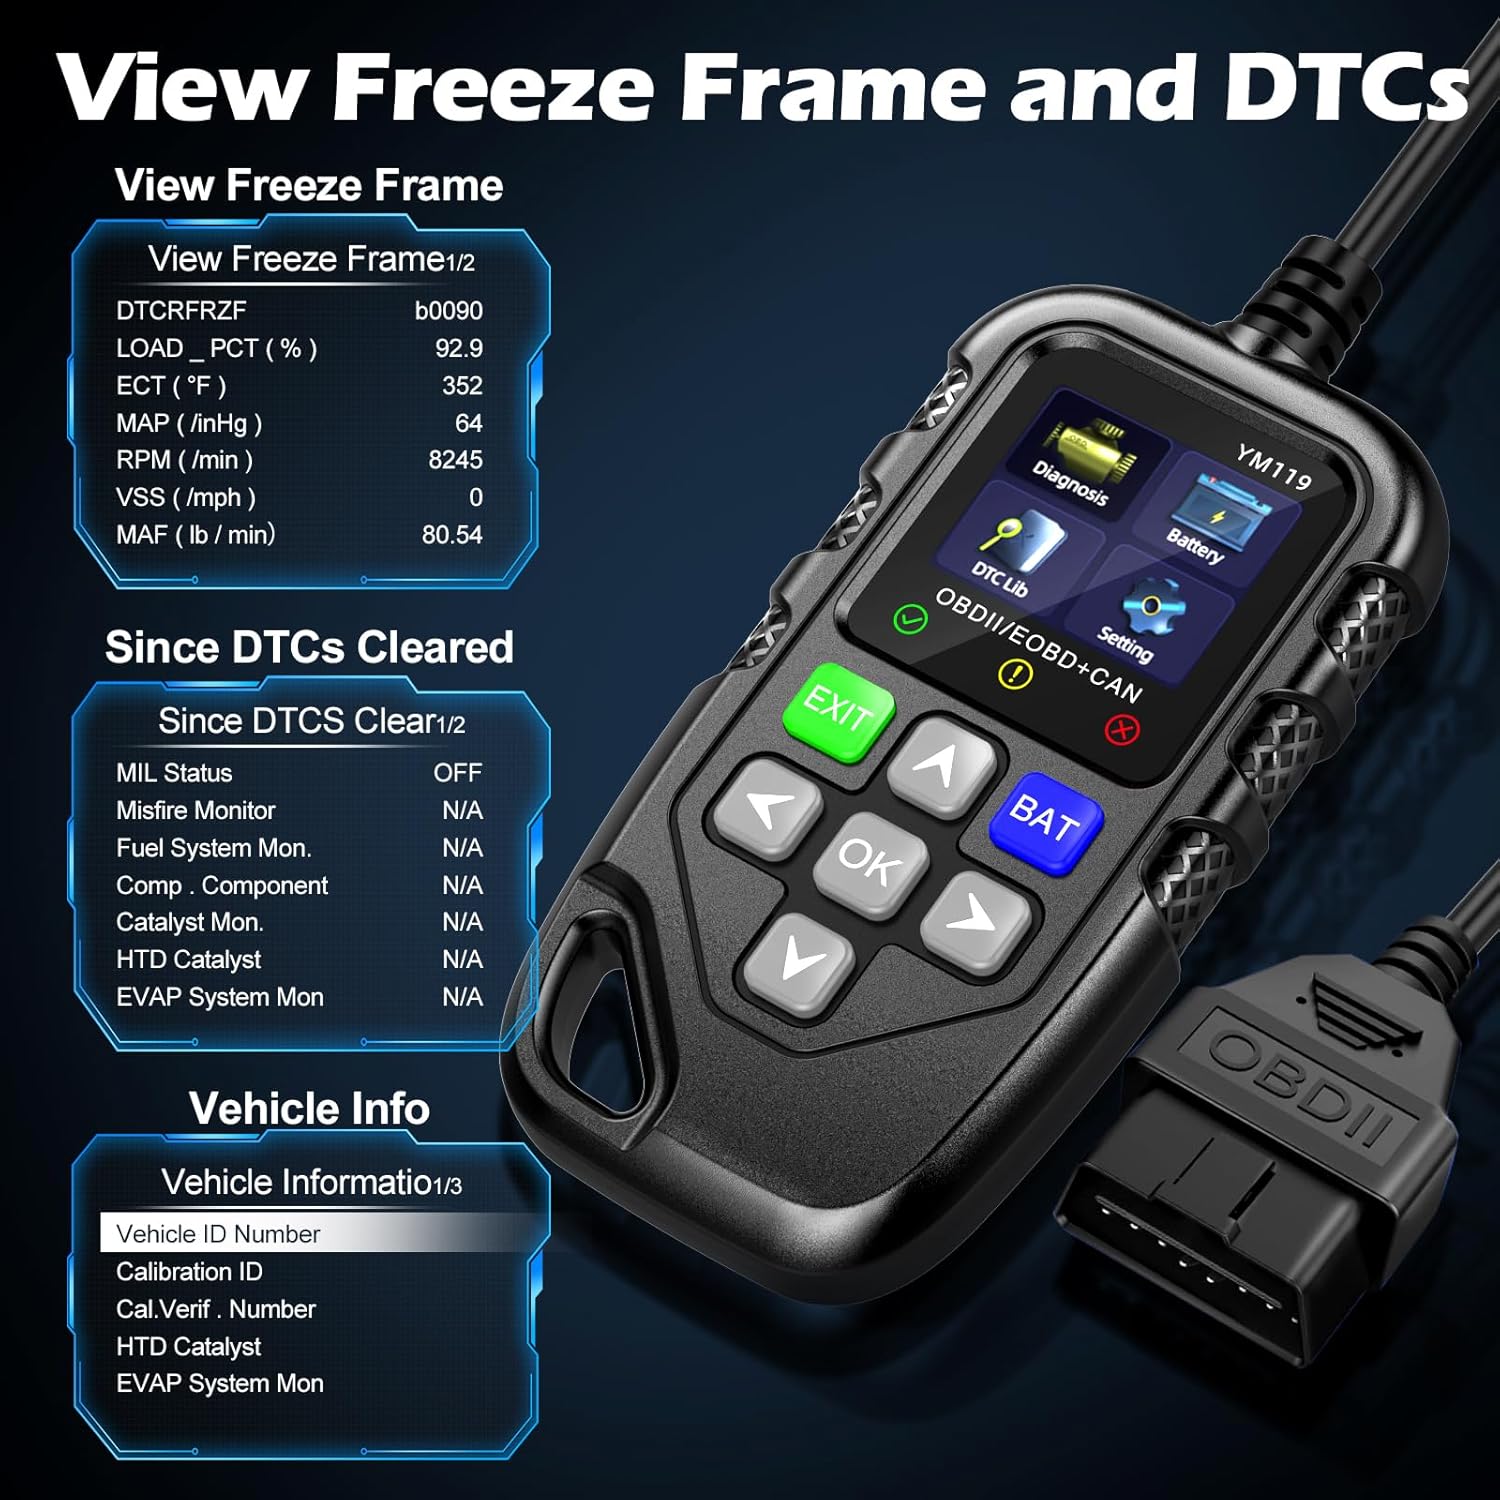
Gambar 3.5: View Freeze Frame and DTCs. This image displays the scanner's ability to capture and show freeze frame data, which provides a snapshot of engine conditions at the moment a fault code was set, aiding in diagnosis.
- Pilih "View Freeze Frame" from the Diagnosis menu.
- Review the recorded parameters.
3.2.5 DTC Query (DTC Lib)
The built-in DTC Library allows you to look up definitions for generic (P0, P2, P34, B0, C0, U0) and manufacturer-specific (P1, P30-P33, B1, C1, U1) codes.
- From the main menu, select "DTC Lib".
- Masukkan kode DTC menggunakan tombol panah dan OK tombol.
- Pemindai akan menampilkan definisi kode tersebut.
3.2.6 Kesiapan I/M
This function checks the readiness of the emission-related monitoring systems on the vehicle. It's useful for determining if the vehicle is ready for an emissions test.
- Select "I/M Readiness" from the Diagnosis menu.
- The scanner will display the status of various monitors (e.g., Misfire Monitor, Fuel System Monitor). "OK" indicates the monitor has completed its test, "INC" indicates incomplete, and "N/A" indicates not applicable.
3.2.7 Volt Bateraitage Tes
The YM119 can perform a basic battery voltage test to assess the vehicle's battery health.

Figure 3.6: Estimate Battery Life Test. This image shows the scanner's dedicated function for monitoring and assessing the vehicle's battery voltagdan kesehatan secara keseluruhan.
- From the main menu, select "Battery" or press the KELELAWAR tombol.
- Pemindai akan menampilkan tegangan baterai saat ini.tage.
3.2.8 Informasi Kendaraan
This function retrieves the Vehicle Identification Number (VIN), Calibration ID (CALID), and Calibration Verification Number (CVN) of the vehicle.
- Select "Vehicle Info" from the Diagnosis menu.
- Pemindai akan menampilkan informasi kendaraan yang tersedia.
4. Pemeliharaan
4.1 Membersihkan Perangkat
To maintain the scanner's performance and appearance:
- Lap unit dengan lembut, damp kain.
- Jangan gunakan pembersih atau pelarut yang bersifat abrasif.
- Pastikan perangkat dalam keadaan kering sebelum disimpan.
4.2 Penyimpanan
Store the scanner in a clean, dry environment away from extreme temperatures and direct sunlight. Keep the OBDII connector free from dust and debris.
5. Penyelesaian masalah
| Masalah | Kemungkinan Penyebab | Larutan |
|---|---|---|
| Pemindai tidak menyala. |
|
|
| Pesan "Kesalahan Tautan" atau "Kesalahan Komunikasi". |
|
|
| Engine light reappears after clearing codes. | Underlying fault has not been repaired. | Clearing codes only turns off the light; it does not fix the problem. Diagnose and repair the underlying issue before clearing codes again. |
| Inaccurate or missing data readings. |
|
|
6. Spesifikasi
| Fitur | Detil |
|---|---|
| Nomor Model | AE0004L (YM119) |
| Merek | Riokko |
| Ukuran Layar | 2.8 inci |
| Protokol yang Didukung | Nine standard OBDII/EOBD protocols |
| Bahasa yang Didukung | 13 bahasa nasional |
| Berat Barang | 7.8 ons (sekitar 221 gram) |
| Dimensi Paket | 8.11 x 5.35 x 1.14 inci (sekitar 20.6 x 13.6 x 2.9 cm) |
| Tanggal Pertama Tersedia | 16 Oktober 2024 |
7. Garansi dan Dukungan
7.1 Informasi Garansi
The Riokko YM119 OBD2 Scanner comes with a Garansi 3 tahun sejak tanggal pembelian. Garansi ini mencakup cacat bahan dan pengerjaan dalam penggunaan normal.
7.2 Kebijakan Pengembalian
A Kebijakan pengembalian 30 hari tanpa pertanyaan is offered for your purchase. Please refer to your retailer's specific return instructions.
7.3 Dukungan Pelanggan
For technical assistance, warranty claims, or any other inquiries, please contact Riokko customer service. Layanan pelanggan 24/7 siap membantu Anda.
Please visit the official Riokko webKunjungi situs web atau lihat kemasan produk Anda untuk informasi kontak terbaru.