Flylinktech BD10
FLYLINKTECH 5000A Jump Starter User Manual
Model: BD10 | Brand: Flylinktech
1. Pendahuluan
Thank you for choosing the FLYLINKTECH 5000A Jump Starter. This portable device is designed to provide instant power to jump-start 12V vehicles, charge electronic devices, and offer emergency lighting. Please read this manual thoroughly before use to ensure safe and optimal performance.
2. Informasi Keselamatan Penting
- Always ensure the jump starter is fully charged before use.
- Jangan mencoba menyalakan kembali aki yang beku.
- Hubungkan clamps correctly: red to positive (+), black to negative (-). Reverse polarity can cause damage.
- Jangan sambungkan cl merah dan hitamampbersama-sama.
- Jauhkan dari jangkauan anak-anak.
- Gunakan di area yang berventilasi baik.
- Hindari memaparkan perangkat pada suhu ekstrem atau sinar matahari langsung dalam waktu lama.
- If the device becomes excessively hot during use, disconnect it immediately.
- Lihat buku panduan pemilik kendaraan Anda untuk prosedur jump-start yang spesifik.
3. Isi Paket
Verifikasi bahwa semua item ada dalam paket Anda:
- FLYLINKTECH 5000A Jump Starter (Model BD10)
- Kabel Jumper Cerdas
- Kabel Pengisian Daya USB-C
- Kasus Penyimpanan EVA
- Panduan Pengguna

Image: Contents of the FLYLINKTECH 5000A Jump Starter package, including the jump starter unit, smart jumper cables, USB-C charging cable, and EVA storage case.
4. Produk Lebihview
Familiarize yourself with the components and ports of your jump starter:
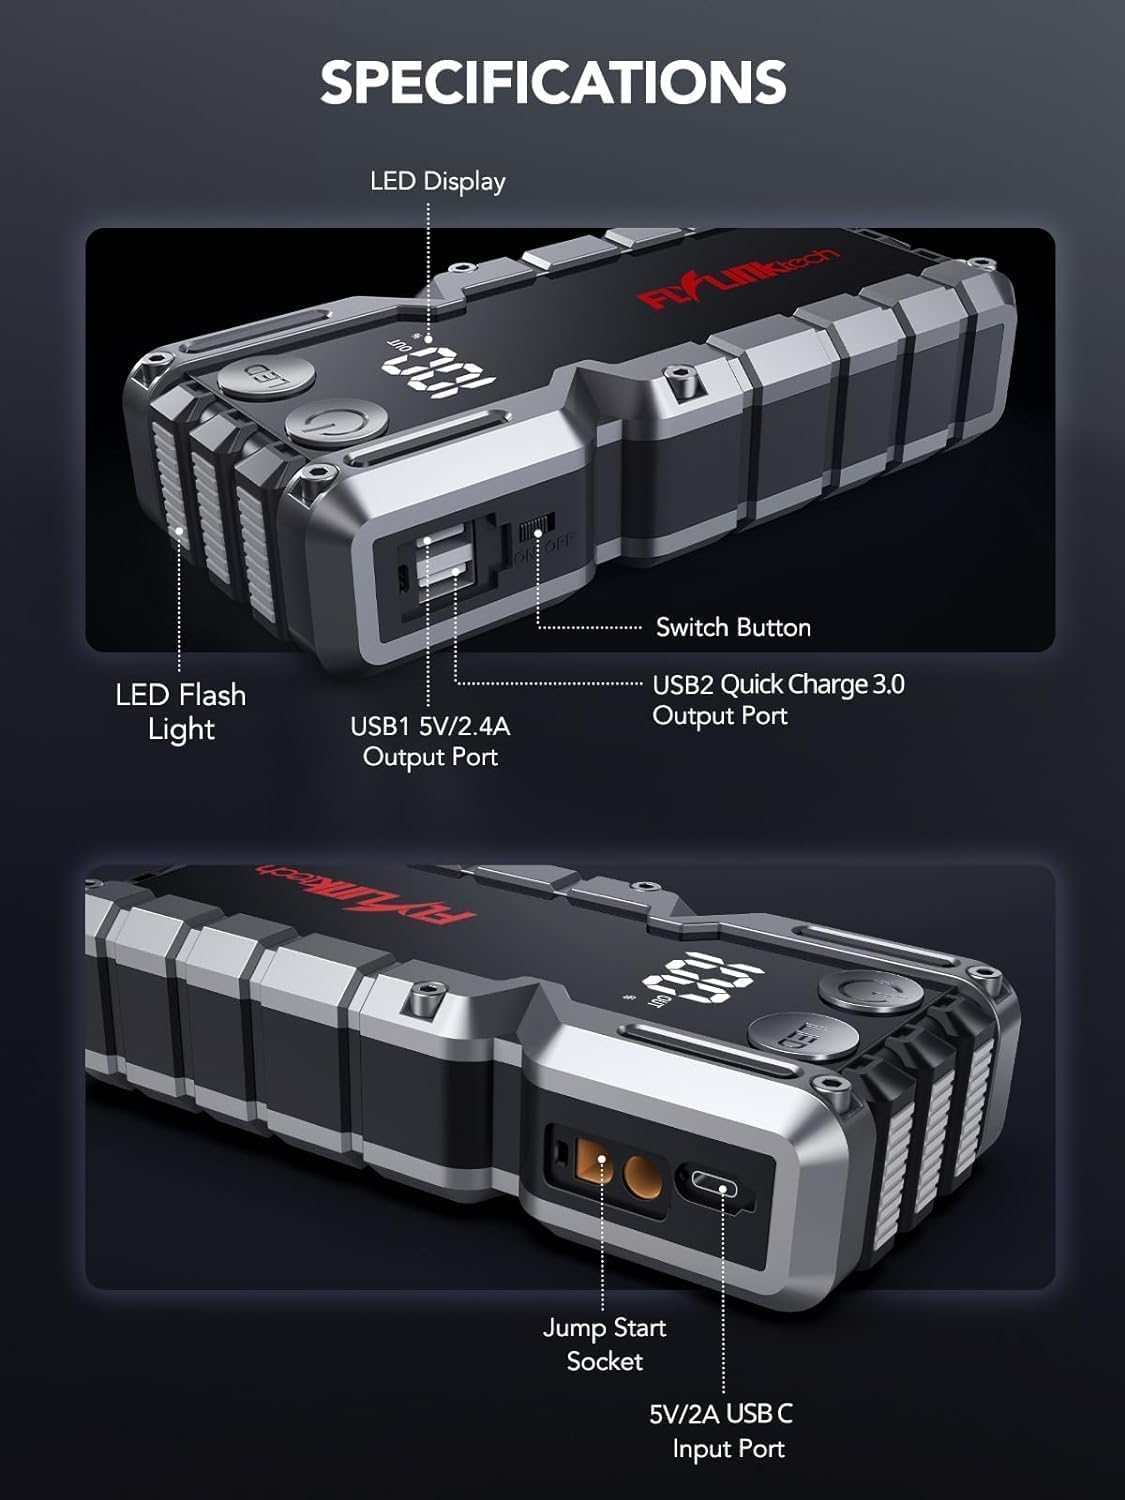
Gambar: Detail view of the jump starter showing the LED display, LED flashlight, power button, switch button, USB1 5V/2.4A output port, USB2 Quick Charge 3.0 output port, Jump Start Socket, and 5V/2A USB-C input port.
- Display LED: Menunjukkan persentase bateraitage.
- Senter LED: Menyediakan penerangan dengan berbagai mode.
- Tombol Daya: Activates the device and controls flashlight modes.
- Tombol Beralih: Kontrol daya utama.
- Keluaran USB1 (5V/2.4A): Standard USB charging port.
- Output USB2 (QC3.0): Quick Charge 3.0 port for faster charging.
- Soket Jumper Start: Terhubung ke kabel jumper pintar.
- USB-C Input (5V/2A): Used to recharge the jump starter.
5. Mengisi Daya Jump Starter
Before first use, fully charge the jump starter. It is recommended to recharge the unit every 3-6 months to maintain battery health.
- Connect the provided USB-C charging cable to the USB-C input port on the jump starter.
- Hubungkan ujung kabel USB-C lainnya ke adaptor dinding USB 5V/2A (tidak termasuk) atau pengisi daya mobil.
- The LED display will show the charging progress. The unit is fully charged when the display shows 100%.

Image: The jump starter connected via USB to charge a smartphone and a tablet, demonstrating its power bank functionality.
6. Jump Starting Your Vehicle
Follow these steps carefully to safely jump-start your 12V vehicle:
- Prepare the Jump Starter: Ensure the jump starter is at least 50% charged. Turn off your vehicle's ignition and all accessories (headlights, radio, etc.).
- Connect Smart Jumper Cables: Insert the blue plug of the smart jumper cables into the Jump Start Socket on the jump starter. Ensure a firm connection. The indicator light on the smart clamp will flash red and green.
- Hubungkan ke Aki Kendaraan:
- Lampirkan merah (+) clamp ke terminal positif baterai kendaraan Anda.
- Lampirkan hitam (-) clamp ke terminal negatif baterai kendaraan Anda.
Once connected correctly, the indicator light on the smart clamp akan berubah menjadi hijau pekat.
- Nyalakan Kendaraan: Go into your vehicle and start the engine. If the vehicle does not start immediately, wait 30 seconds and try again. If it still doesn't start, press the "BOOST" button on the smart clamp for 3 seconds until the green light turns solid, then try starting the car again within 30 seconds.
- Lepaskan Kabel: Setelah mesin menyala, segera lepaskan kabel jumper pintar dari aki kendaraan, lalu lepaskan juga dari alat jump starter.

Image: Visual guide for jump-starting: 1. Insert jump clamp into booster. 2. Connect clamps to car battery. 3. Start your car. 4. Remove clamps.

Image: The smart clamps connected to the jump starter, illustrating the 10-layer safety protections including short circuit, reverse charge, over charge, reverse polarity, over discharge, over current, reverse connection, and high temperature protection.
7. Digunakan sebagai Power Bank
The jump starter can also be used to charge your electronic devices.
- Connect your device's USB charging cable to either the USB1 (5V/2.4A) or USB2 (QC3.0) output port on the jump starter.
- Jump starter akan secara otomatis mulai mengisi daya perangkat Anda.
- The LED display will show the remaining battery capacity of the jump starter.

Image: The jump starter functioning as a portable power bank, with two USB output ports (5V/2.4A and Quick Charge 3.0) actively charging a smartphone and a tablet.
8. Menggunakan Senter LED
The built-in 600-lumen LED flashlight has three modes for various situations:
- Untuk Menghidupkan/Mematikan: Press and hold the LED button for 3 seconds.
- Untuk Mengganti Mode: Once the light is on, short press the LED button to switch between:
- Konstan Aktif: Untuk penerangan umum.
- Modus SOS: Flashes the international SOS signal for emergencies.
- Mode Strobo: Rapid flashing for warning or signaling.

Image: The jump starter with its LED flashlight active, illustrating the three available modes: standard flashlight, SOS signal, and strobe light for emergencies.
9. Pemeliharaan
- Pembersihan: Bersihkan unit dengan kain lembut dan kering. Jangan gunakan bahan kimia keras atau bahan abrasif.
- Penyimpanan: Store the jump starter in its EVA case in a cool, dry place away from direct sunlight. Ensure it is charged to at least 50% before storing for extended periods. Recharge every 3-6 months.
- Perawatan Baterai: The internal lithium-ion battery is designed for long life. Avoid fully discharging the unit frequently.

Water-resistant design.

Rugged ABS shell for drop resistance.

Operates in extreme temperatures (-4°F to 140°F).
10. Penyelesaian masalah
| Masalah | Kemungkinan Penyebab | Larutan |
|---|---|---|
| Vehicle won't start after connecting. | Jump starter battery too low; incorrect clamp koneksi; aki kendaraan benar-benar mati. | Pastikan jump starter terisi penuh. Periksa klemamp connections (red to +, black to -). Press the "BOOST" button on the smart clamp for 3 seconds and try again. |
| Teman pintaramp indicator light is red/flashing. | Reverse polarity; short circuit; over-temperature. | Putuskan klamps and re-connect correctly. Check for any short circuits. Allow unit to cool down if overheated. |
| Jump starter tidak mengisi daya. | Faulty charging cable or adapter; loose connection. | Ensure USB-C cable and adapter are working and connected securely. Try a different cable or adapter. |
| Senter LED tidak berfungsi. | Not activated correctly; low battery. | Press and hold the LED button for 3 seconds to activate. Ensure the jump starter has sufficient charge. |
11. Spesifikasi
| Fitur | Detil |
|---|---|
| Arus Puncak | 5000A |
| Kapasitas Baterai | 18000mAh (66.6Wh) |
| Mulai Voltage | 12V |
| Kompatibilitas Mesin | Hingga 9.0L Bensin / 8.0L Diesel |
| Keluaran USB 1 | Tegangan 5V/2.4A |
| Keluaran USB 2 | QC3.0 |
| Masukan USB-C | Tegangan 5V/2A |
| Senter LED | 600-Lumen (Constant, SOS, Strobe) |
| Suhu Operasional | -4°F hingga 140°F (-20°C hingga 60°C) |
| Ukuran | Ukuran 4.2x9x19 cm |
| Berat | 540 gram (1.19 pon) |
| Perlindungan Keamanan | 10-Layer (Short Circuit, Reverse Polarity, Over-Current, etc.) |
12. Garansi dan Dukungan
The FLYLINKTECH 5000A Jump Starter comes with an industry-leading Garansi 3 tahun terhitung sejak tanggal pembelian. Garansi ini mencakup cacat produksi dan menjamin kinerja yang andal.
For technical support, warranty claims, or any questions regarding your product, please contact FLYLINKTECH customer service through the retailer's platform or visit our official weblokasi.
Harap simpan bukti pembelian Anda untuk validasi garansi.
Ask a question about this manual
Ask about setup, troubleshooting, compatibility, parts, safety, or missing instructions. Manuals+ will review the question and use this page’s manual context to help answer it.