1. Pendahuluan
This user manual provides comprehensive instructions for the ASRock B860M-X Micro ATX motherboard. It covers installation, configuration, operation, and troubleshooting to ensure optimal performance and longevity of your system. The ASRock B860M-X is designed to support Intel Core Ultra processors with an LGA1851 socket, offering advanced features for a powerful computing experience.
2. Informasi Keselamatan
Selalu perhatikan tindakan pencegahan keselamatan berikut selama pemasangan dan pengoperasian:
- Cabut kabel daya dari stopkontak di dinding sebelum menyentuh komponen apa pun.
- Kenakan tali pergelangan tangan antistatis untuk mencegah kerusakan akibat pelepasan muatan elektrostatik (ESD) pada komponen.
- Pegang komponen pada bagian tepinya untuk menghindari menyentuh bagian sensitif.
- Pastikan ventilasi yang tepat di dalam casing PC Anda untuk mencegah panas berlebih.
- Jangan biarkan motherboard terkena kelembaban atau suhu ekstrem.
3. Isi Paket
Verifikasi bahwa semua item ada dalam paket motherboard Anda:
- ASRock B860M-X Micro ATX Motherboard
- Panduan Instalasi Cepat
- Pemberitahuan Peraturan
- Kabel Data SATA
- I / O Shield
- Sekrup/Standoff M.2

Image: ASRock B860M-X Motherboard and included accessories.
4. Tata Letak Papan Utama
Familiarize yourself with the key components and connectors on your ASRock B860M-X motherboard.

Gambar: Atas-bawah view of the ASRock B860M-X Micro ATX Motherboard, highlighting the CPU socket, RAM slots, and various connectors.
Panel I/O Belakang
Panel I/O belakang menyediakan berbagai port untuk menghubungkan periferal.
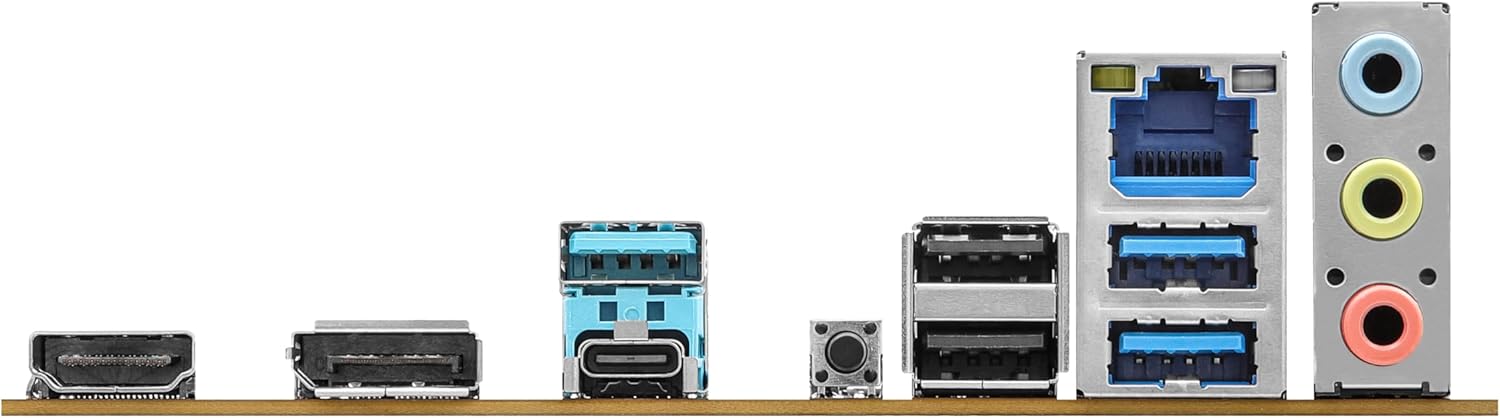
Image: Close-up of the rear I/O panel, showing USB ports, HDMI, DisplayPort, Ethernet, and audio jacks.
5. Pengaturan dan Instalasi
Ikuti langkah-langkah berikut untuk pemasangan motherboard dan komponen yang benar.
5.1 CPU Installation (LGA1851)
- Buka tuas soket CPU.
- Carefully align the CPU with the socket, ensuring the notches match.
- Tempatkan CPU secara perlahan ke dalam soket tanpa memaksanya.
- Tutup tuas soket untuk mengamankan CPU.
5.2 Instalasi Memori (RAM)
The ASRock B860M-X supports 2 x DDR5 DIMMs for dual-channel memory up to 9066+ MHz (OC).
- Buka klip di kedua ujung slot DIMM.
- Align the memory module with the slot, ensuring the notch on the module matches the slot key.
- Tekan dengan kuat kedua ujung modul memori hingga klip terpasang pada tempatnya.
5.3 Instalasi Penyimpanan (M.2 dan SATA)
The motherboard supports M.2 drives and up to 4 SATA3 6.0 Gb/s devices.
- SSD M.2: Locate the M.2 slot(s). Insert the M.2 SSD into the slot at an angle and secure it with the provided screw/standoff.
- Drive SATA: Connect SATA data cables from your storage devices (HDDs/SSDs) to the SATA3 ports on the motherboard. Connect power cables from your power supply to the SATA devices.
5.4 Pemasangan Kartu Ekspansi (PCIe)
The motherboard features PCIe slots for graphics cards and other expansion cards.
- Align your graphics card or other PCIe card with the appropriate slot.
- Tekan dengan kuat hingga kartu terpasang dengan benar dan klip penahan terkunci.
- Amankan kartu ke casing PC dengan sekrup.
5.5 Koneksi Catu Daya
Hubungkan konektor daya ATX 24-pin dan konektor daya CPU 8-pin dari catu daya Anda ke port yang sesuai pada motherboard.
5.6 Koneksi Panel Depan
Connect the front panel cables (power button, reset button, USB ports, audio jacks, etc.) to their respective headers on the motherboard. Refer to the motherboard diagram for exact locations.
6. Petunjuk Pengoperasian
6.1 Boot Pertama
After assembling your system, connect your monitor, keyboard, and mouse. Power on your system. The system should display the ASRock logo and enter the BIOS setup or begin the operating system installation process.
6.2 Pengaturan BIOS/UEFI
Untuk masuk ke utilitas pengaturan BIOS, tekan tombol Menghapus or F2 key during the Power-On Self-Test (POST) screen. Here you can configure various system settings, including boot order, CPU settings, memory timings, and fan speeds.
6.3 Instalasi Driver
After installing your operating system, install the necessary drivers for your motherboard components (chipset, audio, LAN, graphics, etc.) from the ASRock website or the included driver CD/USB drive.
7. Pemeliharaan
7.1 Pembaruan BIOS
Keeping your BIOS updated ensures compatibility with new hardware and improves system stability. ASRock provides two methods for BIOS updates: USB BIOS Flashback and Instant Flash.
Video: ASRock Motherboard BIOS Update Tutorial. This video demonstrates two methods for updating your ASRock motherboard's BIOS: USB BIOS Flashback and Instant Flash.
7.2 Pembersihan
Bersihkan casing PC dan motherboard secara teratur untuk mencegah penumpukan debu, yang dapat menyebabkan panas berlebih dan kerusakan komponen. Gunakan udara bertekanan untuk menghilangkan debu dari kipas, heatsink, dan komponen lainnya. Pastikan sistem dimatikan dan dicabut dari sumber listrik sebelum dibersihkan.
8. Penyelesaian masalah
Jika Anda mengalami masalah, lihat kiat pemecahan masalah umum berikut:
- Tidak Ada Daya: Check all power connections (24-pin ATX, 8-pin CPU, GPU, SATA). Ensure the power supply switch is on.
- Tidak Ada Tampilan: Verify monitor connection and input source. Reseat the graphics card and memory modules.
- Ketidakstabilan Sistem: Check memory compatibility and seating. Ensure CPU cooler is properly installed. Update BIOS and drivers.
- Masalah Booting: Periksa urutan boot di BIOS. Verifikasi koneksi perangkat penyimpanan.
9. Spesifikasi
Key technical specifications for the ASRock B860M-X Micro ATX Motherboard:
| Fitur | Spesifikasi |
|---|---|
| Merek | ASRock |
| Nama Model | B860M-X |
| Soket CPU | LGA1851 |
| Prosesor yang Kompatibel | Intel Core Ultra |
| Jenis Chipset | Intel B860 |
| Teknologi Memori RAM | DDR5 |
| Kecepatan Jam Memori | 9066 MHz (OC) |
| Kapasitas Penyimpanan Memori Maksimum | 128 GB |
| Slot Memori Tersedia | 2 |
| Total SATA Ports | 4 |
| Total PCIe Ports | 3 |
| Graphics Output Options | 1 HDMI, 1 DisplayPort |
| Jumlah Port Ethernet | 1 |
| Kodek Audio | Codec Audio HD 7.1 Saluran Realtek ALC1220 |
| Power Phase Design | 7+1+1+1+1 |
| Pencahayaan RGB | Polychrome RGB |
Video: Selesaiview of Intel B860 Series Motherboards. This video highlights key features and design aspects of the ASRock B860 motherboard series.
10. Garansi dan Dukungan
ASRock provides a 3-year warranty for this product. For technical support, driver downloads, and further information, please visit the official ASRock webAnda juga dapat menemukan sumber daya dukungan tambahan dan FAQ di situs tersebut.
For warranty claims or service, please contact your retailer or authorized ASRock service center with your proof of purchase.