Dasan AT249W-ORB
Buku Panduan Penggunaan Sistem Pancuran Dinding DASAN AT249W-ORB
Model: AT249W-ORB | Brand: Dasan
1. Pendahuluan
This manual provides detailed instructions for the installation, operation, and maintenance of your DASAN AT249W-ORB Wall Mount Shower System. Please read this manual thoroughly before installation and retain it for future reference. Proper installation and care will ensure optimal performance and longevity of your shower system.
2. Informasi Keselamatan
- Selalu matikan pasokan air utama sebelum memulai pekerjaan perpipaan apa pun.
- Kenakan alat pelindung diri yang sesuai, seperti kacamata pengaman dan sarung tangan.
- Jika Anda tidak yakin tentang bagian mana pun dari proses pemasangan, konsultasikan dengan tukang ledeng yang berkualifikasi.
- Pastikan semua sambungan aman untuk mencegah kebocoran.
- Jangan mengencangkan komponen secara berlebihan, karena hal ini dapat menyebabkan kerusakan.
3. Isi Paket
Pastikan semua komponen lengkap dan tidak rusak sebelum pemasangan. Jika ada bagian yang hilang atau rusak, silakan hubungi dukungan pelanggan.

Gambar: Meledak view of the DASAN AT249W-ORB shower system components.
- Kepala Pancuran
- Pelat muka
- Katup Kasar
- Lengan Mandi
- Handheld Wand
- Siku Pasokan Dinding
- Body Jets (4 units)
- Shower Handle
- Perangkat Keras Pemasangan
- Tombol Pengalih
- Flange for Handheld
- Shower Hose (59 inches)
- Flange for Shower Arm
4. Spesifikasi
| Fitur | Spesifikasi |
|---|---|
| Merek | Dasan |
| Nomor Model | AT249W-ORB |
| Warna | Perunggu Gosok Minyak |
| Bahan | Kuningan, stainless steel |
| Jenis Selesai | Tidak mengkilap |
| Jumlah Pegangan | 1 |
| Jenis Pemasangan | Terpasang di Dinding |
| Laju Aliran | 1.8 GPM |
| Ukuran Kepala Pancuran | 9 inci |
| Panjang Selang Pancuran | 59 inci |
| In-Wall Depth (Min-Max) | 2-3/16" (55 mm) hingga 3-1/16" (78 mm) |
| Koneksi | 1/2" Male NPT |
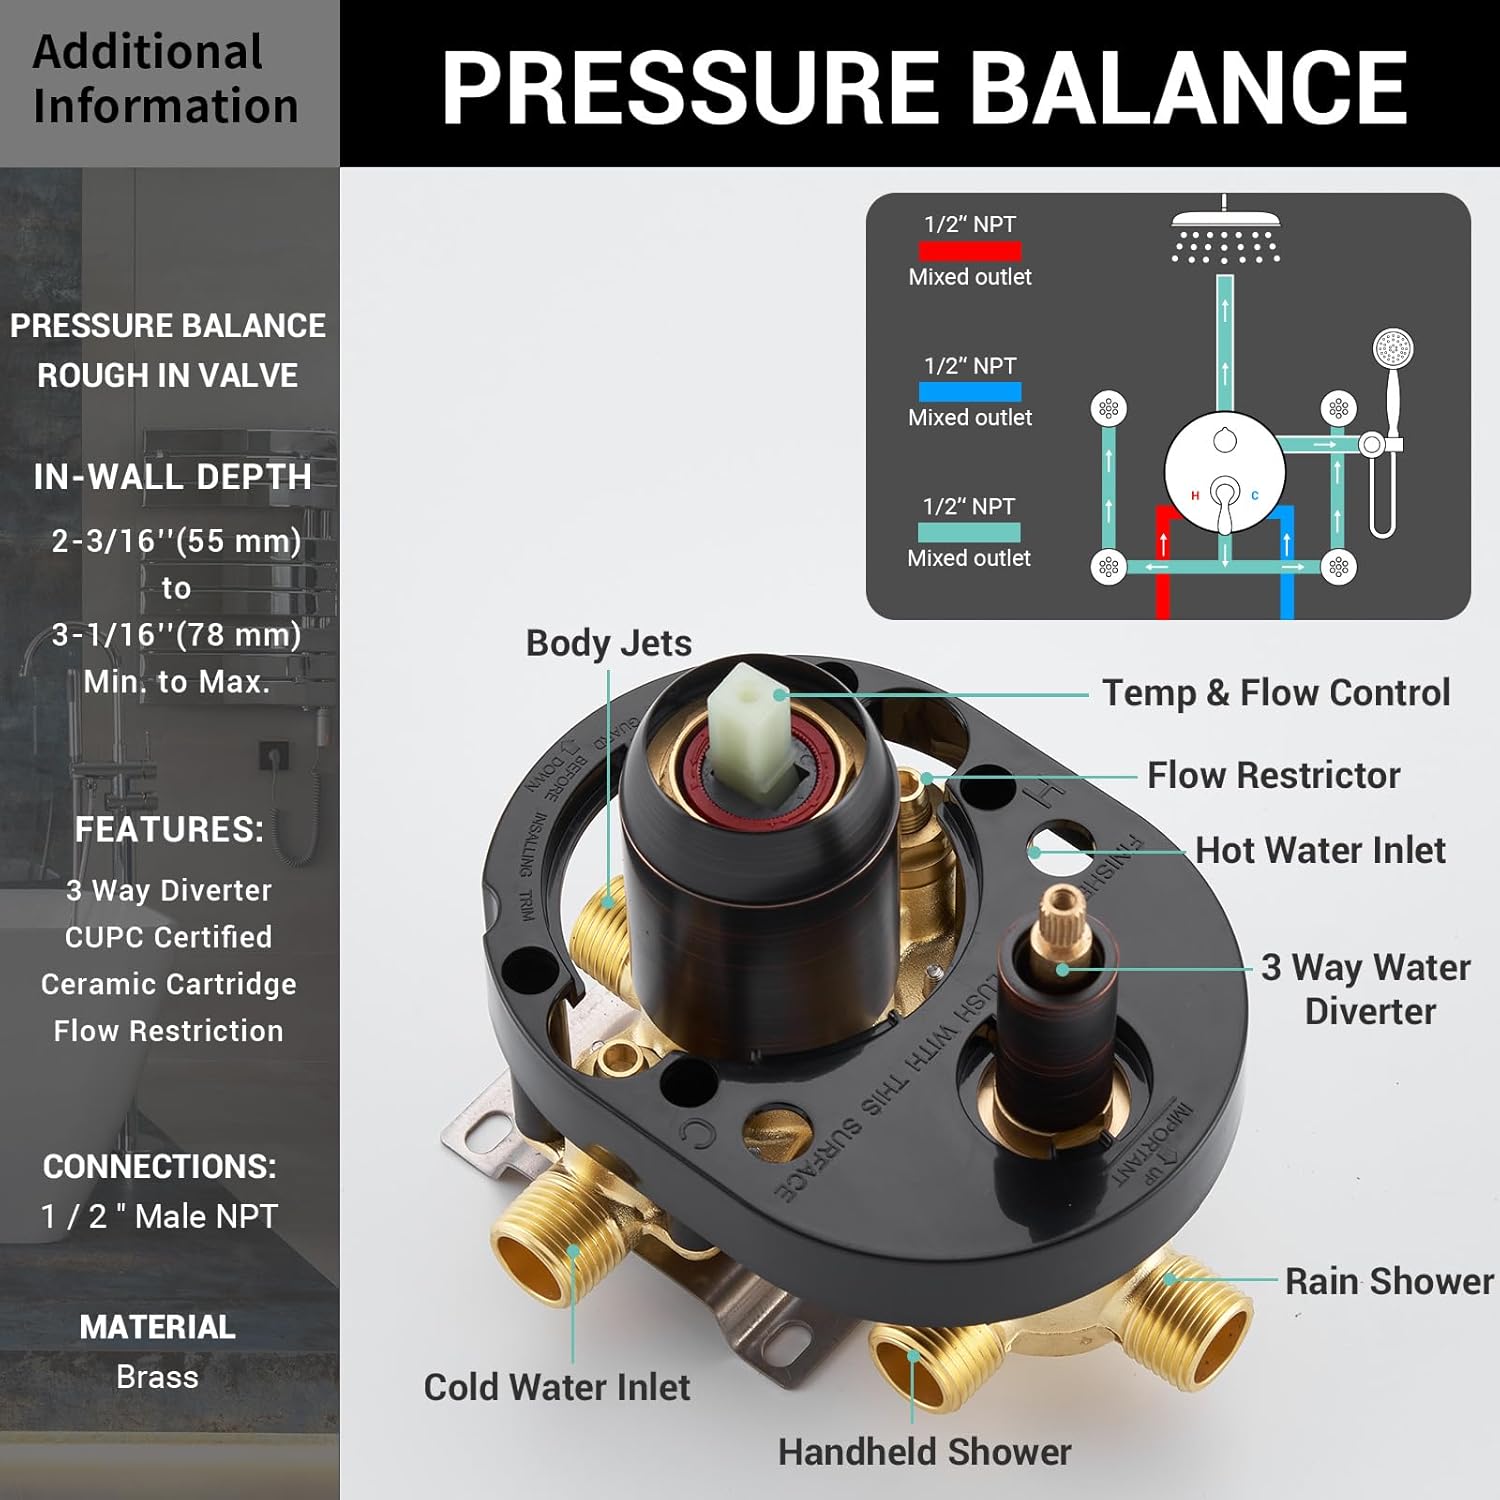
Image: Pressure balance rough-in valve details, including in-wall depth and connections.
5. Petunjuk Instalasi
It is recommended to have this product installed by a professional plumber. Ensure the main water supply is turned off before proceeding.
5.1 Langkah Pra-Instalasi
- Pastikan semua isi paket lengkap dan tidak rusak.
- Prepare the wall opening according to the rough-in valve dimensions, ensuring the in-wall depth is between 2-3/16" (55 mm) and 3-1/16" (78 mm).
- Flush the water lines to remove any debris before connecting the valve.
5.2 Pemasangan Katup Kasar
- Mount the rough-in valve (3) securely within the wall, ensuring it is level and at the correct depth.
- Connect the hot and cold water supply lines to the designated inlets on the valve (1/2" NPT connections).
- Connect the mixed outlets from the valve to the rain shower, handheld shower, and body jet supply lines.
- Perform a leak test by turning on the main water supply and checking all connections.
5.3 Instalasi Komponen
- Shower Arm and Head: Install the shower arm (4) into the wall outlet, ensuring it is securely tightened. Attach the shower head (1) to the shower arm.
- Pancuran Genggam: Install the wall supply elbow (6) for the handheld shower. Connect the shower hose (12) to the wall supply elbow and the handheld wand (5). Mount the flange (11) for the handheld.
- Jet Badan: Install the body jets (7) into their respective wall outlets. Ensure they are securely tightened and oriented as desired.
- Face Plate and Handle: Install the face plate (2) over the rough-in valve. Attach the shower handle (8) and diverter knob (10) according to the valve's instructions, securing them with the provided mounting hardware (9).

Gambar: Lebih dariview of the assembled DASAN AT249W-ORB shower system.
6. Petunjuk Pengoperasian
Your DASAN shower system offers multiple functions for a customized showering experience.

Image: Control functions for the shower system.
6.1 Kontrol Suhu dan Aliran
- The main handle controls both water temperature and flow.
- Rotate the handle to adjust the temperature from cold to hot.
- Pull the handle outwards to increase water flow and push inwards to decrease it.
6.2 Function Selection (Diverter Knob)
The diverter knob allows you to switch between the rain shower, handheld shower, and body jets.
- Hujan Gerimis: Rotate the diverter knob to activate the overhead rain shower. The 9-inch shower head provides broad coverage.
- Pancuran Genggam: Rotate the diverter knob to activate the handheld shower. The 59-inch hose allows for flexible use.
- Jet Badan: Rotate the diverter knob to activate the body spray jets. These jets feature a 360-degree adjustable angle for targeted water flow.

Image: Rain shower head with adjustable angle feature.
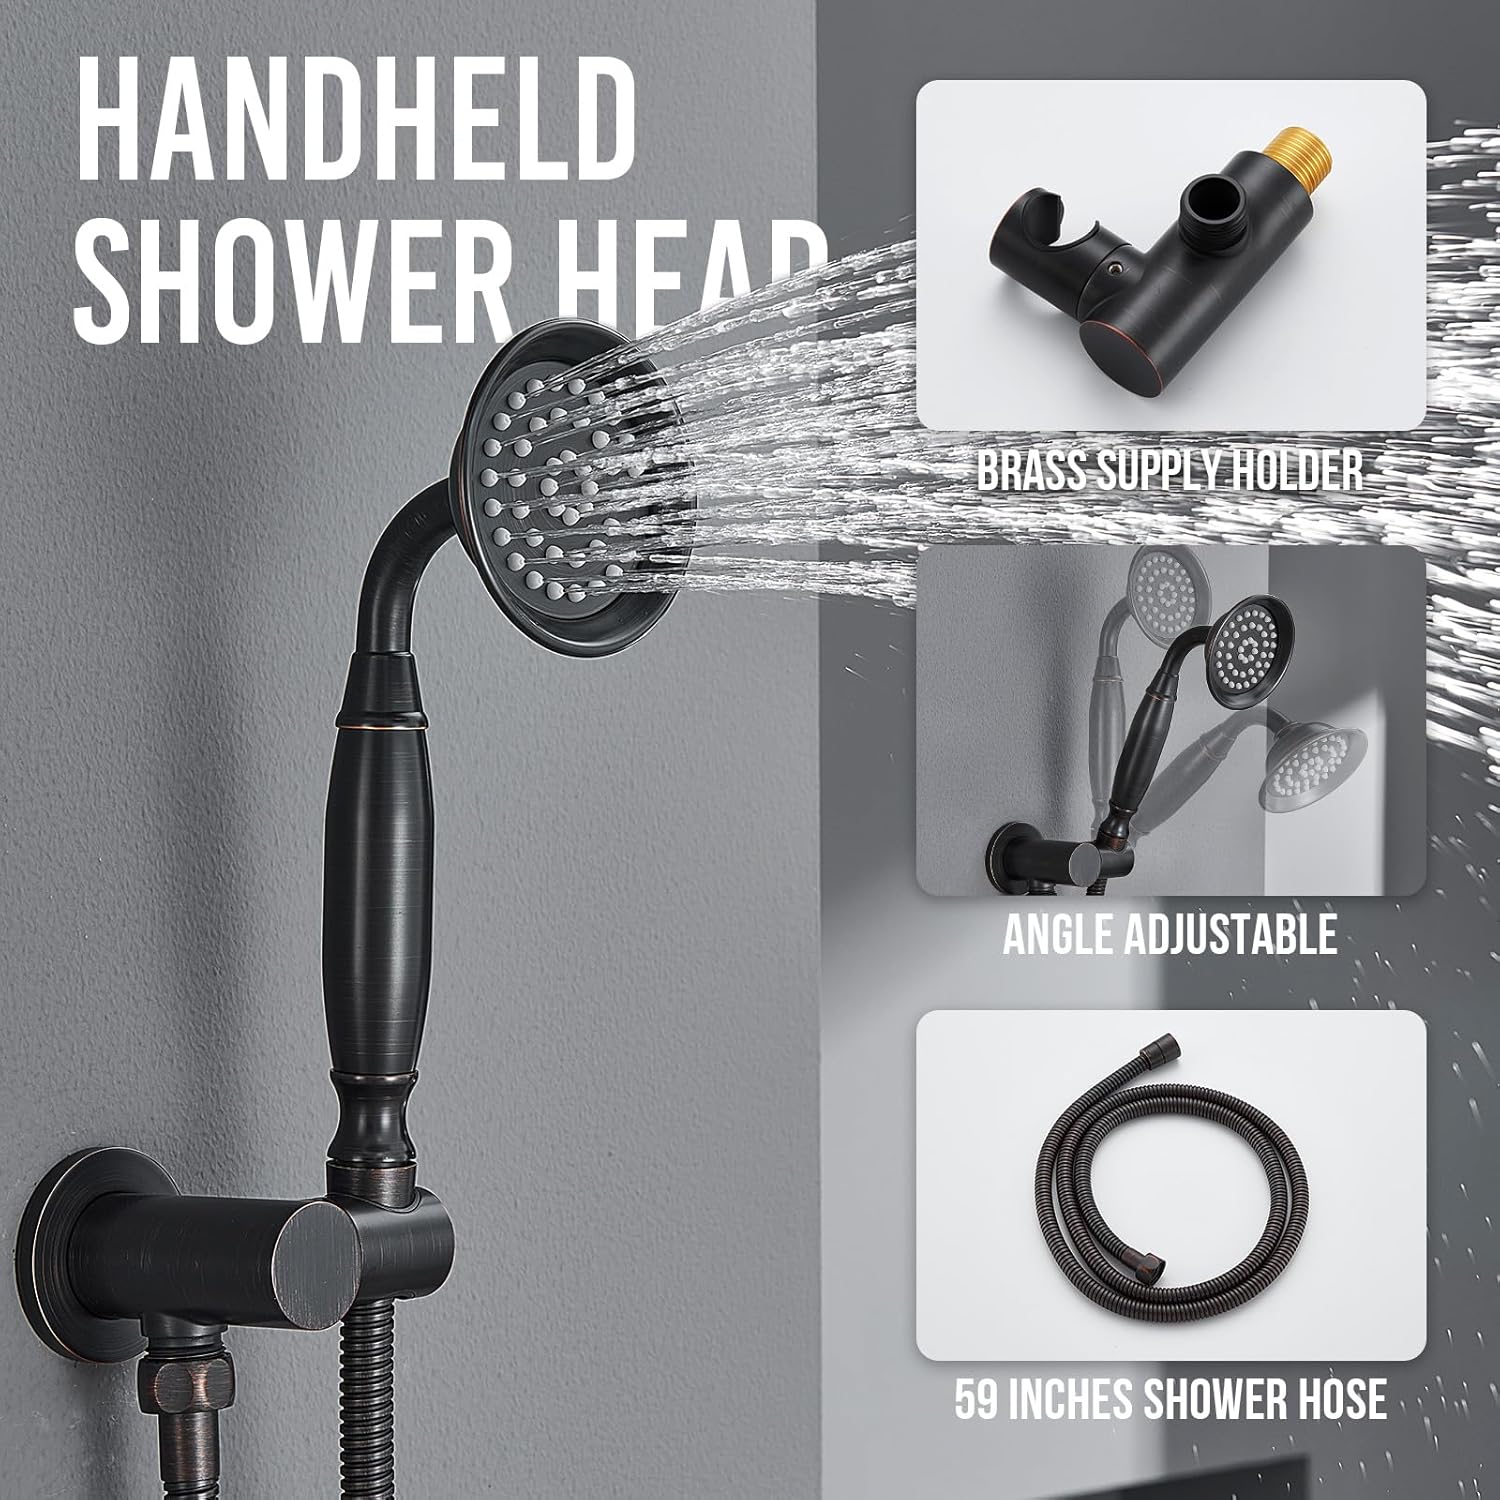
Image: Handheld shower head with 59-inch hose and brass supply holder.

Image: Body jets with easy-clean nozzles and 360-degree adjustable angle.
7. Pemeliharaan
Regular cleaning and maintenance will help preserve the finish and functionality of your shower system.
- Membersihkan Lapisan Akhir: Clean the oil rubbed bronze finish with a soft, damp kain. Hindari pembersih abrasif, bahan kimia keras, atau sabut gosok, karena dapat merusak lapisan akhir.
- Nozel Pembersih: The rain shower head, handheld shower, and body jets feature silicone nozzles. To remove mineral buildup (limescale), gently rub the nozzles with your finger or a soft brush. This helps maintain consistent water flow.
- Pemeriksaan Berkala: Periodically check all connections for tightness and signs of leaks.
8. Penyelesaian masalah
If you encounter issues with your shower system, refer to the following common problems and solutions:
| Masalah | Kemungkinan Penyebab | Larutan |
|---|---|---|
| Aliran Air Rendah | Clogged nozzles, partially closed shut-off valves, debris in lines. | Clean silicone nozzles. Ensure shut-off valves are fully open. Flush water lines if debris is suspected. |
| Kebocoran Air | Loose connections, damaged O-rings/washers. | Tighten all connections. Inspect and replace any damaged O-rings or washers. Do not overtighten. |
| Suhu Air Tidak Konsisten | Pressure balance valve issue, hot/cold water supply imbalance. | Ensure hot and cold water supplies are balanced. If the problem persists, consult a plumber to inspect the pressure balance valve. |
| Diverter Not Switching Functions | Debris in diverter mechanism, worn diverter cartridge. | Flush the system. If the issue continues, the diverter cartridge may need inspection or replacement by a professional. |
If these solutions do not resolve the issue, please contact Dasan customer support.
9. Informasi Garansi
The DASAN AT249W-ORB Wall Mount Shower System comes with the following warranty:
- Penggunaan Perumahan: Garansi Terbatas 10 Tahun
- Penggunaan Komersial: Garansi Terbatas 5 Tahun
Please retain your proof of purchase for warranty claims. The warranty covers manufacturing defects under normal use and service. For full warranty terms and conditions, please refer to the official Dasan websitus atau hubungi dukungan pelanggan.
10. Dukungan
For further assistance, technical support, or to inquire about replacement parts, please visit the official Dasan store or contact their customer service department.
Visit the Dasan Store: Dasan Official Store