1. Pendahuluan
This manual provides comprehensive instructions for the installation, operation, and maintenance of your Keenso Digital Tachometer Gauge. This high-accuracy LCD display gauge is designed for various vehicle modifications, including cars, trucks, boats, and generator engines, providing precise engine speed (RPM) and hour readings.

Gambar 1.1: Depan view of the Keenso Digital Tachometer Gauge, featuring a black dial and silver bezel. The display shows RPM and hour readings.
Isi Paket:
- 1 x 0-9990RPM Tachometer Gauge
- 1 x Connecting Cable
- 1 x Buku Petunjuk
2. Fitur
- Akurasi Tinggi: Utilizes a stepping motor for precise RPM display and a clear LCD for hour readings.
- Konstruksi Tahan Lama: Made from stainless steel and plated plastic for long-lasting performance.
- Peringkat Tahan Air: IP67 protection class, allowing operation underwater up to 1 meter. Features curved glass with anti-fog function.
- Volume lebartagRentang: Designed for ultra-wide working voltage of 9-32V DC, with a maximum tolerance of 36V (for less than 1 minute).
- Konsumsi Daya Rendah: Efficient design ensures extended service life.
- Aplikasi serbaguna: Suitable for various stepping gauges and compatible with car, truck, boat, and generator engines.
3. Spesifikasi
| Spesifikasi | Nilai |
|---|---|
| Tipe Barang | Pengukur Takometer |
| Bahan | Stainless Steel + Plated Plastic |
| Warna Lampu Latar | Merah |
| Diameter Instalasi | Kira-kira 52 mm (2 inci) |
| Volume Operasitage | 9-32V DC |
| Arus Operasional | ≤60mA |
| Menunjukkan Rentang | 0-9990rpm |
| Sinyal input | Pulse Signal from tacho sensor, engine, alternator, ignition coil, crankshaft sensor, etc. |
| Kelas Perlindungan | IP67 (can work underwater 1m) |
| Berat Barang | 4.3 ons |
| Dimensi Paket | 3.54x2.76x2.76 inci |

Gambar 3.1: Depan view of the tachometer, illustrating its approximate 52mm (2-inch) installation diameter.
4. Pengaturan & Instalasi
Follow these steps for proper installation of your tachometer gauge. Ensure the vehicle's power is disconnected before beginning installation.
4.1 Memasang Alat Ukur
- Choose a suitable location on your dashboard or panel for installation.
- Cut a circular hole with an approximate diameter of 52mm (2 inches) at the chosen location.
- Insert the tachometer gauge into the hole.
- Secure the gauge from the back using the provided mounting bracket and nuts.
4.2 Koneksi Kabel
Refer to the wiring diagram below and the provided connecting cable for correct connections. Incorrect wiring can damage the device or vehicle electrical system.
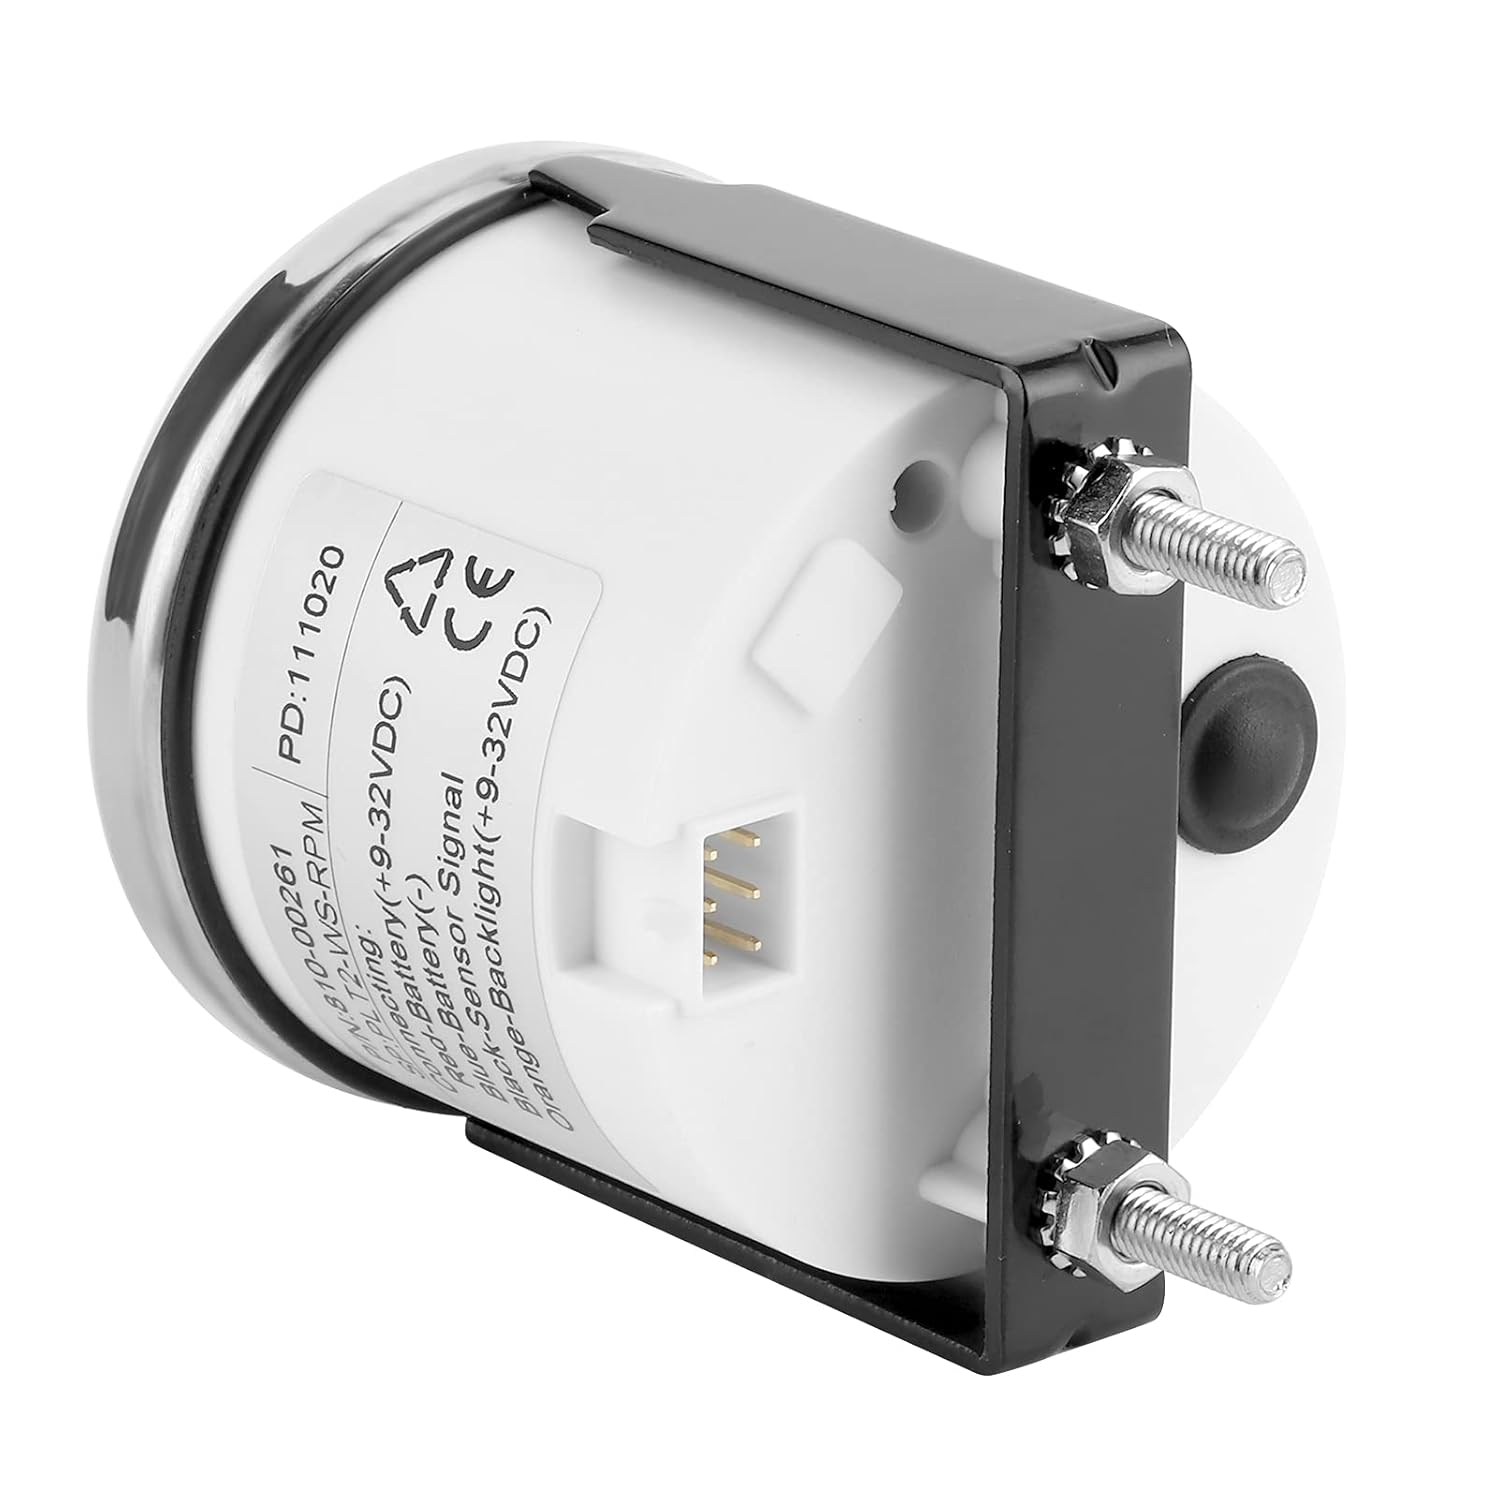
Gambar 4.1: Belakang view of the tachometer, displaying the wiring terminals and connection points.
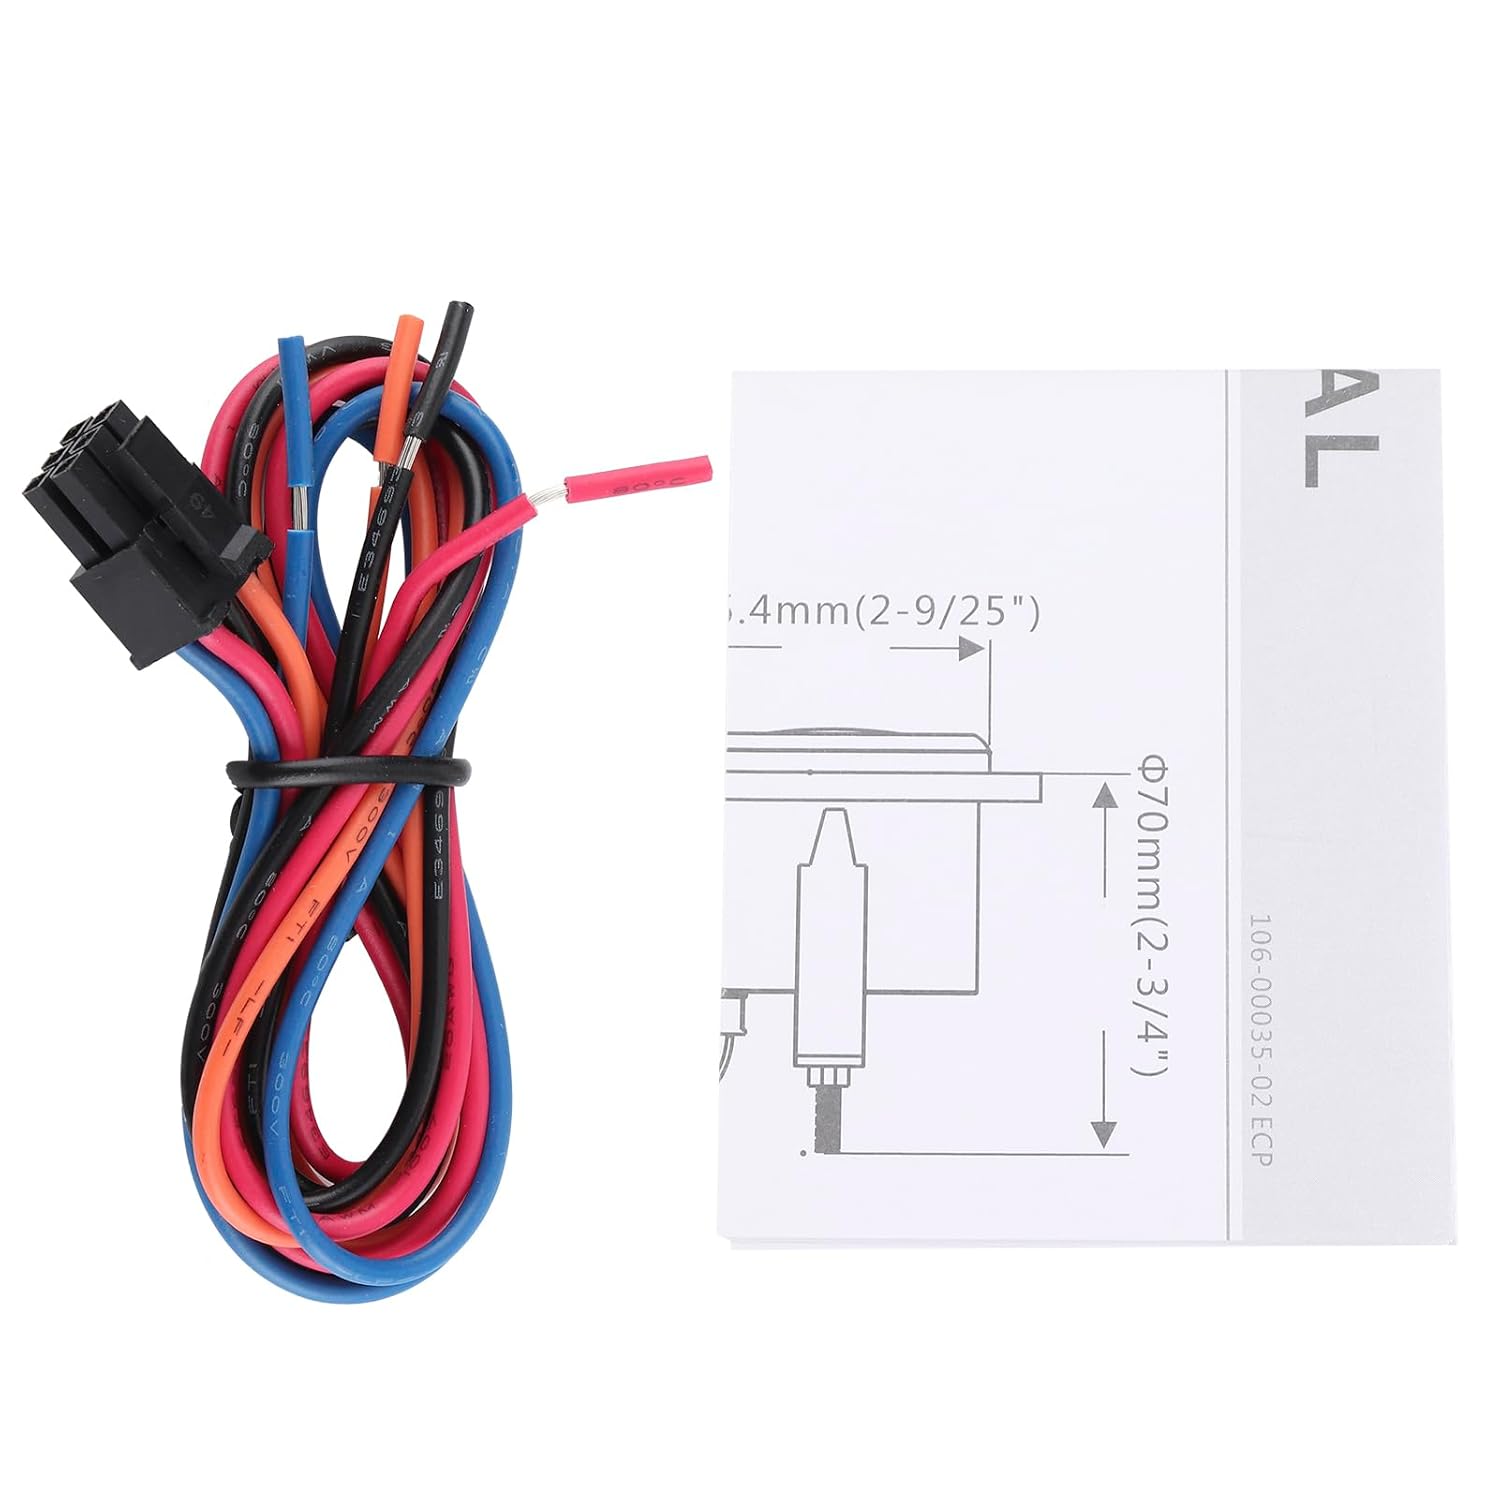
Image 4.2: The included connecting cable harness with color-coded wires for installation.
- Kabel Merah: Connect to Battery Positive (+9-32V DC).
- Kabel Biru: Connect to Battery Negative (-).
- Kabel Hitam: Connect to Signal Input. This receives the pulse signal from your tacho sensor, engine, alternator, ignition coil, or crankshaft sensor.
- Orange/Yellow Wire: Connect to Backlight Positive (+9-32V DC). This powers the red backlight.
After all connections are made, ensure they are secure and insulated to prevent short circuits. Reconnect the vehicle's power.
5. Petunjuk Pengoperasian
The Keenso Digital Tachometer Gauge provides real-time engine RPM and accumulated operating hours on its LCD display.

Gambar 5.1: Close-up view of the digital display, clearly showing RPM (Revolutions Per Minute) and accumulated operating hours (H).
5.1 Membaca Tampilan
- The large digital numbers indicate the engine's RPM (Revolutions Per Minute), typically displayed as "RPM x10" or similar, meaning the displayed value should be multiplied by 10. The indicating range is 0-9990 RPM.
- The smaller digital numbers, usually accompanied by an "H", display the total accumulated operating hours of the engine.
5.2 Daya Hidup/Mati
The gauge will power on automatically when connected to a 9-32V DC power source and will display readings once an engine pulse signal is detected. It powers off when the power source is disconnected.
6. Pemeliharaan
The Keenso Digital Tachometer Gauge is designed for durability and requires minimal maintenance.
- Pembersihan: Wipe the display and bezel with a soft, damp cloth. Avoid abrasive cleaners or solvents that could damage the surface or anti-fog coating.
- Tahan Air: The gauge has an IP67 rating, meaning it is protected against dust and can withstand immersion in water up to 1 meter for 30 minutes. However, prolonged submersion or high-pressure water jets should be avoided.
- Koneksi: Periksa sambungan kabel secara berkala untuk memastikan tetap aman dan bebas dari korosi.
7. Penyelesaian masalah
If you encounter issues with your tachometer gauge, refer to the following common problems and solutions:
- Tidak Ada Tampilan/Tidak Ada Daya:
- Check the power connections (Red wire to positive, Blue wire to negative) for proper voltage (9-32V DC) and secure contact.
- Ensure the backlight wire (Orange/Yellow) is correctly connected if the backlight is not illuminating.
- Incorrect RPM Reading:
- Verify the signal wire (Black) is correctly connected to a reliable pulse signal source (tacho sensor, ignition coil, alternator, crankshaft sensor).
- Ensure the signal source is functioning correctly.
- Check for any loose or corroded connections in the signal line.
- Display Flickering or Intermittent:
- Check all wiring for loose connections or damaged insulation.
- Ensure the power supply is stable and within the 9-32V DC operating range.
If problems persist after attempting these solutions, please contact Keenso customer support for further assistance.
8. Garansi & Dukungan
Keenso products are manufactured to high-quality standards. For information regarding warranty coverage, technical support, or service, please refer to the contact information provided with your purchase or visit the official Keenso weblokasi.
When contacting support, please have your product model number (Keenso1ash52fivb-12) and purchase details available.