Perkenalan
Terima kasih sudah membeliasing the Argon Audio TT MK2 Turntable. This manual provides essential information for the safe and optimal operation, setup, and maintenance of your new turntable. Please read this manual thoroughly before using the product and retain it for future reference.
The Argon Audio TT MK2 is designed to deliver high-fidelity audio playback from your vinyl records, featuring a built-in phono pre-amplifier, an Audio Technica AT3600 cartridge, and dual-speed control for 33 and 45 RPM records.
Petunjuk Keselamatan Penting
Untuk mengurangi risiko sengatan listrik, kebakaran, atau kerusakan pada unit, harap perhatikan tindakan pencegahan keselamatan berikut:
- Jangan biarkan alat ini terkena hujan atau lembab.
- Jangan menaruh benda berisi cairan seperti vas bunga di atas alat ini.
- Jangan halangi lubang ventilasi apa pun. Pasang sesuai petunjuk produsen.
- Jangan memasang di dekat sumber panas seperti radiator, pemanas, kompor, atau peralatan lainnya (termasuk amppengangkat) yang menghasilkan panas.
- Lindungi kabel daya agar tidak terinjak atau terjepit, terutama di steker, stopkontak, dan titik keluarnya dari alat.
- Gunakan hanya perlengkapan/aksesoris yang ditentukan oleh produsen.
- Cabut peralatan ini saat terjadi badai petir atau bila tidak digunakan dalam waktu lama.
- Serahkan semua perbaikan ke teknisi servis yang berkualifikasi. Perbaikan diperlukan jika peralatan mengalami kerusakan, seperti kabel atau steker catu daya rusak, cairan tumpah atau benda jatuh ke dalam peralatan, peralatan terkena hujan atau lembap, tidak beroperasi secara normal, atau terjatuh.
Apa yang ada di dalam kotak
Carefully unpack all components and ensure all items are present before discarding packaging materials:
- Argon Audio TT MK2 Turntable Unit
- Audio Technica AT3600 Cartridge (pre-mounted)
- Dust Lid
- RCA Kabel
- Adaptor Daya
- Pengimbang
- Berat Anti-skate
- Platter and Drive Belt
- Merasa Mat

Image: The Argon Audio TT MK2 Turntable with its clear dust cover in place, showcasing its sleek black finish.
Panduan Pengaturan
1. Penempatan
Place the turntable on a stable, level surface away from direct sunlight, heat sources, and strong vibrations. Ensure there is enough space around the unit for ventilation and operation.
2. Pemasangan Piringan dan Sabuk
- Carefully place the metal platter onto the spindle.
- Locate the drive belt. Gently stretch the belt around the inner rim of the platter and hook it onto the motor pulley. Ensure the belt is not twisted.
- Letakkan alas kain kempa di atas piring.

Image: The Argon Audio TT MK2 Turntable with its dust cover removed, showing the platter and tonearm assembly.
3. Cartridge and Tonearm Setup
The Audio Technica AT3600 cartridge comes pre-mounted on the tonearm. Follow these steps to balance the tonearm and set the tracking force:
- Remove the stylus protector from the cartridge.
- Lepaskan lengan tonearm dari penyangganya dengan perlahan.
- Rotate the counterweight at the rear of the tonearm until the tonearm floats freely and is perfectly balanced horizontally.
- Once balanced, hold the counterweight steady and rotate the numbered ring on the front of the counterweight to "0".
- Rotate the entire counterweight (including the numbered ring) counter-clockwise until the desired tracking force is set. For the AT3600 cartridge, the recommended tracking force is typically 3.5 grams.

Gambar: Close-up view of the tonearm's counterweight and anti-skate mechanism, showing the numerical scale for adjustment.
4. Anti-Skate Adjustment
Attach the anti-skate weight to the small loop on the tonearm and hang it over the second groove of the anti-skate support rod. This helps prevent the stylus from skipping inwards.
5. Connecting to Audio System
The TT MK2 features a built-in phono pre-amplifier, allowing direct connection to powered speakers or an amplifier's line-level input. If your amplifier has a dedicated "Phono" input, you can bypass the internal pre-amp.
- Connect the supplied RCA cable from the "RCA OUT" jacks on the rear of the turntable to the corresponding input on your amplifier or powered speakers (e.g., "AUX", "LINE IN").
- Locate the "RIAA" switch on the rear of the turntable.
- Set the switch to "ON" if connecting to a line-level input (e.g., AUX, CD) on your amplifier or directly to powered speakers. This activates the internal phono pre-amppengangkat.
- Set the switch to "OFF" if connecting to a dedicated "Phono" input on your amplifier. This bypasses the internal phono pre-amplifier, as your amplifier will provide the necessary RIAA equalization.

Image: The rear panel of the Argon Audio TT MK2 Turntable, showing the RCA output jacks, the RIAA (Phono/Line) switch, and the DC 12V power input.
6. Koneksi Daya
Connect the supplied power adapter to the "DC IN 12V" port on the rear of the turntable, then plug the adapter into a wall outlet.
Petunjuk Pengoperasian
1. Menghidupkan/Mematikan
Use the power switch located on the rear panel to turn the turntable ON or OFF.
2. Selecting Playback Speed
The TT MK2 supports two playback speeds: 33 1/3 RPM for LPs and 45 RPM for singles. Use the speed selection knob on the top right of the turntable to switch between "33" and "45".
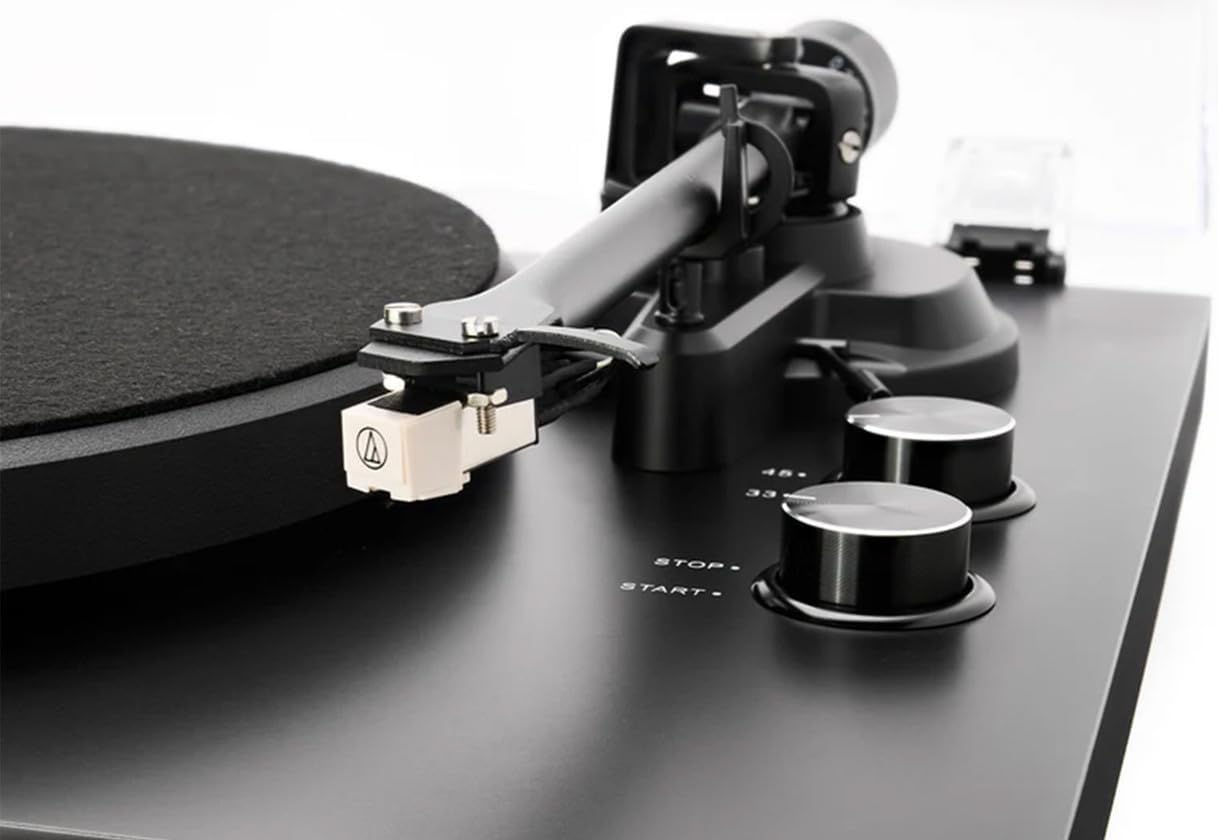
Image: A close-up of the Audio Technica AT3600 cartridge mounted on the tonearm, alongside the "STOP" and "START" buttons and the 33/45 RPM speed selection knob.
3. Memutar Rekaman
- Place a record on the platter, ensuring it is centered.
- Select the correct speed (33 or 45 RPM) using the speed knob.
- Press the "START" button. The platter will begin to rotate.
- Angkat lengan pemutar piringan hitam secara perlahan menggunakan tuas pengatur posisi.
- Posisikan lengan pemutar di atas alur awal yang diinginkan pada piringan hitam.
- Slowly lower the cueing lever to gently drop the stylus onto the record.
4. Menghentikan Pemutaran
- At the end of a record, the tonearm will not automatically return. Gently lift the tonearm using the cueing lever.
- Return the tonearm to its rest and secure it with the tonearm clip.
- Press the "STOP" button to halt platter rotation.
- Carefully remove the record.
Pemeliharaan
1. Membersihkan Stylus
The stylus (needle) should be cleaned regularly to ensure optimal sound quality and prevent damage to your records. Use a soft brush designed for stylus cleaning, brushing gently from back to front (away from the cantilever).
2. Pembersihan Catatan
Always handle records by their edges. Use a carbon fiber brush or a dedicated record cleaning solution and cloth to remove dust and debris before each play.
3. Membersihkan Meja Putar
Wipe the turntable chassis and dust cover with a soft, dry, lint-free cloth. For stubborn marks, a slightly damp cloth can be used, followed by a dry cloth. Avoid using harsh chemicals or abrasive cleaners.
4. Dust Cover Care
The dust cover protects your turntable from dust. When not in use, keep the dust cover closed. Clean it gently with a soft, damp cloth to avoid scratching the acrylic surface.
Penyelesaian Masalah
If you experience issues with your Argon Audio TT MK2 Turntable, please consult the following table before contacting support:
| Masalah | Kemungkinan Penyebab | Larutan |
|---|---|---|
| Tidak ada suara atau suara sangat pelan |
|
|
| Suara terdistorsi atau teredam |
|
|
| Piring tidak berputar |
|
|
| Speed issues (too fast/slow) |
|
|
Spesifikasi
| Fitur | Detil |
|---|---|
| Nama Model | TT MK2 |
| Merek | Argon Audio |
| Dimensi (L x D x T) | Ukuran 42x35x12 cm |
| Berat Barang | 4.5 kg |
| Bahan | Engineered Wood, Aluminium |
| Warna | Hitam |
| Kartrid | Audio Technica AT3600 (pre-fitted) |
| Phono Pra-amp | Built-in, switchable (RIAA ON/OFF) |
| Kecepatan Rotasi | 33 1/3 RPM, 45 RPM (electronic speed selection) |
| Konektivitas | Keluaran RCA |
| Komponen yang Termasuk | Turntable, Audio Technica AT3600 Cartridge, Dust Lid, RCA Cable, Power Adapter |
| Pabrikan | Argon Audio |
| Negara Asal | Denmark |
Garansi dan Dukungan
Argon Audio products are designed and manufactured to the highest quality standards. This product is covered by a manufacturer's warranty. Please refer to the warranty card included with your product or visit the official Argon Audio websitus untuk mengetahui syarat dan ketentuan garansi secara terperinci.
For technical support, troubleshooting assistance beyond this manual, or warranty claims, please contact your authorized Argon Audio dealer or Argon Audio customer service directly. Contact information can typically be found on the Argon Audio weblokasi.