1. Pendahuluan
The SPL 2Control is a compact and user-friendly stereo monitor controller designed to provide comprehensive control over your digital audio workstation's (DAW) monitoring functions. It ensures high-quality audio reproduction through both studio monitors and headphones, allowing you to hear every detail of your mix. Key features include a precise speaker volume potentiometer, active circuitry for sound integrity, and a unique Crossfeed control for accurate headphone monitoring that simulates a stereo speaker image.
2. Petunjuk Keselamatan
- Bacalah petunjuk ini dengan saksama sebelum mengoperasikan perangkat.
- Simpan manual ini untuk referensi di masa mendatang.
- Jangan biarkan unit terkena hujan atau kelembapan untuk mencegah kebakaran atau sengatan listrik.
- Pastikan ventilasi yang baik; jangan halangi lubang ventilasi apa pun.
- Gunakan hanya perlengkapan/aksesoris yang ditentukan oleh produsen.
- Cabut kabel daya saat terjadi badai petir atau bila tidak digunakan dalam jangka waktu lama.
- Serahkan semua servis kepada teknisi servis yang berkualifikasi.
- Hindari menempatkan unit di dekat sumber panas seperti radiator, ventilasi pemanas, kompor, atau peralatan lainnya (termasuk amppengangkat) yang menghasilkan panas.
3. Isi Paket
Saat membongkar kemasan, harap verifikasi bahwa item berikut disertakan:
- 1 x SPL 2Control Module
- 1 x Kabel Daya
- Panduan Pengguna ini
4. Produk Lebihview
4.1 Kontrol dan Indikator Panel Depan
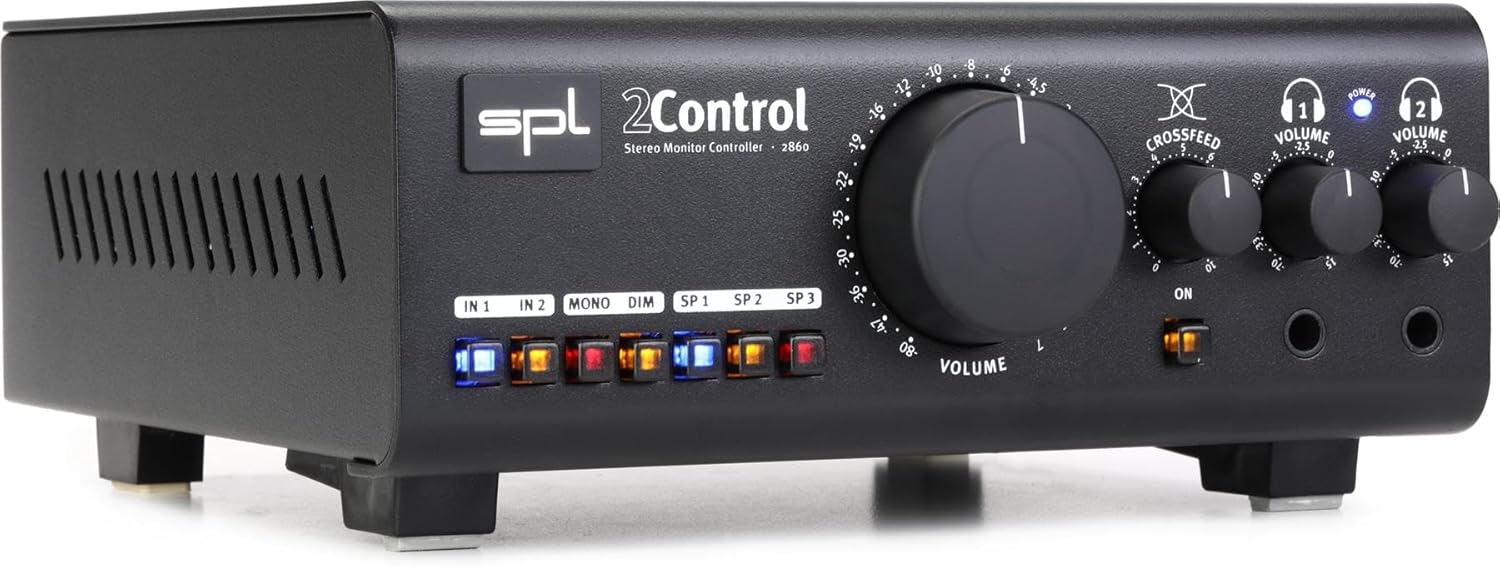
Gambar 1: Front Panel of the SPL 2Control Stereo Monitor Controller.
This image displays the front panel of the SPL 2Control. From left to right, it features input selection buttons (IN 1, IN 2), function buttons (MONO, DIM), speaker output selection buttons (SP 1, SP 2, SP 3), a large central master VOLUME knob, a CROSSFEED knob, and two individual headphone VOLUME knobs with corresponding headphone output jacks. A power indicator LED is visible above the headphone controls.
- IN 1 / IN 2 Buttons: Selects the active stereo input source.
- MONO Button: Sums the stereo signal to mono for compatibility checking.
- Tombol DIM: Reduces the output volume by a fixed amount (e.g., -20dB) for temporary level reduction.
- SP 1 / SP 2 / SP 3 Buttons: Selects the active stereo speaker output pair.
- Tombol VOLUME: Master volume control for selected speaker outputs.
- CROSSFEED Knob: Adjusts the stereo panorama for headphone monitoring to simulate a speaker listening environment.
- HEADPHONE VOLUME 1 / 2 Knobs: Independent volume controls for the two headphone outputs.
- HEADPHONE 1 / 2 Jacks: 1/4-inch stereo headphone outputs.
- LED DAYA: Menunjukkan bahwa unit dalam keadaan menyala.
4.2 Rear Panel Connections (Inferred)
The rear panel typically houses the audio input and output connections, as well as the power input. Based on common audio equipment and product specifications, you can expect:
- Input Analog: Balanced XLR or TRS inputs for connecting your audio interface or mixer.
- Keluaran Pembicara: Multiple sets of balanced XLR or TRS outputs for connecting up to three pairs of studio monitors.
- Masukan Daya: Konektor untuk kabel daya yang disertakan.
5. Pengaturan
- Penempatan: Position the SPL 2Control on a stable, flat surface, ensuring adequate ventilation around the unit.
- Sambungan Daya: Connect the provided power cord to the power input on the rear panel of the 2Control and then to a suitable AC power outlet.
- Koneksi Input: Connect the stereo outputs of your audio interface, mixer, or other audio source to the IN 1 and/or IN 2 inputs on the rear panel using balanced XLR or TRS cables.
- Koneksi Pembicara: Connect your studio monitors to the SP 1, SP 2, and/or SP 3 outputs on the rear panel using balanced XLR or TRS cables. Ensure correct left and right channel connections.
- Headphone Connections: Plug your headphones into the HEADPHONE 1 and/or HEADPHONE 2 jacks on the front panel.
- Nyalakan Daya Pertama: Ensure all volume controls are set to their minimum positions before powering on the unit. Then, connect the power cord to the wall outlet. The POWER LED on the front panel will illuminate.
6. Petunjuk Pengoperasian
- Memilih Masukan: Tekan salah satu tombol DI 1 or DI 2 button to select your desired audio source. The active button will illuminate.
- Selecting Speaker Outputs: Tekan tombol SP 1, SP 2, atau SP 3 button to route the audio to the corresponding pair of studio monitors. Only one speaker output can be active at a time.
- Mengatur Volume Utama: Slowly turn the large VOLUME knob clockwise to increase the listening level for the selected speaker outputs. Turn counter-clockwise to decrease.
- Penjumlahan Mono: Tekan tombol MONO button to sum the stereo signal to mono. This is useful for checking phase compatibility and mix balance. Press again to return to stereo.
- Fungsi Redup: Tekan tombol REDUP button to temporarily reduce the output volume. This is useful for quick conversations or when you need to lower the volume without losing your main volume setting. Press again to restore the original volume.
- Pemantauan Headphone:
- Plug your headphones into the desired headphone jack (HEADPHONE 1 or 2).
- Sesuaikan individu HEADPHONE VOLUME 1 or 2 knob to set the listening level for your headphones.
- Gunakan umpan silang knob to adjust the stereo image for headphone listening. Turning it clockwise increases the crossfeed, simulating a more natural speaker-like stereo field by blending the left and right channels slightly.
7. Pemeliharaan
- Pembersihan: Gunakan kain lembut dan kering untuk membersihkan bagian luar unit. Jangan gunakan cairan pembersih atau pelarut.
- Ventilasi: Ensure that the ventilation slots are kept clear of dust and debris to prevent overheating.
- Penyimpanan: Jika menyimpan unit untuk jangka waktu lama, cabut dari listrik dan simpan di tempat yang sejuk dan kering.
8. Penyelesaian masalah
| Masalah | Kemungkinan Penyebab | Larutan |
|---|---|---|
| Tidak ada suara dari speaker. |
|
|
| Tidak ada suara dari headphone. |
|
|
| Audio terdistorsi. |
|
|
9. Spesifikasi
| Fitur | Detil |
|---|---|
| Nama Model | 2 Control (also known as 2860) |
| Merek | Bahasa Inggris |
| Jenis Pembicara | Memantau |
| Penggunaan yang Direkomendasikan | Control, Volume for Monitors |
| Perangkat yang Kompatibel | Monitors, Speakers |
| Konfigurasi Saluran Suara Surround | 2.0 |
| Warna | Hitam |
| Komponen yang Termasuk | 1 x SPL Control Module |
| Dimensi Produk (P x L x T) | 8.66" x 8.46" x 3.15" |
| Berat Barang | 7.06 pon (sekitar 3.2 kg) |
| Sumber Daya | Listrik Kabel |
| Teknologi Konektivitas | TRS, XLR |
| Mode Keluaran Audio | Stereo |
| Jenis Pemasangan | Dudukan Meja |
| Pabrikan | Sound Performance Lab |
10. Garansi dan Dukungan
The SPL 2Control Monitor Controller comes with a limited warranty. For specific warranty terms, duration, and conditions, please refer to the documentation provided with your purchase or visit the official SPL website. For technical support, service, or inquiries, please contact the manufacturer, Sound Performance Lab, or your authorized dealer.
Pabrikan: Sound Performance Lab


