1. Pendahuluan
This manual provides essential information for the proper setup, operation, and maintenance of your Thorens TD-235 Semi-automatic Turntable. Please read these instructions carefully before using your turntable to ensure optimal performance and longevity of the unit.
2. Petunjuk Keselamatan
- Jangan biarkan unit terkena hujan atau kelembapan.
- Jangan membuka kabinet. Serahkan semua perbaikan kepada personel yang berkualifikasi.
- Pastikan meja putar diletakkan di permukaan yang stabil dan rata, jauh dari sinar matahari langsung, sumber panas, dan getaran berlebihan.
- Cabut kabel daya dari stopkontak di dinding jika unit tidak akan digunakan dalam jangka waktu lama.
- Handle the stylus with care to prevent damage and ensure proper playback.
3. Isi Paket
Pastikan semua barang yang tercantum di bawah ini ada di dalam kemasan:
- Thorens TD-235 Turntable Unit
- Penutup Debu
- Piring
- Sabuk berkendara
- Merasa Mat
- Pengimbang
- Berat anti-skating
- Adaptor Daya
- Kabel Audio (RCA)
- AT-95E Cartridge (pre-installed or separate)
- User Manual (dokumen ini)
4. Pengaturan
4.1 Pembongkaran dan Penempatan
Carefully remove all components from the packaging. Place the turntable on a flat, stable surface. Ensure adequate ventilation around the unit.
4.2 Pemasangan Piringan dan Sabuk
- Letakkan piring saji di atas poros tengah.
- Locate the drive belt. Carefully stretch the belt around the inner rim of the platter and then around the motor pulley. Ensure the belt is not twisted.
- Letakkan alas kain kempa di atas piring.

Gambar: Atas-bawah view of the Thorens TD-235 turntable with the dust cover closed, illustrating the assembled unit.
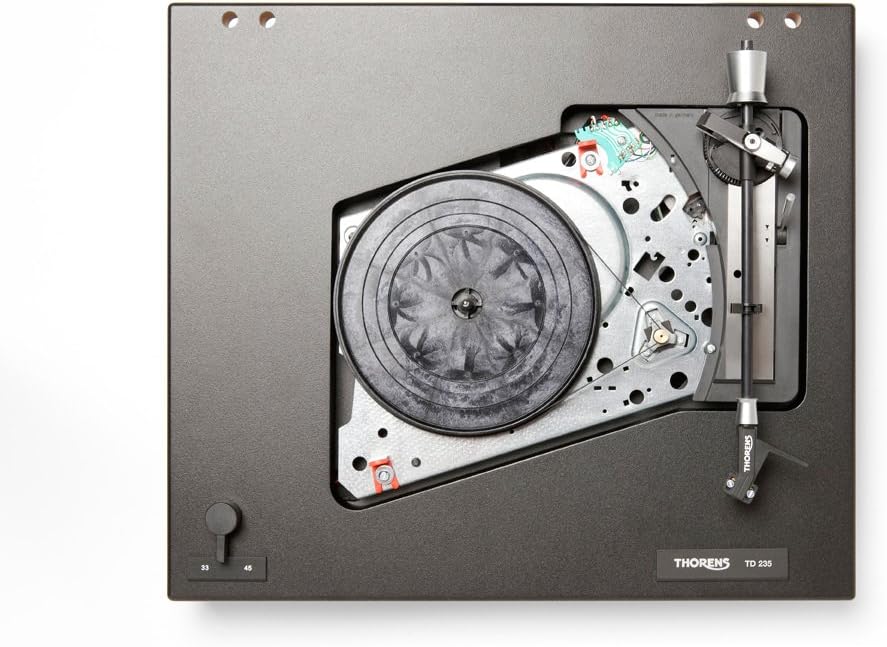
Gambar: Internal view of the Thorens TD-235 turntable with the platter removed, showing the motor and belt drive system for installation reference.
4.3 Pengaturan Kartrid dan Lengan Tonearm
The TD-235 typically comes with an AT-95E cartridge pre-installed. If not, carefully mount the cartridge to the headshell following the cartridge manufacturer's instructions.
- Counterweight Adjustment: Slide the counterweight onto the rear of the tonearm. Adjust it until the tonearm is balanced and floats horizontally. Lock the counterweight in place.
- Tracking Force Setting: Refer to the cartridge specifications (e.g., 2.0 grams for AT-95E). Rotate the numbered ring on the counterweight to the desired tracking force without moving the counterweight itself.
- Anti-skating Adjustment: Attach the anti-skating weight to the small fishing line and loop it over the anti-skating rod. Set the anti-skating force to match the tracking force.

Gambar: Detail view of the tonearm assembly, highlighting the cartridge, counterweight, and anti-skating system for precise adjustment.
4.4 Pemasangan Penutup Debu
Insert the hinges of the dust cover into the receptacles at the rear of the turntable plinth.
4.5 Koneksi Audio dan Daya
- Connect the integrated RCA audio cables from the turntable to the PHONO input of your amplifier or receiver. Ensure the ground wire is connected to the ground terminal on your amppengangkat.
- Connect the power adapter to the DC input on the turntable and then plug it into a wall outlet.
5. Petunjuk Pengoperasian
5.1 Menghidupkan/Mematikan
The turntable powers on automatically when the tonearm is moved over the platter and powers off when the tonearm returns to its rest or after the record finishes playing.
5.2 Pemilihan Kecepatan
Use the speed selector switch, typically located on the front left of the plinth, to choose between 33 1/3 RPM for LPs and 45 RPM for singles. Ensure the correct speed is selected for the record you are playing.
5.3 Memutar Rekaman
- Letakkan piringan hitam di atas alas berbahan felt di atas piringan putar.
- Lepaskan lengan tonearm dari penyangganya.
- Angkat lengan pemutar piringan hitam secara perlahan menggunakan tuas pengatur posisi.
- Move the tonearm over the desired starting groove of the record. The platter should begin to spin automatically.
- Lower the cueing lever slowly to allow the stylus to descend onto the record.

Image: The Thorens TD-235 turntable with its dust cover open, ready for operation, displaying the main components.
5.4 Menghentikan Pemutaran
When the record reaches the end of the last track, the tonearm will automatically lift and return to its rest, and the platter will stop spinning. To stop playback manually:
- Angkat lengan tonearm menggunakan tuas pengatur posisi.
- Gently guide the tonearm back to its rest.
- Turunkan tuas pengatur isyarat.
- Lock the tonearm in its rest position. The platter should stop spinning shortly after.
6. Pemeliharaan
6.1 Membersihkan Stylus
Regularly clean the stylus using a soft brush designed for stylus cleaning, brushing gently from back to front. A dirty stylus can degrade sound quality and damage records.
6.2 Pembersihan Catatan
Keep your records clean to prevent dust and debris from accumulating on the stylus. Use a carbon fiber brush or a record cleaning solution and cloth before each play.
6.3 Membersihkan Meja Putar
Wipe the plinth and dust cover with a soft, dry, lint-free cloth. For stubborn marks, a slightly damp cloth can be used, followed by a dry cloth. Avoid harsh chemicals or abrasive cleaners.
6.4 Drive Belt Replacement
The drive belt may stretch or degrade over time, affecting speed stability. Replace the belt if you notice inconsistent speed or if it appears worn. Refer to section 4.2 for installation.
7. Penyelesaian masalah
| Masalah | Kemungkinan Penyebab | Larutan |
|---|---|---|
| Tidak ada suara atau volume rendah | Salah amplifier input, loose connections, damaged stylus/cartridge. | Ensure RCA cables are securely connected to the PHONO input. Check ground wire. Inspect stylus for damage. |
| Suara terdistorsi | Dirty stylus, incorrect tracking force/anti-skating, damaged record. | Clean stylus. Re-adjust tracking force and anti-skating. Try a different record. |
| Kecepatan pemutaran tidak tepat | Wrong speed selected, worn drive belt. | Verify speed selector switch. Inspect and replace drive belt if necessary. |
| Platter does not spin automatically | Tonearm not moved far enough over platter, power issue. | Ensure tonearm is moved fully over the record area. Check power connection. |
| Automatic stop/return not working | Mechanism obstruction, internal issue. | Ensure no physical obstructions. If problem persists, contact Thorens support. |
8. Spesifikasi
- Model: Thorens TD-235
- Jenis: Semi-automatic Turntable
- Tipe Motor: Motor arus searah
- Kecepatan: 33 1/3, 45 RPM
- Kartrid: AT-95E (included)
- Format Sinyal: Analog
- Sinyal untuk rasio kebisingan: 72dB
- Sumber Daya: Listrik Kabel
- Dimensi Produk: 16.14 x 13.39 x 5.12 inci (410 x 340 x 130 mm)
- Berat Barang: 14.77 pon (6.7 kg)
- Pabrikan: Thorens
9. Garansi dan Dukungan
Thorens products are covered by a manufacturer's warranty. Please refer to the warranty card included with your product or visit the official Thorens website for detailed warranty terms and conditions. For technical support or service inquiries, please contact your authorized Thorens dealer or the Thorens customer service department.
For further assistance, you may visit the official Thorens weblokasi: www.thorens.com


