1. Pendahuluan
This manual provides detailed instructions for the proper installation and maintenance of your Metra 99-3303 Vehicle Radio Mount. This product is designed to facilitate the installation of an aftermarket single DIN or double DIN car stereo into specific vehicles, providing a factory-like finish and secure mounting. Please read all instructions carefully before beginning the installation process.
2. Informasi Keselamatan
- Selalu lepaskan terminal negatif baterai kendaraan sebelum memulai instalasi listrik apa pun untuk mencegah korsleting dan kerusakan.
- Pastikan semua sambungan kabel terpasang dengan aman dan terisolasi dengan benar untuk menghindari bahaya listrik.
- Refer to your vehicle's service manual for specific dashboard disassembly and reassembly procedures.
- If you are unsure about any part of the installation, consult a qualified professional installer.
- Gunakan perlengkapan keselamatan yang sesuai, seperti sarung tangan dan pelindung mata, selama pemasangan.
3. Isi Paket
Verify that all components are present before beginning installation. The Metra 99-3303 kit typically includes:
- Main Dash Bezel / Trim Panel
- Radio Mounting Brackets (left and right)
- Wiring Harness Adapter (vehicle-specific)
- Antenna Adapter (if required for vehicle)
- Hardware Pack (screws, clips, etc.)
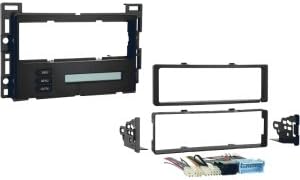
Gambar 1: This image displays the various components typically included in the Metra 99-3303 vehicle radio mount kit. It shows the main dash bezel, side mounting brackets, and a wiring harness adapter, designed to integrate an aftermarket radio into a vehicle's dashboard.
4. Alat yang Dibutuhkan
The following tools are generally required for installation:
- Alat Penghapusan Panel
- Obeng Kepala Phillips
- Obeng Kepala Datar
- Wire Strippers/Crimpers
- Tape Listrik atau Heat Shrink Tubing
- Small Socket Set (optional, depending on vehicle)
5. Pengaturan dan Instalasi
Follow these general steps for installing the Metra 99-3303 radio mount. Specific vehicle disassembly steps may vary.
- Persiapan Kendaraan: Lepaskan terminal negatif baterai kendaraan Anda.
- Dashboard Disassembly: Carefully remove the factory dash trim panels and any necessary components to access the factory radio. Use a panel removal tool to avoid scratching surfaces.
- Factory Radio Removal: Unbolt and remove the factory radio from the dashboard. Disconnect all wiring harnesses and the antenna cable from the back of the radio.
- Mount Assembly (to Aftermarket Radio): Attach the Metra mounting brackets to your new aftermarket radio using the screws provided with the radio or the Metra kit. Ensure the radio is centered and flush with the front of the brackets.
- Koneksi Kabel: Connect the Metra wiring harness adapter to your aftermarket radio's wiring harness. Match wire colors (e.g., yellow to yellow for constant power, red to red for accessory power, black to black for ground). Solder or crimp connections for reliability and insulate them properly. Connect the antenna adapter if needed.
- Install Radio and Mount: Slide the assembled aftermarket radio and Metra mount into the vehicle's dash opening. Secure the mount using the factory mounting points or hardware provided.
- Uji Koneksi: Before reassembling the dash, reconnect the vehicle's negative battery terminal. Turn on the vehicle and test the aftermarket radio's functionality (power, audio, balance, fader, radio reception, etc.).
- Dashboard Reassembly: Once all functions are verified, disconnect the battery again. Reinstall all removed dash panels and components in reverse order of removal. Reconnect the battery.
6. Operasi
The Metra 99-3303 is a passive mounting solution. Its primary function is to securely house your aftermarket car stereo within the vehicle's dashboard, providing a stable and aesthetically integrated platform. Once installed, the operation of your car audio system will be governed by the features and controls of your aftermarket radio itself. The mount ensures that the radio is held firmly in place and that the dash retains a factory-like appearance.
7. Pemeliharaan
The Metra 99-3303 radio mount requires minimal maintenance:
- Periodically inspect the mounting screws and connections to ensure they remain tight and secure.
- Clean the visible surfaces of the dash kit with a soft, damp kain. Hindari bahan kimia keras yang dapat merusak lapisan akhir.
- If any part of the mount becomes loose or damaged, address it promptly to prevent rattling or potential damage to the radio.
8. Penyelesaian masalah
Most issues related to an aftermarket radio installation are typically electrical or related to the radio unit itself. However, if you encounter problems that might be related to the mount:
- Longgar/Berderak: Ensure all mounting screws are tightened. Verify that the radio is properly seated within the mounting brackets and that the dash bezel is securely clipped into place.
- Gaps Around Radio: Double-check that the radio is pushed fully into the mount and that the dash bezel is correctly aligned and snapped into the dashboard.
- Radio Tidak Menyala: While often a wiring issue, ensure the radio is fully seated and making proper contact with the wiring harness. Re-check all electrical connections.
For electrical or radio-specific issues, refer to your aftermarket radio's instruction manual or consult a professional.
9. Spesifikasi
- Merek: Bahasa Indonesia: Metra
- Nomor Model: Nomor telepon 99-3303
- Nomor Bagian Pabrikan: BTL5002-KV0586
- Berat Barang: 1.5 pon (perkiraan)
- Dimensi Paket: 14.06 x 12.03 x 12.02 inci (perkiraan)
- ASIN: B007W7Z8II
- Kesesuaian: Designed for specific vehicle applications (refer to product packaging or Metra website for exact vehicle fitment).
10. Garansi dan Dukungan
Warranty information for Metra products is typically provided by the manufacturer and may vary. Please refer to the documentation included with your specific product or visit the official Metra website for the most current warranty details and support options. For technical assistance or inquiries regarding your Metra 99-3303 Vehicle Radio Mount, it is recommended to contact Metra customer support directly.
Metra Elektronik: www.metraonline.com


