1. Pendahuluan
This manual provides detailed instructions for the setup, operation, and maintenance of your Vibe Axcess 5-in-1 Universal Remote. Please read this manual thoroughly before using the remote control to ensure proper functionality and to maximize your user experience. This remote is designed to control up to five different audio/video devices.
2. Produk Lebihview
The Vibe Axcess 5-in-1 Universal Remote is designed to consolidate control of multiple home entertainment devices into a single unit. It features dedicated buttons for various functions and device types.
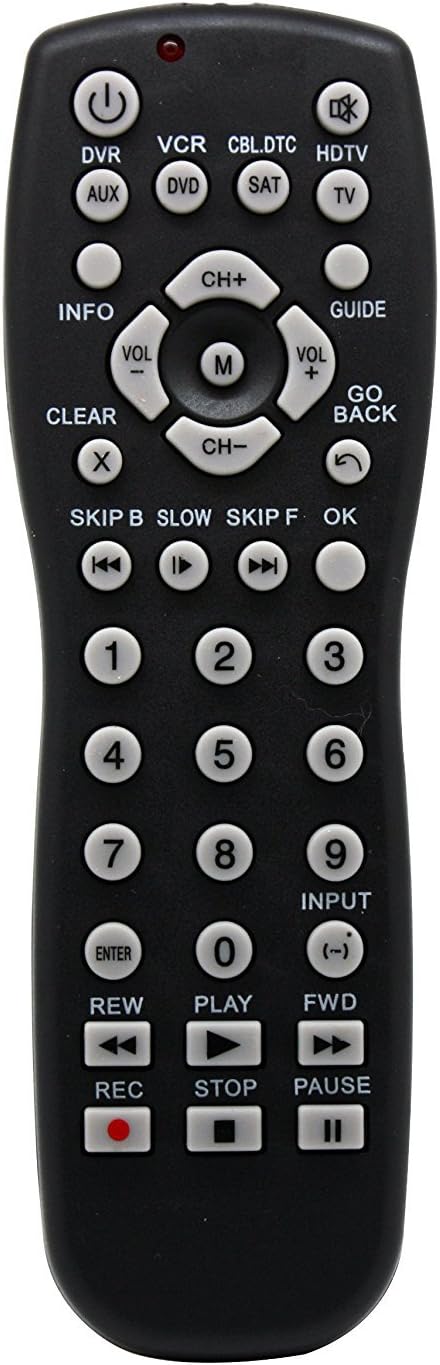
Gambar 1: Depan view of the Vibe Axcess 5-in-1 Universal Remote. This image displays the remote's layout, including device selection buttons (DVR, VCR, CBL.DTC, HDTV, AUX, DVD, SAT, TV), navigation pad, number keys, and media control buttons (REW, PLAY, FWD, REC, STOP, PAUSE).

Gambar 2: Packaging of the Vibe Axcess 5-in-1 Universal Remote. The packaging highlights the remote's 5-in-1 capability and compatibility with various device types such as DVD/VCR, HDTV, DVD, AUX, and CBL/SAT/CABLE.
3. Pengaturan
3.1 Pemasangan Baterai
- Temukan penutup kompartemen baterai di bagian belakang remote control.
- Geser penutup ke bawah atau tekan kait dan angkat untuk membukanya.
- Masukkan dua (2) baterai AAA, pastikan terminal positif (+) dan negatif (-) sesuai dengan diagram di dalam kompartemen.
- Pasang kembali penutup ruang baterai, geser kembali ke tempatnya hingga terkunci dengan aman.
Catatan: Always use fresh batteries and replace both batteries at the same time. Do not mix old and new batteries or different types of batteries.
3.2 Memprogram Remote Control
To control your devices, the universal remote must be programmed with the correct codes for each device. There are typically two methods for programming:
3.2.1 Entri Kode Langsung
This method involves entering a specific code from a code list (usually provided with the remote or available online) for your device's brand.
- Nyalakan perangkat yang ingin Anda kendalikan (misalnya, TV, pemutar DVD).
- Press and hold the desired device button on the remote (e.g., TV, DVD) for approximately 3 seconds until the indicator light (usually red) illuminates and stays on.
- While the indicator light is on, enter the 3-digit or 4-digit code for your device's brand using the number keys.
- If the code is valid, the indicator light will turn off. If the light flashes and remains on, the code was invalid; re-enter the code.
- Uji remote dengan menekan tombol KEKUATAN button. If the device turns off, the code is correct. If not, try the next code listed for your brand.
3.2.2 Pencarian Kode Otomatis
If you cannot find a code or direct code entry fails, use the auto code search method.
- Nyalakan perangkat yang ingin Anda kontrol.
- Press and hold the desired device button (e.g., TV) for approximately 3 seconds until the indicator light illuminates and stays on.
- While holding the device button, press the KEKUATAN button once. The indicator light will start flashing, indicating it is searching for a code.
- Point the remote at the device and wait for the device to turn off. This may take several minutes as the remote cycles through codes.
- Setelah perangkat mati, segera tekan tombol MEMASUKI Tekan tombol untuk menyimpan kode. Lampu indikator akan mati.
- Test the remote's functions. If some functions do not work, repeat the auto search process to find a more compatible code.
4. Petunjuk Pengoperasian
Once programmed, operating your Vibe Axcess 5-in-1 Universal Remote is straightforward.
- Pilih alat: Tekan tombol perangkat yang sesuai (misalnya, TV, DVD, CBL.DTC) for the device you wish to control. The indicator light will briefly illuminate to confirm selection.
- Daya Hidup/Mati: Tekan tombol KEKUATAN Tombol untuk menghidupkan atau mematikan perangkat yang dipilih.
- Kontrol Volume: Gunakan VOL+ Dan VOL- tombol untuk mengatur volume.
- Kontrol Saluran: Gunakan Bahasa Indonesia: CH+ Dan Bahasa Indonesia: CH- tombol untuk mengubah saluran.
- Tombol Angka: Use the number keys (0-9) to directly enter channel numbers or other numerical inputs.
- Navigasi: Use the directional pad (up, down, left, right) and OK button for menu navigation.
- Kontrol Media: Menggunakan BERMAIN, BERHENTI SEBENTAR, BERHENTI, MENGEMBALIKAN, Maju cepat, Dan REKAM for controlling media playback on compatible devices.
5. Pemeliharaan
5.1 Pembersihan
To clean your remote, gently wipe it with a soft, dry cloth. Do not use abrasive cleaners, solvents, or harsh chemicals, as these can damage the remote's finish or internal components.
5.2 Penggantian Baterai
When the remote's performance degrades or the indicator light fails to illuminate, it is time to replace the batteries. Follow the battery installation steps in Section 3.1. Dispose of used batteries responsibly according to local regulations.
6. Penyelesaian masalah
- Remote tidak berfungsi:
- Periksa apakah baterai terpasang dengan benar dan tidak habis dayanya. Ganti jika perlu.
- Pastikan Anda telah memilih tombol perangkat yang benar (misalnya, TV (untuk televisi Anda).
- Verify that the remote is programmed with the correct code for your device. Re-program if unsure.
- Pastikan tidak ada penghalang antara remote dan sensor inframerah perangkat.
- Beberapa fungsi tidak berfungsi:
- Some universal remote codes may not support all original remote functions. Try another code for your device brand using the programming steps.
- Ensure the device you are trying to control supports the specific function (e.g., not all TVs have a dedicated 'INFO' button function).
- Lampu indikator tidak menyala:
- Periksa dan ganti baterai.
- If the issue persists after battery replacement, the remote may be faulty.
7. Spesifikasi
- Model: OT795-KO
- Merek: Atmosfer
- Dimensi Produk: 10.7x4x0.8 inci
- Berat Barang: 4 ons
- Baterai: Diperlukan 2 baterai AAA (tidak termasuk)
- Jumlah Maksimum Perangkat yang Didukung: 5
- Teknologi Konektivitas: Inframerah
- Fitur Khusus: Universal
8. Garansi dan Dukungan
For information regarding warranty coverage or technical support, please refer to the documentation included with your purchase or contact the retailer where the product was acquired. Specific warranty terms may vary.


