1. Pendahuluan
This manual provides essential information for the safe and efficient use of your Hitachi CP-EX251N XGA 3LCD Projector. Please read this manual thoroughly before operating the projector and keep it for future reference. The CP-EX251N is designed for clear, bright projections with 2700 lumens brightness and XGA (1024x768) native resolution, featuring 3LCD technology and a long-life lamp.
2. Informasi Keselamatan
Perhatikan tindakan pencegahan keselamatan berikut untuk mencegah kebakaran, sengatan listrik, atau cedera.
- Sumber Daya: Use only the power supply specified for this unit. Ensure the power cord is securely plugged into an outlet.
- Ventilasi: Jangan halangi lubang ventilasi. Pastikan ada ruang yang cukup di sekitar proyektor untuk aliran udara yang lancar guna mencegah panas berlebih.
- Panas: Proyektor lamp becomes very hot during operation. Allow the projector to cool down before handling or performing maintenance.
- Lamp: Jangan melihat langsung ke lensa proyektor saat lampuamp menyala, karena cahaya terang dapat merusak mata Anda.
- Kelembaban: Jangan biarkan proyektor terkena hujan atau lembab untuk mencegah kebakaran atau sengatan listrik.
- Pelayanan: Serahkan semua perbaikan kepada teknisi servis yang berkualifikasi. Jangan mencoba membuka atau memperbaiki proyektor sendiri.
3. Isi Paket
Verifikasi bahwa semua item ada dalam paket:
- Hitachi CP-EX251N Projector
- Kabel Listrik
- Kontrol Jarak Jauh dengan Baterai
- Kabel VGA
- User Manual (dokumen ini)
4. Produk Lebihview

Gambar 4.1: Sudut view of the Hitachi CP-EX251N Projector, showing the lens, control panel, and ventilation.
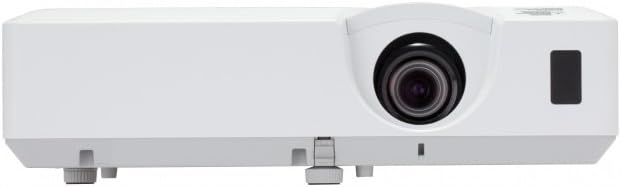
Gambar 4.2: Depan view of the Hitachi CP-EX251N Projector, highlighting the projection lens and front IR receiver.
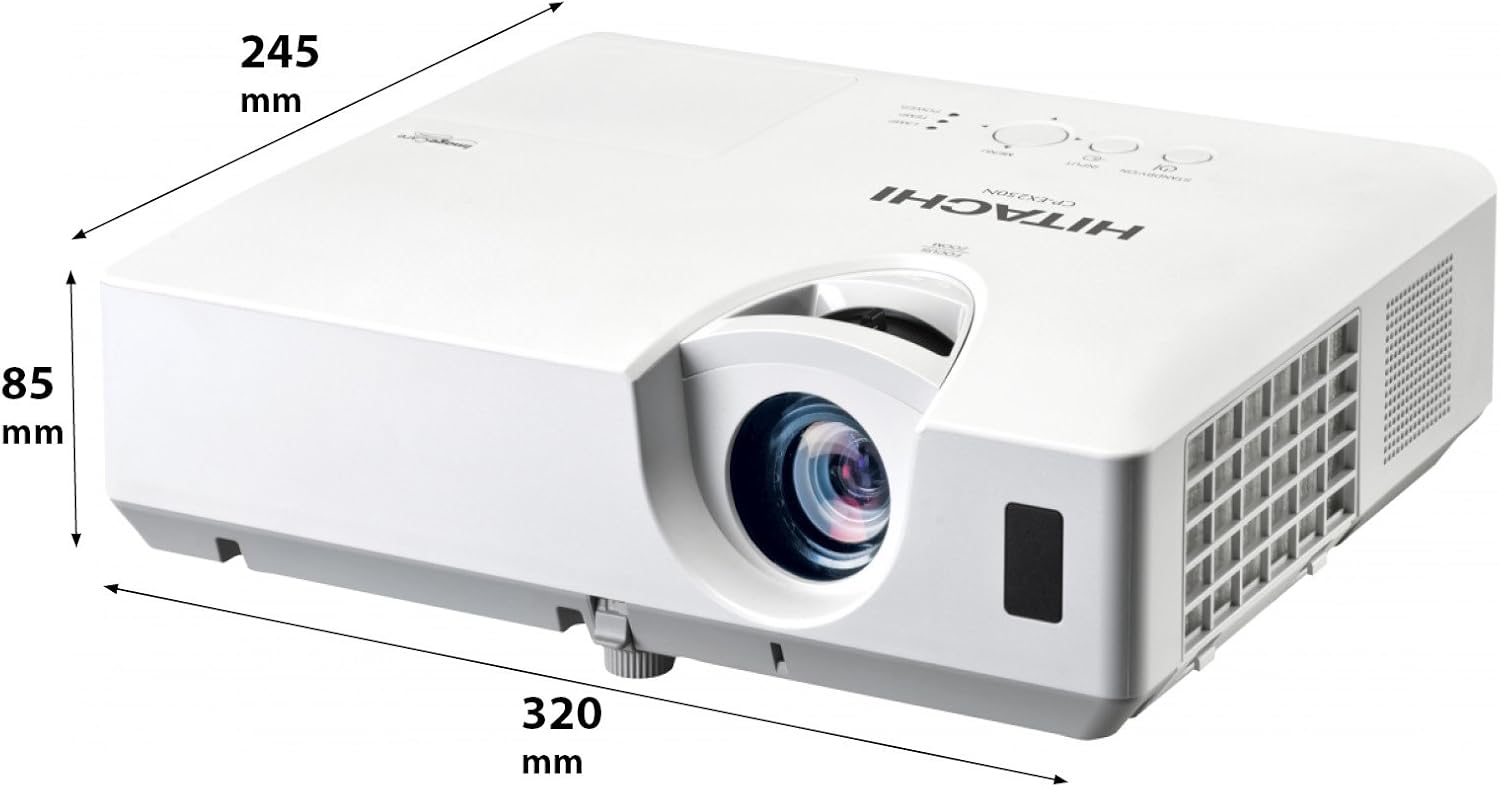
Gambar 4.3: Sudut view of the projector illustrating its approximate dimensions (320mm length, 245mm width, 85mm height).
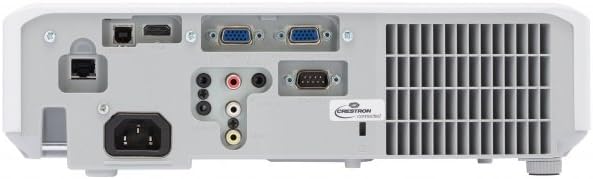
Figure 4.4: Rear panel of the projector, showing various input and output ports including HDMI, VGA, Composite, RS232C, and RJ45.
5. Pengaturan
5.1 Penempatan
Position the projector on a stable, flat surface or mount it securely. Ensure the projector is at an appropriate distance from the screen to achieve the desired image size. Maintain clear space around the projector for ventilation.
5.2 Menghubungkan Daya
- Hubungkan kabel daya ke soket AC proyektor.
- Colokkan ujung kabel daya yang lain ke stopkontak yang diarde.
5.3 Menghubungkan Sumber Input
The CP-EX251N offers multiple connectivity options:
- HDMI: Connect an HDMI cable from your source device (e.g., laptop, Blu-ray player) to the projector's HDMI port.
- VGA: Connect a VGA cable from your computer to one of the projector's VGA ports (VGA1 or VGA2).
- Video Komposit: Use an RCA composite video cable to connect devices like DVD players to the composite video input.
- Suara: Connect audio cables to the corresponding audio input jacks if using analog video sources.
- Kontrol: For remote control and monitoring, connect an RS232C serial cable or an RJ45 Ethernet cable to a control system.
5.4 Pengaktifan Awal dan Penyesuaian Gambar
- Press the Power button on the projector or remote control. The power indicator will light up.
- Sesuaikan Cincin Fokus on the lens until the image is sharp.
- Sesuaikan Cincin Zoom on the lens to achieve the desired image size.
- Jika gambarnya berbentuk trapesium, gunakan Koreksi Keystone function (usually found in the projector menu or via dedicated buttons on the remote) to square the image.
6. Operasi
6.1 Daya Hidup/Mati
- Untuk menghidupkan: Tekan tombol Daya sekali.
- Untuk mematikan: Press the Power button twice. The projector will enter a cooling cycle before shutting down completely. Do not unplug the projector during the cooling cycle.
6.2 Pilihan Masukan
Press the 'Input' or 'Source' button on the remote control or projector control panel to cycle through available input sources (HDMI, VGA1, VGA2, Composite).
6.3 Navigasi Menu
Use the 'Menu' button to access the on-screen display (OSD) menu. Navigate using the arrow buttons and confirm selections with the 'Enter' button. The menu allows adjustment of picture settings, audio, display options, and system settings.
6.4 Penyesuaian Gambar
Di dalam menu OSD, Anda dapat menyesuaikan:
- Kecerahan: Sesuaikan kecerahan atau kegelapan keseluruhan gambar.
- Kontras: Adjust the difference between the light and dark areas of the image.
- Mode Warna: Select from various preset modes (e.g., Standard, Dynamic, Cinema, sRGB) or customize settings.
- Rasio Aspek: Change the display ratio (e.g., 4:3, 16:9).
6.5 Mode Eco
Activate Eco Mode to reduce lamp brightness, conserve energy, and extend lamp life up to 10,000 hours. This setting can be found in the projector's OSD menu.
7. Pemeliharaan
7.1 Membersihkan Lensa
Usap lensa proyektor secara perlahan menggunakan kain lembut bebas serat yang dirancang khusus untuk permukaan optik. Jangan gunakan pembersih abrasif atau tenaga berlebihan.
7.2 Membersihkan Filter Udara
Regularly clean the air filter to maintain optimal performance and prevent overheating. Refer to the projector's OSD menu for filter usage time. Remove the filter cover and gently clean the filter with a soft brush or vacuum cleaner. Replace the filter if it is damaged or excessively dirty.
7.3 Lamp Penggantian
Proyektor lamp has a long lifespan, but will eventually require replacement. When the lamp indicator lights up or the image becomes dim, replace the lamp. Always use a genuine Hitachi replacement lamp. Allow the projector to cool completely before attempting lamp replacement. Consult the full service manual for detailed lamp petunjuk penggantian.
7.4 Penyimpanan
When storing the projector for an extended period, ensure it is powered off and cooled down. Store it in a cool, dry place, away from direct sunlight and extreme temperatures.
8. Penyelesaian masalah
| Masalah | Kemungkinan Penyebab | Larutan |
|---|---|---|
| Tidak ada daya | Power cord disconnected; Power outlet faulty; Projector in standby mode. | Check power cord connection; Try a different outlet; Press the Power button. |
| Tidak ada gambar yang ditampilkan | Input source not selected; Cable not connected properly; Source device not outputting signal. | Select correct input source; Reconnect video cable; Check source device settings. |
| Gambar terdistorsi atau buram | Focus/Zoom not adjusted; Keystone not corrected; Projector not perpendicular to screen. | Adjust Focus and Zoom rings; Use Keystone correction; Reposition projector. |
| Tidak ada suara | Audio cable not connected; Volume too low; Mute function active. | Connect audio cable (if applicable); Increase volume; Deactivate mute. |
| Kontrol jarak jauh tidak berfungsi | Baterai habis; Ada penghalang antara remote dan proyektor; Sensor remote terhalang. | Replace batteries; Remove obstructions; Ensure clear line of sight to IR sensor. |
9. Spesifikasi
| Fitur | Spesifikasi |
|---|---|
| Nomor Model | CP-EX251N |
| Teknologi Tampilan | 3LCD |
| Kecerahan | 2700 lumen cahaya |
| Resolusi Asli | XGA (1024x768) |
| Lamp Kehidupan | Up to 10,000 hours (in Eco Mode) |
| Konektivitas | HDMI x 1, VGA x 2, Component (Shared) x 2, Composite x 1, RS232C, RJ45 |
| Keluaran Audio | Speaker 16W |
| Berat Barang | 6.83 pon (sekitar 3.1 kg) |
| Dimensi Produk | 6 x 12 x 14 inci (sekitar 15.2 x 30.5 x 35.6 cm) |
| Penggunaan yang Direkomendasikan | Bisnis, Pendidikan, Permainan, Sinema Rumah |
| Fitur Khusus | Portabel |
10. Garansi dan Dukungan
For warranty information, please refer to the warranty card included with your product or visit the official Hitachi website. For technical support, service, or inquiries about replacement parts, please contact Hitachi customer service through their official channels.
Dukungan online: www.hitachi.com/support (Mantanample link, please refer to actual product documentation for correct URL)


