1. Pendahuluan
This manual provides detailed instructions for the safe and effective operation of the Extech EX355 True RMS Multimeter. The EX355 is a professional digital multimeter designed for a wide range of electrical measurements, including AC/DC voltage, current, resistance, capacitance, frequency, duty cycle, and temperature. It features True RMS for accurate readings of non-sinusoidal waveforms, Non-Contact Voltage (NCV) detection for enhanced safety, Low Impedance (LoZ) mode to prevent ghost voltage readings, and a Low Pass Filter (LPF) for noise reduction in electrical environments.
Please read this manual thoroughly before using the device to ensure proper function and to prevent potential hazards.
2. Informasi Keselamatan
Always adhere to the following safety precautions to avoid personal injury or damage to the multimeter:
- Baca semua instruksi: Familiarize yourself with the operation and safety features before use.
- Observe all warnings: Pay close attention to all warnings and cautions marked on the meter and in this manual.
- Use proper range: Always select the correct function and range for your measurement.
- Inspect test leads: Before each use, check test leads for damaged insulation or exposed metal. Replace if damaged.
- Do not exceed maximum input limits: Jangan pernah melamartage or current that exceeds the specified maximum limits for the meter.
- Avoid live circuits: Do not measure resistance, continuity, or diode on live circuits.
- Berhati-hatilah dengan volume tinggitagadalah: Be extremely careful when working with voltagJangan gunakan tegangan di atas 60V DC atau 30V AC RMS, karena tegangan tersebut menimbulkan bahaya sengatan listrik.
- Do not operate if damaged: If the meter appears damaged or is not operating properly, discontinue use immediately.
- Penggantian baterai: Ganti baterai segera setelah indikator baterai lemah muncul untuk memastikan pembacaan yang akurat.
- CAT III 600V: This meter is designed for measurements in CAT III 600V environments.
3. Produk Lebihview
The Extech EX355 is a versatile True RMS Multimeter equipped with several advanced features for accurate and safe electrical testing.
Fitur Utama:
- 12 Fungsi Pengukuran: Includes AC/DC voltage, arus, resistansi, kapasitansi, frekuensi, siklus kerja, dan suhu.
- Akurasi RMS Sejati: Ensures precise readings for both standard and distorted electrical waveforms.
- Volume Non-KontaktagDeteksi e (NCV): Allows for quick and safe detection of AC voltage tanpa kontak langsung.
- Mode Impedansi Rendah (LoZ): Prevents false readings caused by ghost voltages in circuits.
- Filter Lolos Rendah (LPF): Reduces high-frequency noise for stable and accurate measurements in noisy environments.
- Menampilkan: 4000 count LCD display with backlight.
- Data Hold, Min/Max, Relative Mode: For capturing and analyzing measurements.
- Mati Otomatis: Menghemat daya baterai.
- Continuity and Diode Test: Penting untuk diagnostik rangkaian.

Figure 1: The Extech EX355 True RMS Multimeter. This image shows the front view of the multimeter, highlighting its display, rotary dial, function buttons, and input jacks.
4. Pengaturan
4.1 Pemasangan Baterai
The Extech EX355 requires two (2) AA batteries for operation. These are typically included with the device.
- Pastikan multimeter dalam keadaan mati.
- Temukan penutup kompartemen baterai di bagian belakang unit.
- Lepaskan sekrup pengunci dan lepaskan penutupnya dengan hati-hati.
- Insert two AA batteries, observing the correct polarity (+ and -) as indicated inside the compartment.
- Pasang kembali penutup kompartemen baterai dan kencangkan dengan sekrup.
Catatan: Replace batteries immediately when the low battery indicator appears on the display to maintain measurement accuracy.
4.2 Menghubungkan Kabel Uji
Always connect the test leads correctly for the desired measurement function.
- Untuk sebagian besar volumetage, resistance, continuity, diode, capacitance, and frequency measurements, insert the red test lead into the VΩHzCAP jack dan kabel uji hitam ke dalam DAPAT mendongkrak.
- For current measurements up to 10A, insert the red test lead into the 10A jack dan kabel uji hitam ke dalam DAPAT mendongkrak.
- For current measurements up to 400mA, insert the red test lead into the mAµA jack dan kabel uji hitam ke dalam DAPAT mendongkrak.
- Ensure test leads are fully inserted into the jacks.
5. Petunjuk Pengoperasian
This section details how to perform various measurements using the Extech EX355 multimeter.
5.1 AC/DC Voltage Pengukuran
- Setel tombol putar ke V~ (AC Voltage) atau V- (DC Jiltage) posisi.
- Hubungkan kabel tes merah ke VΩHzCAP Tes Jack dan Black mengarah ke DAPAT mendongkrak.
- Sentuhkan probe penguji ke titik-titik sirkuit di mana tegangantage harus diukur.
- Baca vol.tagnilai e pada layar.
5.2 Pengukuran Arus AC/DC
Peringatan: Jangan pernah menghubungkan multimeter secara paralel dengan tegangan.tagSaat mengukur arus, selalu hubungkan sumber arus secara seri dengan beban.
- Set the rotary dial to the appropriate A~ (Arus AC) atau A- (DC Current) range (e.g., 10A or mAµA).
- Hubungkan kabel tes merah ke 10A or mAµA Tes Jack dan Black mengarah ke DAPAT mendongkrak.
- Open the circuit where current is to be measured and connect the test probes in series.
- Baca nilai terkini yang ditampilkan.
5.3 Pengukuran Resistansi
Peringatan: Pastikan rangkaian dimatikan sebelum mengukur resistansi.
- Setel tombol putar ke Ω Posisi (resistensi).
- Hubungkan kabel tes merah ke VΩHzCAP Tes Jack dan Black mengarah ke DAPAT mendongkrak.
- Touch the test probes across the component or circuit segment to be measured.
- Baca nilai resistansi di layar.
5.4 Pengukuran Kapasitansi
Peringatan: Discharge capacitors before measuring to prevent damage to the meter.
- Setel tombol putar ke TOPI Posisi (Kapasitansi).
- Hubungkan kabel tes merah ke VΩHzCAP Tes Jack dan Black mengarah ke DAPAT mendongkrak.
- Sentuhkan probe penguji di antara terminal kapasitor.
- Baca nilai kapasitansi pada layar.
5.5 Pengukuran Frekuensi dan Siklus Kerja
- Setel tombol putar ke Hz/% (Frequency/Duty Cycle) position.
- Hubungkan kabel tes merah ke VΩHzCAP Tes Jack dan Black mengarah ke DAPAT mendongkrak.
- Touch the test probes to the signal source.
- Tekan tombol Hz/% button to toggle between frequency and duty cycle readings.
5.6 Pengukuran Suhu
The EX355 includes a general purpose bead wire temperature probe.
- Setel tombol putar ke Suhu Posisi (Suhu).
- Masukkan probe suhu ke dalam VΩHzCAP (positive) and DAPAT (negative) jacks, observing polarity.
- Place the tip of the temperature probe on or in the object to be measured.
- Read the temperature value on the display. The unit can display in Celsius or Fahrenheit.

Figure 2: Using the Extech EX355 to measure temperature in an HVAC vent. The image shows a person holding the multimeter and inserting the temperature probe into an air conditioning vent.
5.7 Non-Kontak Voltage (NCV) Deteksi
NCV mode allows for quick detection of AC voltagtanpa kontak langsung, sehingga meningkatkan keamanan.
- Setel tombol putar ke NCV posisi.
- Move the top of the multimeter near a conductor or outlet.
- The NCV indicator light will illuminate and an audible beep will sound if AC voltage is detected. The intensity of the beep and light may increase with stronger fields.
5.8 Mode Impedansi Rendah (LoZ)
LoZ mode helps eliminate false readings caused by ghost voltagyaitu.
- Setel tombol putar ke LoZ V posisi.
- Connect the test leads as for standard voltage pengukuran.
- The meter will present a low impedance load to the circuit, dissipating ghost voltages and providing a more accurate reading of actual voltage.
5.9 Filter Lolos Rendah (LPF)
The LPF function is used to filter out high-frequency noise, providing stable readings in variable frequency drive (VFD) applications or other noisy electrical environments.
- Set the rotary dial to an AC Voltagadalah (V~) or AC Current (A~) jangkauan.
- Tekan tombol LPF button to activate the low pass filter. The LPF icon will appear on the display.
- Perform your measurement as usual. The meter will now display readings with high-frequency noise attenuated.
- Tekan tombol LPF button again to deactivate the filter.
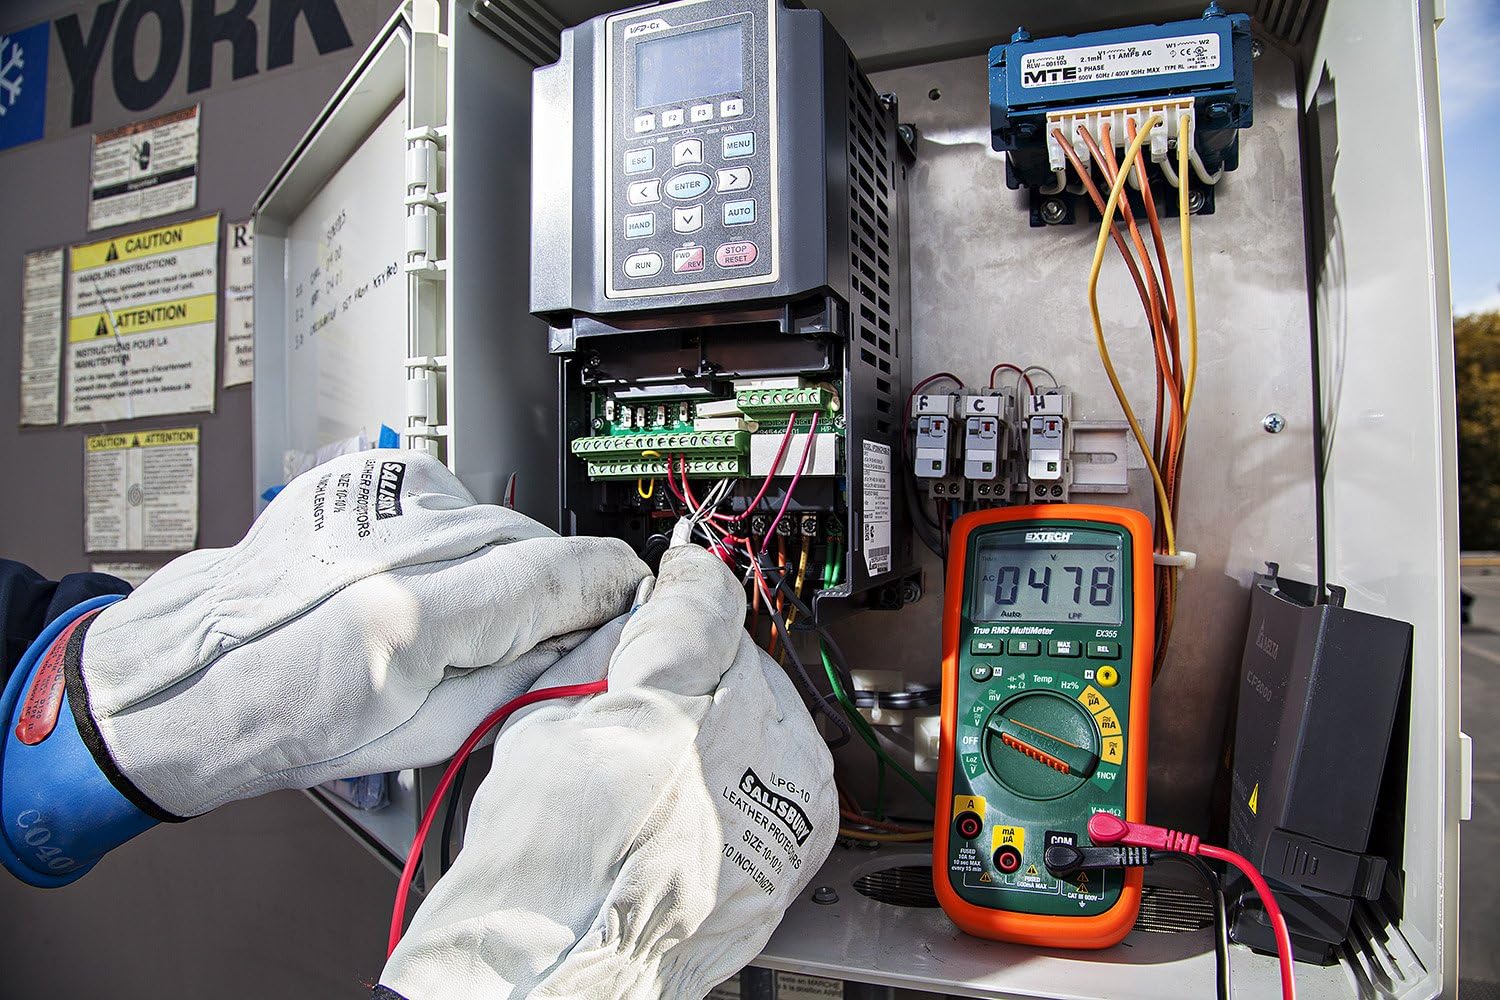
Figure 3: The Extech EX355 Multimeter in use, connected to an electrical control panel. This image demonstrates the multimeter's application in industrial or commercial electrical diagnostics.

Figure 4: The Extech EX355 Multimeter connected to a fuse box. This image illustrates the multimeter being used for testing within a residential or commercial electrical distribution system.
5.10 Data Hold, Min/Max, Relative Mode
- Data terus: Tekan tombol MEMEGANG Tekan tombol untuk membekukan pembacaan saat ini pada layar. Tekan lagi untuk melepaskan.
- Min/Maks: Tekan tombol MIN / MAX button to enter Min/Max recording mode. The meter will display the maximum reading. Press again to cycle through minimum and average readings. Hold the button to exit.
- Modus Relatif: Tekan tombol REL button to store the current reading as a reference value. Subsequent measurements will be displayed as a difference from this reference. Press again to exit.
5.11 Uji Kontinuitas dan Dioda
Peringatan: Ensure the circuit is de-energized before performing continuity or diode tests.
- Kontinuitas: Setel tombol putar ke Ω (Resistance) position and press the MEMILIH button until the continuity symbol (♫) appears. A continuous beep indicates a low resistance path (continuity).
- Tes Dioda: Setel tombol putar ke Ω (Resistance) position and press the MEMILIH button until the diode symbol (→|) appears. Connect the red lead to the anode and black lead to the cathode for forward bias voltage jatuh. Kabel terbalik untuk bias terbalik.
6. Pemeliharaan
6.1 Penggantian Baterai
Refer to section 4.1 for detailed instructions on replacing the two AA batteries. Always use fresh, high-quality AA batteries.
6.2 Penggantian Sekring
If the current measurement functions cease to work, the fuse may need replacement. This procedure should only be performed by qualified personnel.
- Pastikan multimeter dimatikan dan semua kabel uji dilepas.
- Lepaskan penutup kompartemen baterai dan baterai.
- Unscrew the case screws and carefully separate the two halves of the meter casing.
- Locate the blown fuse(s). The EX355 typically uses two fuses: a 0.5A/600V fast-blow fuse for the mA/µA input and a 10A/600V fast-blow fuse for the 10A input.
- Replace the fuse(s) with fuses of the exact same type and rating. Never use a fuse with a different rating.
- Carefully reassemble the meter casing, ensuring all screws are tightened. Reinstall batteries and the battery cover.
6.3 Pembersihan dan Penyimpanan
- Clean the meter regularly with a damp kain dan deterjen ringan. Jangan gunakan bahan abrasif atau pelarut.
- Pastikan alat ukur benar-benar kering sebelum digunakan.
- When storing the meter for extended periods, remove the batteries to prevent leakage.
- Simpan alat pengukur di tempat yang sejuk dan kering, jauh dari sinar matahari langsung dan suhu ekstrem.
7. Penyelesaian masalah
| Masalah | Kemungkinan Penyebab | Larutan |
|---|---|---|
| Tidak ada tampilan atau tampilan redup | Baterai mati atau lemah | Ganti baterai (lihat Bagian 4.1). |
| Bacaan salah | Incorrect function/range selected; Damaged test leads; External interference; Blown fuse (for current) | Verify function/range; Inspect/replace test leads; Move away from strong electromagnetic fields; Check/replace fuses (refer to Section 6.2). |
| Tidak ada bunyi bip kontinuitas | Open circuit; High resistance; Incorrect mode | Ensure circuit is closed; Check for high resistance; Verify continuity mode is selected. |
| Pengukuran arus tidak berfungsi | Blown fuse; Incorrect lead connection | Check and replace appropriate fuse (refer to Section 6.2); Ensure leads are in the correct current jacks. |
| NCV tidak mendeteksi volumetage | Tanpa AC jilidtage present; Weak field; Incorrect mode | Periksa tegangan ACtage with direct contact method; Ensure NCV mode is selected; Move closer to the conductor. |
8. Spesifikasi
The following table outlines the key specifications for the Extech EX355 True RMS Multimeter:
| Parameter | Nilai |
|---|---|
| Nomor Model | EX355 |
| Fungsi Pengukuran | Tegangan AC/DCtage, AC/DC Current, Resistance, Capacitance, Frequency, Duty Cycle, Temperature, Diode, Continuity |
| RMS sejati | Ya |
| Volume Non-Kontaktage (NCV) | Ya |
| Impedansi Rendah (LoZ) | Ya |
| Filter Akses Rendah (LPF) | Ya |
| Volume Operasi Maksimumtage | 600 Volt |
| Akurasi Pengukuran | +/-0.5% (typical, varies by function/range) |
| Menampilkan | LCD 4000 Hitungan |
| Sumber Daya | 2 x Baterai AA (termasuk) |
| Dimensi (P x L x T) | 8.1 x 4.8 x 17 cm (3.2 x 1.9 x 6.7 inci) |
| Berat Barang | 372 gram (0.82 pon) |
| Bahan | ABS |
| Sertifikasi | IEC 61010-1, CE, CAT III 600V |
| Komponen yang Termasuk | Test leads, two AA batteries, general purpose bead wire temperature probe |

Figure 5: Extech EX355 Multimeter with approximate dimensions shown in inches and centimeters. This image provides a visual reference for the physical size of the device.
9. Informasi Garansi
Extech provides a warranty for its products. Specific warranty terms and conditions, including duration and coverage, may vary by region and product. For detailed warranty information, please refer to the warranty card included with your product or visit the official Extech websitus. Simpan struk pembelian Anda sebagai bukti pembelian untuk klaim garansi apa pun.
10. Dukungan Pelanggan
For technical assistance, troubleshooting, or service inquiries regarding your Extech EX355 Multimeter, please contact Extech customer support. You can typically find contact information, including phone numbers and email addresses, on the official Extech websitus atau dalam dokumentasi yang disertakan dengan produk Anda.
Sumber Daya Daring: Visit the official Extech website for FAQs, product downloads, and additional support resources.


