1. Pendahuluan
This manual provides detailed instructions for setting up, operating, and maintaining your Waveshare 7-inch IPS Display. Designed for seamless integration with various Raspberry Pi models, this display offers a 1024x600 resolution via a DPI interface, ensuring a clear visual experience for your projects.
2. Isi Paket
Pastikan semua item yang tercantum di bawah ini termasuk dalam paket Anda. Jika ada komponen yang hilang atau rusak, silakan hubungi layanan pelanggan.
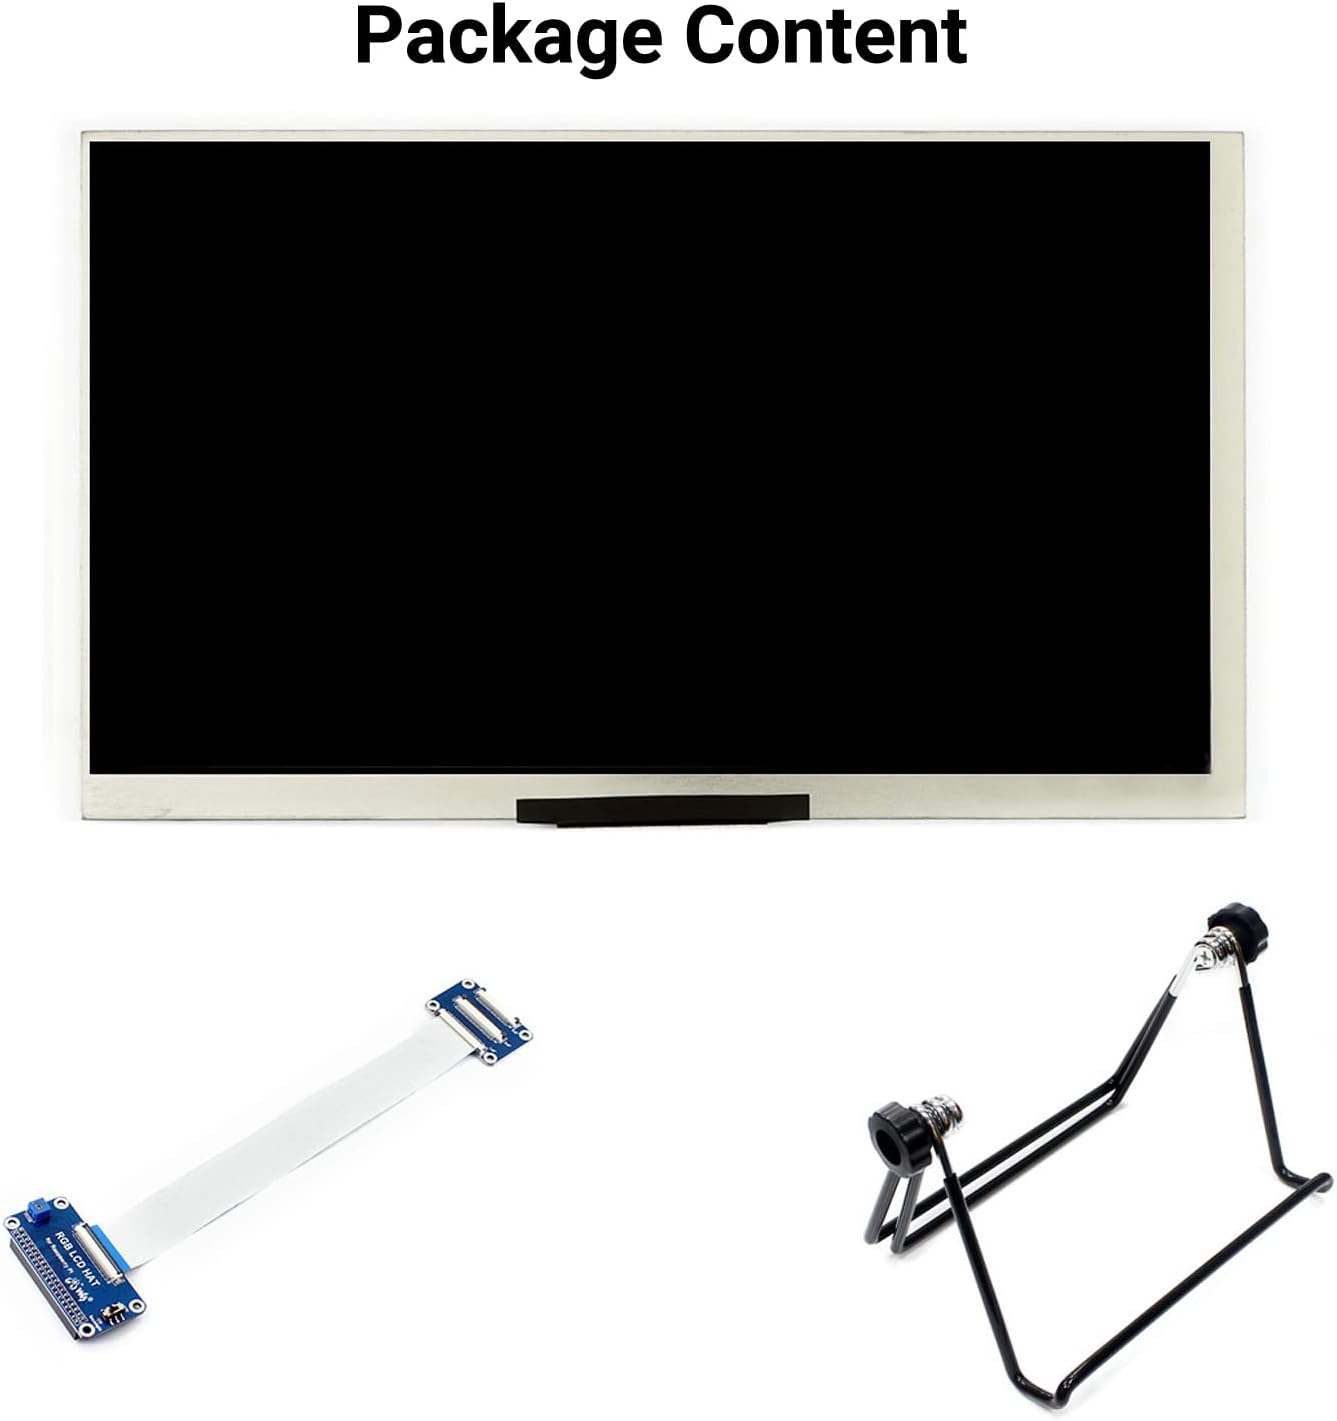
Gambar 2.1: Isi Paket
- Waveshare 7-inch IPS Display (1024x600)
- FFC (Flexible Flat Cable)
- Adjustable Metal Stand
3. Fitur dan Spesifikasi Produk
The Waveshare 7-inch DPI Display is engineered for optimal performance and compatibility with Raspberry Pi boards.

Figure 3.1: Display Features and Supported Devices
3.1 Fitur Utama
- Ukuran Layar: 7 inci
- Resolusi: 1024x600 piksel
- Tipe Panel: IPS (In-Plane Switching) for wide viewsudut ing
- Antarmuka: DPI (Display Parallel Interface)
- Viewsudut: 170°
- Lampu latar: Controllable for lower power consumption
- Kesesuaian: Designed for Raspberry Pi 40-pin GPIO interface
3.2 Supported Raspberry Pi Models
The display is compatible with the following Raspberry Pi series boards:
- Raspberry Pi 4B
- Raspberry Pi 3B+ / 3B
- Raspberry Pi 2B / B+ / A+
- Raspberry Pi Zero / Zero W / WH / Zero 2W
Supports future versions that maintain backward compatibility with the 40-pin GPIO interface.
3.3 Sistem Operasi yang Didukung
The display supports operating systems such as Raspberry Pi OS (formerly Raspbian) and Ubuntu.
4. Panduan Pengaturan
Follow these steps carefully to connect and configure your Waveshare 7-inch DPI Display with your Raspberry Pi.
4.1 Koneksi Fisik
- Prepare the FFC Cable: Gently insert one end of the 50-pin FFC cable into the JP2 connector (drawer socket) on the display's small adapter board. Ensure the cable is fully seated and then close the drawer socket to secure it.
- Connect to RGB LCD HAT: Insert the other end of the 50-pin FFC cable into the connector on the RGB LCD HAT. This is typically a turn-cover socket; lift the cover, insert the cable, and then press the cover down to lock it.
- Attach RGB LCD HAT to Raspberry Pi: Carefully align the 40-pin GPIO header of the RGB LCD HAT with the GPIO pins on your Raspberry Pi board. Press down gently but firmly to ensure a secure connection.
- Mount the Display (Optional): If using the adjustable metal stand, attach the display to the stand as shown in the product images. This provides a stable viewsudut.
- Nyalakan: Connect a 5V/3A power supply to your Raspberry Pi. The display will draw power directly from the Pi's GPIO pins.

Figure 4.1: FFC Cable Insertion

Gambar 4.2: Koneksi Examples with Raspberry Pi

Figure 4.3: Assembled Display with Stand and Raspberry Pi
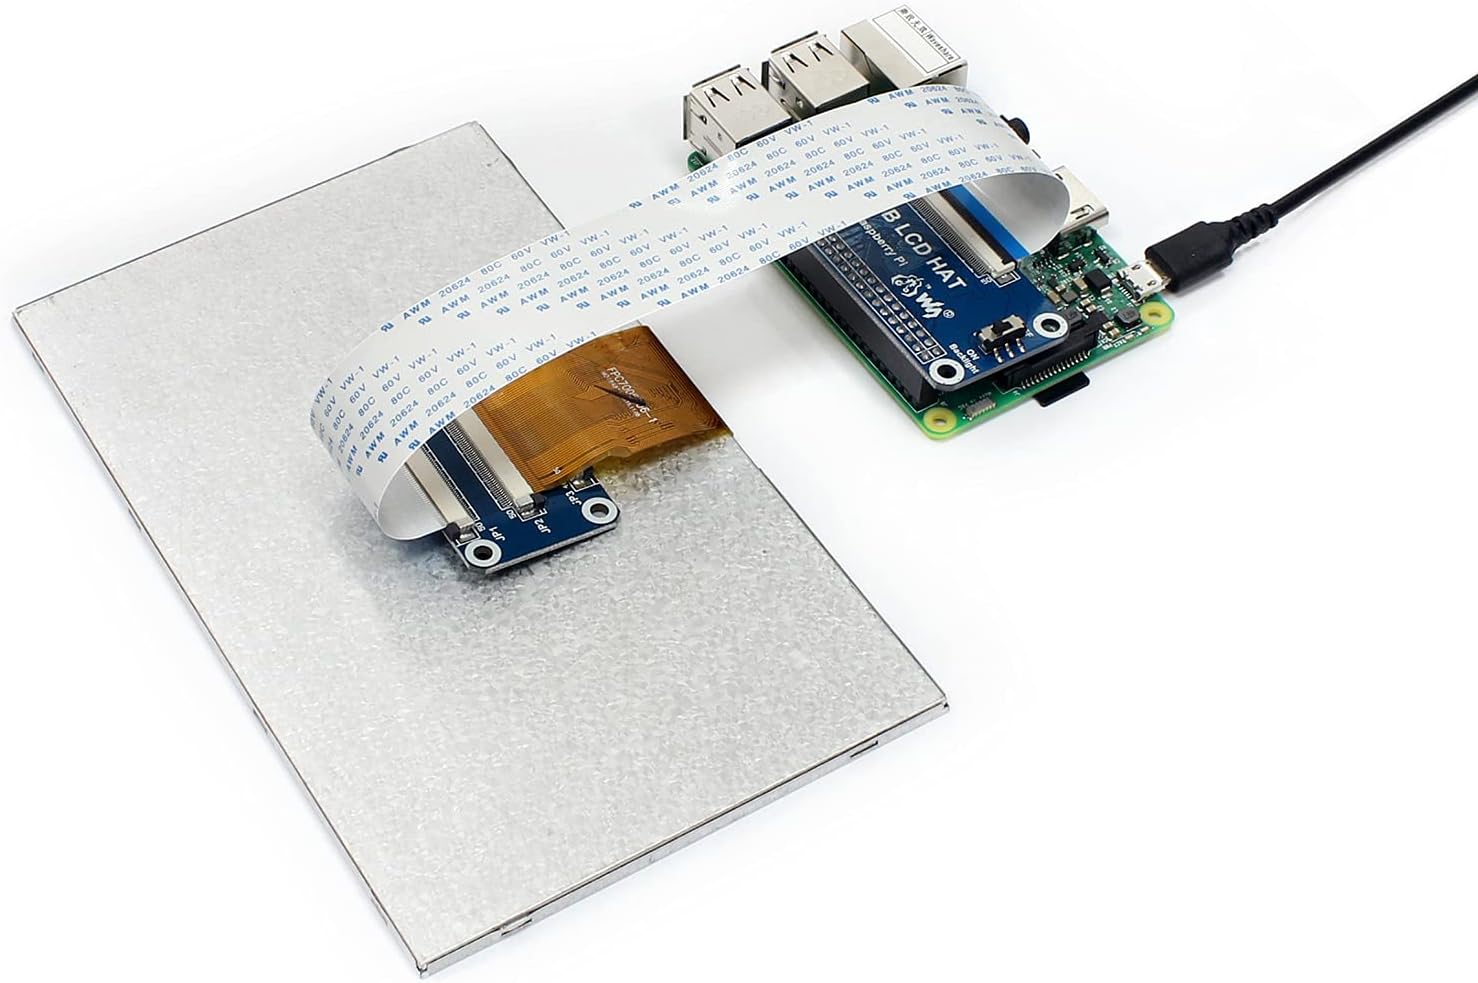
Figure 4.4: Display Connected to Raspberry Pi
4.2 Konfigurasi Perangkat Lunak
For the display to function correctly, you may need to modify the config.txt file on your Raspberry Pi's boot partition. This typically involves setting the correct resolution and DPI interface parameters. Refer to the official Waveshare online user manual for specific configuration lines for your Raspberry Pi model and OS version.
Catatan: Incorrect configuration in config.txt is a common cause for display issues such as a black screen or no image. Always back up your config.txt before making changes.
5. Petunjuk Pengoperasian
5.1 Kontrol Lampu Latar
The display features backlight control to manage power consumption. Specific methods for controlling the backlight (e.g., via software commands or physical jumpers) may vary. Consult the Waveshare online documentation for detailed instructions relevant to your setup.
6. Pemeliharaan
Untuk memastikan umur panjang dan kinerja optimal layar Anda, ikuti panduan perawatan berikut:
- Pembersihan: Use a soft, lint-free cloth to gently wipe the screen surface. For stubborn smudges, slightly dampBilas kain dengan air atau pembersih yang aman untuk layar. Hindari bahan kimia keras atau bahan abrasif.
- Penanganan: Handle the display by its edges. Avoid applying pressure directly to the screen surface or the FFC cable.
- Lingkungan: Operate and store the display in a dry environment, away from extreme temperatures, direct sunlight, and excessive dust.
7. Penyelesaian masalah
If you encounter issues with your Waveshare 7-inch DPI Display, refer to the following common problems and solutions:
- Tidak Ada Tampilan / Layar Hitam:
- Ensure all FFC cables and the RGB LCD HAT are securely connected to both the display and the Raspberry Pi.
- Verify that the Raspberry Pi is receiving adequate power (a stable 5V/3A supply is recommended).
- Periksa Anda
config.txtfile for correct DPI settings and resolution. Incorrect settings are a frequent cause of this issue. - If the backlight is on but no image appears, double-check the FFC cable insertion and the
config.txtpengaturan.
- Layar Berkedip:
- Ensure your power supply is stable and sufficient for both the Raspberry Pi and the display.
- Check for any loose connections in the FFC cable or the HAT.
- Display Not Recognized:
- Confirm that your Raspberry Pi OS is up to date and that the necessary drivers or configuration files are correctly applied as per Waveshare's online documentation.
Penting: Many issues stem from incorrect software configuration. Always consult the official Waveshare online user manual for the most up-to-date and specific configuration instructions for your Raspberry Pi model and operating system.
8. Dimensi Produk
The physical dimensions of the Waveshare 7-inch DPI Display are provided below for integration into your projects.
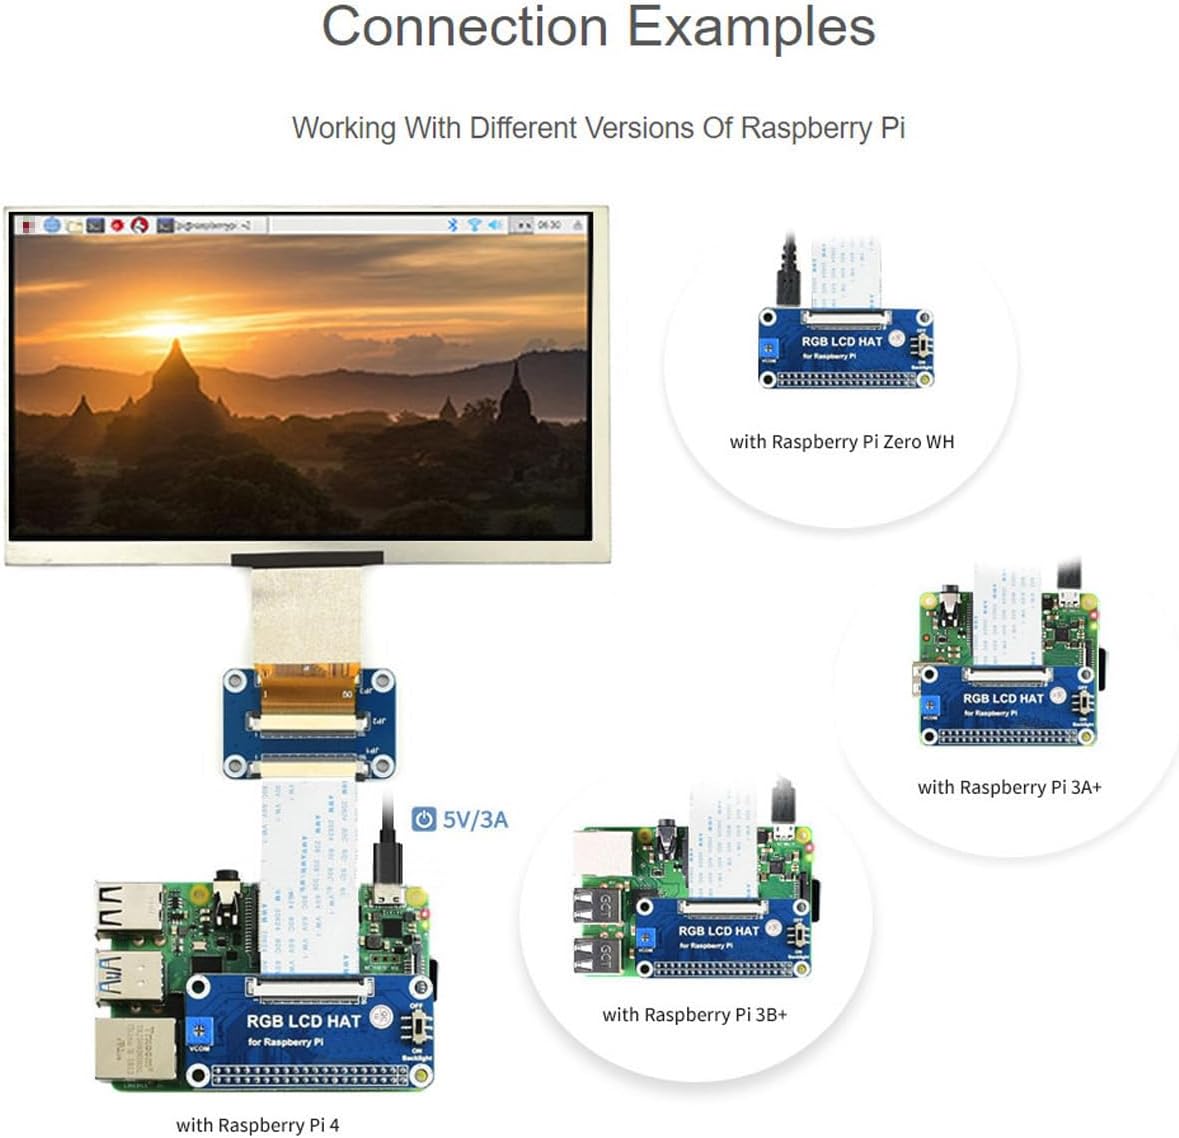
Figure 8.1: Appearance and Dimensions (Unit: mm)
- Panjang Keseluruhan: 163.64 mm
- Lebar Keseluruhan: 96.84 mm
- Display Area Length: 154.21 mm
- Display Area Width: 85.92 mm
9. Sertifikasi
The Waveshare 7-inch DPI Display holds relevant industry certifications, ensuring quality and compliance.

Figure 9.1: HDMI Certification
This product is an official authorized HDMI Adopter. For verification, please visit the official HDMI weblokasi: https://hdmi.org/qr/alic/FVP01SGM0CI
10. Garansi dan Dukungan
For warranty information, technical support, or further assistance, please refer to the official Waveshare website or contact their customer service directly. Online user manuals and resources are typically available to provide comprehensive guidance.


