1. Pendahuluan
This manual provides essential information and instructions for the safe and efficient use of your Nokia 8 Sirocco TA-1005 smartphone. Please read this guide thoroughly before operating your device to ensure optimal performance and longevity. This device is designed for use with GSM, 3G, and 4G LTE networks. Compatibility with CDMA networks, including Verizon, Sprint, and US Cellular, is not supported. Verify network compatibility with your service provider prior to use.
2. Apa yang ada di dalam kotak
Upon unboxing your Nokia 8 Sirocco TA-1005, verify that all components are present:
- Nokia 8 Sirocco TA-1005 Device
- Kabel USB Tipe-C
- Adaptor Daya
- Headset
- Alat Pengeluar SIM
- Panduan Memulai Cepat
- Informasi Keamanan dan Garansi
3. Tata Letak Perangkat
Familiarize yourself with the physical components of your Nokia 8 Sirocco TA-1005.
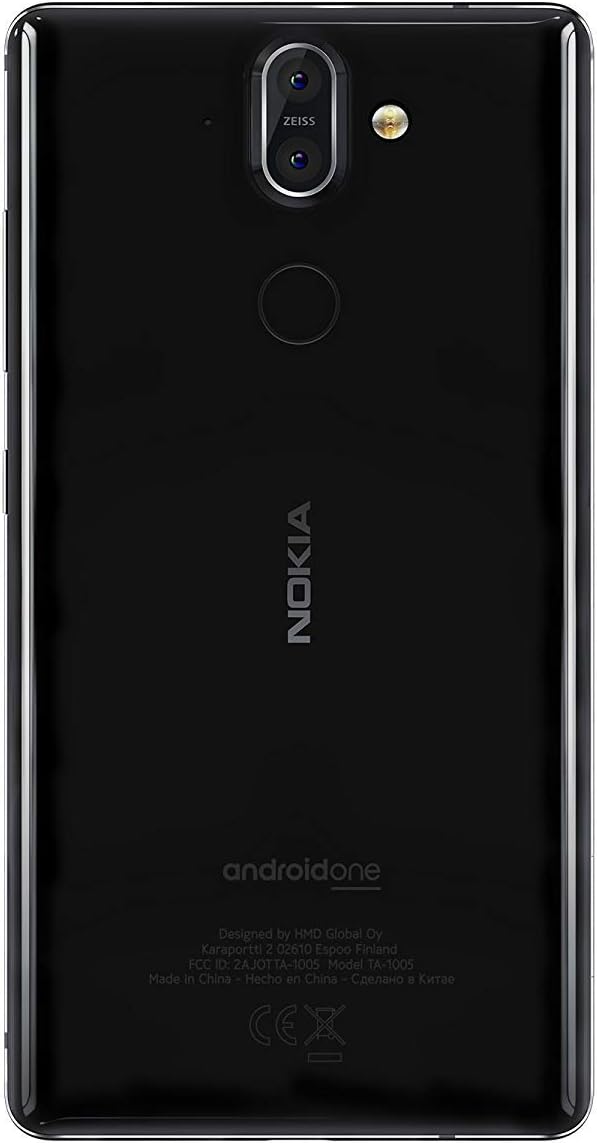
Gambar 3.1: Belakang view of the Nokia 8 Sirocco TA-1005. This image displays the dual camera setup with ZEISS optics, the circular fingerprint sensor below the camera, and the Nokia logo centrally placed. The 'androidone' branding is visible towards the bottom.
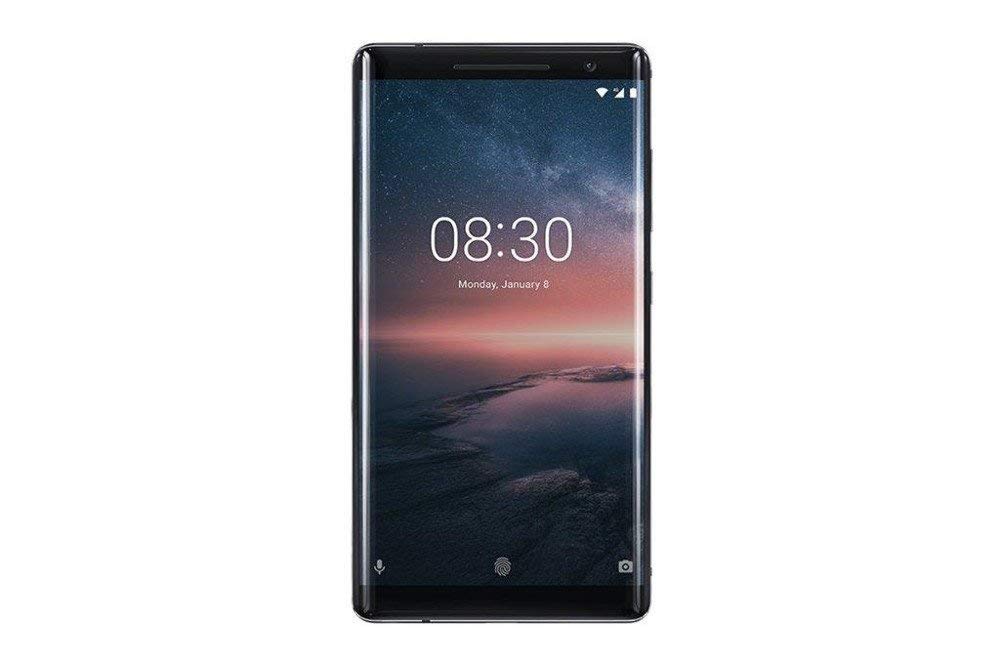
Gambar 3.2: Depan view of the Nokia 8 Sirocco TA-1005. The image highlights the 5.5-inch P-OLED curved display, the front-facing camera at the top, and the on-screen navigation buttons. The device features minimal bezels.

Gambar 3.3: Samping view of the Nokia 8 Sirocco TA-1005. This image illustrates the slim profile of the device, with the power button and volume rocker located on the right side for easy access.
Komponen Utama:
- Kamera Depan: Terletak di bagian atas layar.
- Lubang suara: For calls, located above the display.
- Menampilkan: 5.5-inch P-OLED capacitive touchscreen.
- Tombol Volume: On the right side, to adjust audio levels.
- Tombol Daya/Kunci: On the right side, to power on/off or lock/unlock the screen.
- Port USB Tipe-C: Di bagian bawah, untuk pengisian daya dan transfer data.
- Mikropon: Located at the bottom and top.
- Pembicara: Terletak di bagian bawah.
- Tempat Kartu SIM/Memori: On the side, for inserting SIM cards.
- Kamera Belakang: Dual cameras with ZEISS optics on the back.
- Kilatan: Dual-tone flash next to the rear cameras.
- Sensor Sidik Jari: On the back, below the rear cameras.
4. Pengaturan
4.1. Memasukkan Kartu SIM
- Temukan tempat kartu SIM di sisi perangkat Anda.
- Masukkan alat pelepas SIM ke dalam lubang kecil pada baki untuk membukanya.
- Place your Nano-SIM card(s) into the designated slot(s) on the tray, ensuring the gold contacts face downwards.
- Dorong baki kembali ke dalam perangkat dengan hati-hati hingga terdengar bunyi klik pada tempatnya.
Catatan: This device does not support external memory cards.
4.2. Menghidupkan dan Mematikan
- Untuk menghidupkan: Press and hold the Power/Lock button until the Nokia logo appears.
- Untuk mematikan: Press and hold the Power/Lock button until the power options menu appears, then select "Power off".
4.3. Pengaturan Awal
Upon first power-on, the device will guide you through the initial setup process. This includes selecting your language, connecting to a Wi-Fi network, setting up your Google account, and configuring security features like fingerprint unlock or a PIN/pattern.
5. Petunjuk Pengoperasian
5.1. Melakukan Panggilan
- Buka aplikasi "Telepon".
- Masukkan nomor telepon menggunakan papan tombol atau pilih kontak dari buku alamat Anda.
- Ketuk ikon panggilan untuk memulai panggilan.
5.2. Mengirim Pesan
- Open the "Messages" application.
- Ketuk ikon "Mulai obrolan" atau "Pesan baru".
- Masukkan nomor penerima atau pilih dari kontak.
- Ketik pesan Anda di kolom teks.
- Ketuk ikon kirim.
5.3. Menggunakan Kamera
- Buka aplikasi "Kamera".
- Bingkai subjek Anda di layar.
- Ketuk tombol rana untuk mengambil foto.
- Switch between photo and video modes, or access advanced settings like portrait mode or panorama, as desired.
5.4. Konektivitas Internet
- Wifinya: Pergi ke Pengaturan > Jaringan & internet > Wi-Fi. Turn Wi-Fi on and select an available network. Enter the password if required.
- Data Seluler: Pergi ke Pengaturan > Jaringan & internet > Jaringan seluler. Ensure "Mobile data" is enabled.
5.5. Fitur Keamanan
Your Nokia 8 Sirocco TA-1005 offers various security options:
- Buka Kunci Sidik Jari: Daftarkan sidik jari Anda melalui Settings > Security & Location > Fingerprint.
- Kunci Layar: Set a PIN, pattern, or password via Settings > Security & Location > Screen lock.
6. Pemeliharaan
6.1. Membersihkan Perangkat
Use a soft, lint-free cloth to clean your device. Avoid using harsh chemicals or abrasive materials, which can damage the screen or finish.
6.2. Perawatan Baterai
- Charge your device using only Nokia-approved chargers and cables.
- Hindari memaparkan perangkat ke suhu ekstrem.
- Jangan biarkan baterai habis sepenuhnya terlalu sering.
6.3. Pembaruan Perangkat Lunak
Periksa dan instal pembaruan perangkat lunak secara berkala untuk memastikan perangkat Anda memiliki fitur, patch keamanan, dan peningkatan kinerja terbaru. Kunjungi Pengaturan > Sistem > Pembaruan sistem.
7. Penyelesaian masalah
Jika Anda mengalami masalah dengan perangkat Anda, lihat solusi umum berikut:
| Masalah | Larutan |
|---|---|
| Perangkat tidak menyala | Pastikan baterai terisi daya. Hubungkan ke pengisi daya minimal 30 menit. Jika tidak responsif, lakukan restart paksa dengan menahan tombol Daya selama 10-15 detik. |
| Sinyal jaringan buruk | Check SIM card insertion. Move to an area with better network coverage. Restart the device. Verify network settings in Pengaturan > Jaringan & internet > Jaringan seluler. |
| Applications are crashing | Bersihkan cache aplikasi (Pengaturan > Aplikasi & notifikasi > [Nama Aplikasi] > Penyimpanan & cache > Hapus cachePerbarui aplikasi dari Google Play Store. Jika masalah berlanjut, hapus instalan dan instal ulang aplikasi. |
| Baterai cepat habis | Reduce screen brightness. Close unused background apps. Disable Wi-Fi, Bluetooth, and GPS when not in use. Check battery usage in Pengaturan > Baterai untuk mengidentifikasi aplikasi yang menghabiskan daya. |
| Perangkat tidak responsif | Perform a force restart by holding the Power button for 10-15 seconds. If the issue continues, consider a factory reset (Pengaturan > Sistem > Opsi reset > Hapus semua data (reset pabrik)). Peringatan: Reset pabrik akan menghapus semua data di perangkat Anda. Cadangkan data penting sebelum melanjutkan. |
8. Spesifikasi
Detailed technical specifications for the Nokia 8 Sirocco TA-1005:
| Fitur | Detil |
|---|---|
| Nama Model | 8 Sirocco |
| Nomor Model | TA-1005 |
| Sistem Operasi | Android 8.0 (Oreo) |
| Prosesor | Qualcomm MSM8998 Snapdragon 835, Octa-core (4x2.5 GHz Kryo & 4x1.8 GHz Kryo) |
| GPU | Adreno 540 |
| RAM | 6 GB |
| Penyimpanan Internal | 128 GB |
| Menampilkan | 5.5 inches, P-OLED capacitive touchscreen, 1440 x 2560 pixels, Corning Gorilla Glass 5 |
| Kamera Belakang | 12MP Wide (f/1.7) + 13 MP Tele (f/2.6), dual-tone flash |
| Kamera Depan | 5MP |
| Kapasitas Baterai | 3250 mAh |
| Pengisian daya | Dukungan Pengisian Cepat |
| Konektivitas | Wi-Fi 802.11a/b/g/n, Bluetooth, USB Type-C |
| Ukuran | Ukuran 43.36x43.17x0.75 cm |
| Berat | 181 gram |
| Tipe SIM | Kartu SIM Nano |
| Dukungan Jaringan | 2G GSM, 3G, 4G LTE (Note: Not compatible with CDMA networks) |
9. Safety and Warranty Information
9.1. Pedoman Keselamatan
- Do not use the device in prohibited areas, such as aircraft or hospitals.
- Hindari memaparkan perangkat ke air atau kelembapan berlebihan.
- Gunakan hanya aksesori asli atau yang telah disetujui.
- Jangan mencoba membongkar atau memperbaiki perangkat sendiri.
- Buang perangkat dan baterainya secara bertanggung jawab sesuai dengan peraturan setempat.
9.2. Informasi Garansi
Your Nokia 8 Sirocco TA-1005 is covered by a limited manufacturer's warranty. Please refer to the separate warranty document included in your product packaging or visit the official Nokia support webKunjungi situs web untuk melihat syarat dan ketentuan yang lebih detail. Simpan bukti pembelian Anda untuk klaim garansi.