Perkenalan
This manual provides detailed instructions for the installation, operation, and maintenance of your MYPIN CE0318-26 Dual Dash Cam. This device is designed to record high-definition video from both the front and rear of your vehicle, offering enhanced security and documentation for your journeys. Please read this manual thoroughly before use to ensure proper functionality and safety.
Apa yang ada di dalam kotak
Verifikasi bahwa semua item yang tercantum di bawah ini disertakan dalam paket Anda:
- MYPIN CE0318-26 Dual Dash Cam Unit
- Pengisi Daya Mobil
- Dudukan Pengisap
- Kamera Belakang dengan Kabel
- Kabel Data USB
- 3M VHB Adhesive Pads (2x)
- Panduan Pengguna
Deskripsi Video: This video demonstrates the unboxing of the MYPIN CE0318-26 Dual Dash Cam. It shows the main camera unit, the suction mount, the rear camera with its connecting cable, the car charger, and the user manual. The video highlights the various components included in the package.
Produk Selesaiview
Familiarize yourself with the main components and controls of your dash cam.
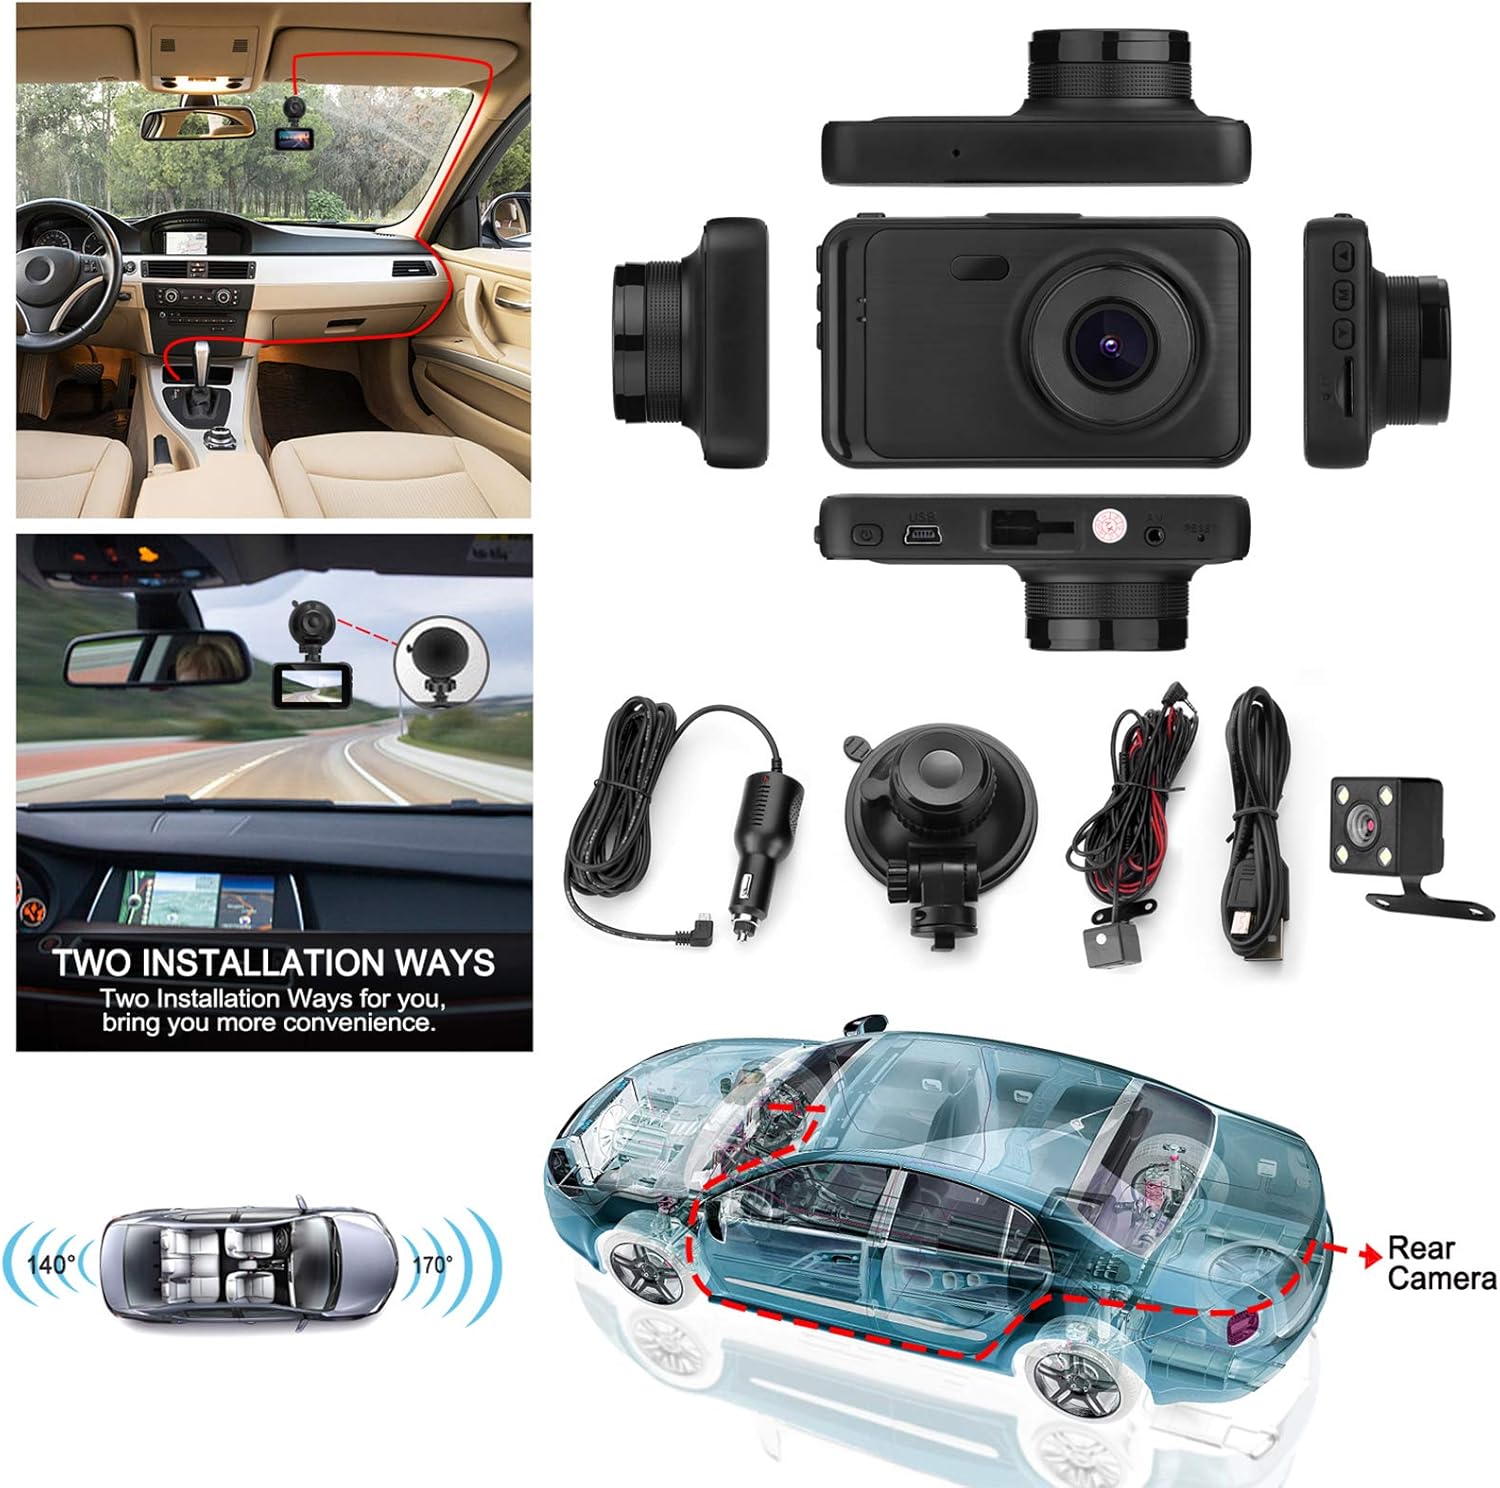
Deskripsi Gambar: Sebuah overhead view displaying the MYPIN CE0318-26 Dual Dash Cam unit along with its accessories, including the car charger, suction mount, rear camera, and cables. This image illustrates the complete package contents and the camera's physical design.
Fungsi Tombol
The user manual includes a diagram detailing the buttons and ports:
- ARAH: Switches between video recording, still photo, and playback modes.
- UP: Navigates up in menus or zooms in during photo mode.
- OK/REC: Confirms selections, starts/stops recording, or takes a photo.
- TURUN: Navigates down in menus or zooms out during photo mode.
- TIDAK BISA: Mengakses pengaturan sistem.
- Tombol Daya: Long press to turn on/off. Short press to turn screen on/off.
Pengaturan
1. Memasang Kartu Micro SD
- Pastikan dashcam dalam keadaan mati.
- Insert a Class 10 or higher Micro SD card (up to 32GB, not included) into the Micro SD card slot until it clicks into place.
- Untuk melepaskannya, dorong kartu perlahan hingga keluar.
2. Memasang Kamera Dasbor
There are two primary ways to mount the dash cam:
- Gunung hisap: Attach the suction cup to a clean, smooth area on your windshield, ensuring it does not obstruct your view. Secure the camera to the mount.
- Pemasangan perekat: Use the provided 3M VHB adhesive pads to attach the camera mount directly to your windshield. Ensure the surface is clean and dry for optimal adhesion.
Deskripsi Gambar: This image illustrates two common installation methods for the dash cam: using a suction cup mount on the windshield and a more permanent adhesive mount. It also shows the routing of the rear camera cable through the vehicle.
3. Menghubungkan Kamera Belakang
Connect the rear camera to the main unit using the provided cable. Route the cable discreetly along the vehicle's interior trim to the rear of the car. Mount the rear camera on the rear windshield or license plate area, ensuring a clear view.
4. Koneksi Daya
Plug the car charger into your vehicle's cigarette lighter socket and connect the mini USB end to the dash cam's USB port. The camera will automatically power on and begin recording when the vehicle starts.
Petunjuk Pengoperasian
Rekaman Video
The dash cam automatically starts recording when powered on. To manually start/stop recording, press the OK/REC button. The 3-inch LCD screen provides a real-time view of the front and rear cameras.

Deskripsi Gambar: A close-up of the dash cam's 3-inch LCD screen, showing a clear, real-time view of a road with traffic during sunset. This highlights the display quality and user interface.
170 ° Lensa Sudut Lebar
The front camera features a 170-degree wide-angle lens, capturing a broad view of the road and minimizing blind spots. This allows for comprehensive coverage of up to three lanes of traffic.

Deskripsi Gambar: A diagram illustrating the 170-degree wide-angle capability of the front camera, showing how it effectively captures three lanes of traffic from an overhead perspective.
Rekaman Loop
When the memory card is full, the loop recording function automatically overwrites the oldest unlocked video files to ensure continuous recording without manual intervention. Important footage dapat dikunci untuk mencegah penimpaan.
Sensor G (Pengunci Darurat)
The built-in G-sensor detects sudden movements or impacts (e.g., collisions). When triggered, it automatically locks the current video file, protecting it from being overwritten by loop recording. This ensures critical accident footage dipertahankan.
Monitor Parkir
With the parking monitor feature enabled, the dash cam can act as a 24-hour security camera. If a vibration or impact is detected while the vehicle is parked and the engine is off, the camera will automatically turn on and record a short video. Ensure the dash cam's internal battery has sufficient charge for this function.

Deskripsi Gambar: An illustration demonstrating the parking monitor feature. It shows a car parked, with icons indicating detection of a potential robbery or parking incident, triggering a 30-second recording.
Night Vision and WDR (Wide Dynamic Range)
The dash cam incorporates IR cut technology for automatic switching to clear night vision mode in low-light conditions. Wide Dynamic Range (WDR) technology enhances image quality by balancing bright and dark areas, providing clearer video footage both day and night.

Deskripsi Gambar: A split image comparing the dash cam's performance in daylight versus night conditions. It shows clear license plate readability in both scenarios, demonstrating effective night vision capabilities.
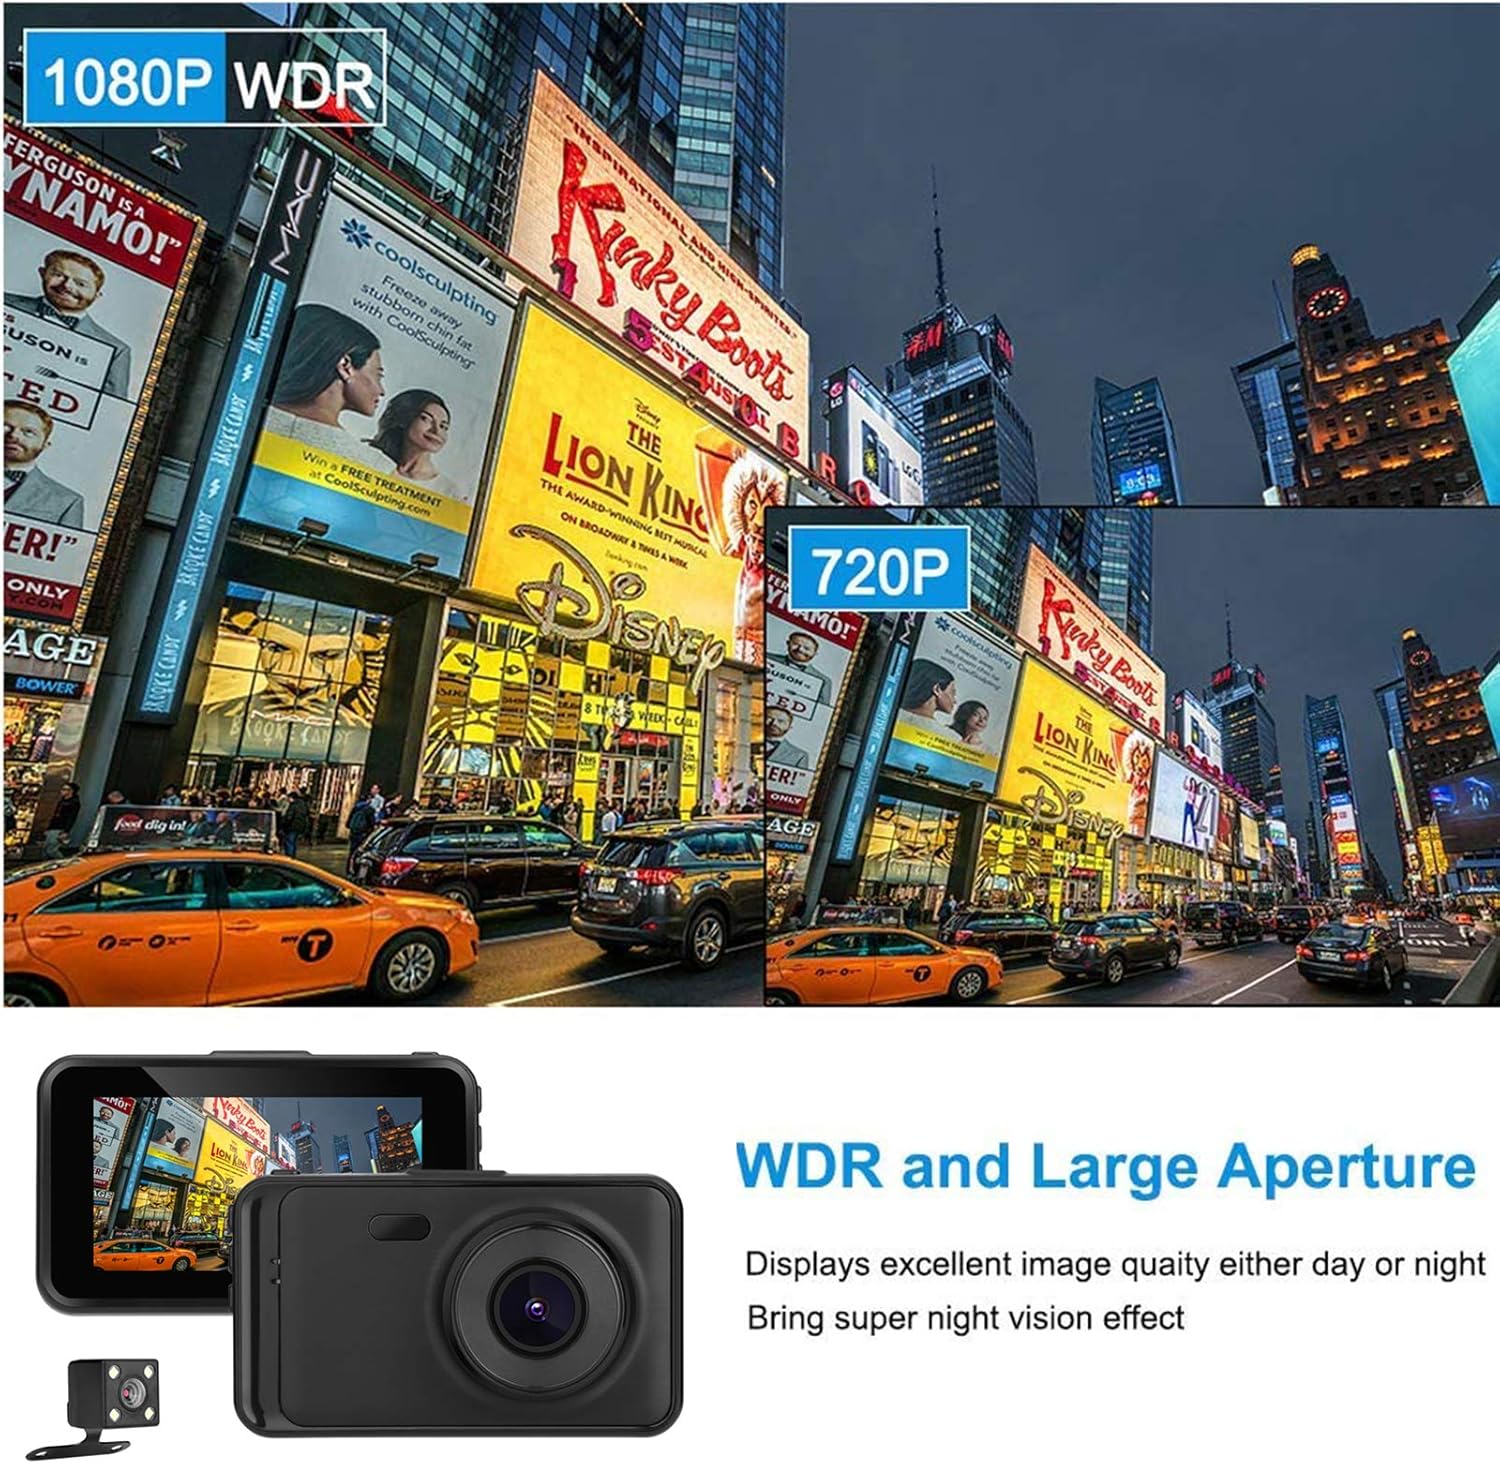
Deskripsi Gambar: An image illustrating the effect of WDR (Wide Dynamic Range) technology. It shows a scene with varying light levels, demonstrating how WDR improves visibility in both bright and dark areas of the image.
Deskripsi Video: This video showcases actual footage from the MYPIN CE0318-26 Dual Dash Cam. It includes a segment demonstrating daylight recording quality (starting around 0:11) and another segment showing night recording quality (starting around 1:56), highlighting the camera's performance in different lighting conditions.
Pemeliharaan
- Pembersihan: Use a soft, dry cloth to clean the camera lens and screen. Avoid abrasive cleaners or solvents.
- Penyimpanan: If not in use for an extended period, store the dash cam in a cool, dry place away from direct sunlight.
- Pembaruan Firmware: Periksa pabrikannya webKunjungi situs web secara berkala untuk memeriksa pembaruan firmware yang tersedia guna memastikan kinerja optimal.
- Kartu Memori: Format the Micro SD card regularly (e.g., once a month) to prevent data corruption and ensure smooth operation.
Penyelesaian Masalah
- Kamera tidak menyala: Ensure the car charger is properly connected and the vehicle's power outlet is functioning. Check the dash cam's internal battery charge.
- Rekaman berhenti tiba-tiba: The Micro SD card may be full or corrupted. Format the card or replace it with a new Class 10 or higher card.
- Kualitas video buruk: Clean the camera lens. Ensure the protective film is removed from the lens. Check video resolution settings.
- Rear camera not working: Verify the rear camera cable is securely connected to both the main unit and the rear camera.
- Dash cam freezes: Press the reset button (if available) or disconnect and reconnect the power supply.
Spesifikasi
| Fitur | Detil |
|---|---|
| Nomor Model | CE0318-26 |
| Resolusi Pengambilan Video | 1080p |
| Ukuran Layar | 3 Inches (Note: Product description states 3", specifications state 4". Using 3" as per product title.) |
| Sudut Lebar | 170° |
| Fitur Khusus | Loop Recording, Night Vision, G-Sensor, Parking Monitor, WDR |
| Teknologi Konektivitas | USB |
| Jenis Pemasangan | Dudukan Pengisap |
| Metode Kontrol | Tombol |
| Berat Barang | 13.1 ons |
| Dimensi Paket | 5.59x4.57x3.5 inci |
| Baterai | 1 baterai Lithium Polymer diperlukan (termasuk) |
Garansi dan Dukungan
For warranty information, technical support, or service inquiries, please refer to the contact details provided on the product packaging or the official MYPIN websitus. Simpan struk pembelian Anda sebagai bukti pembelian untuk klaim garansi.


