1. Pendahuluan
This manual provides detailed instructions for the setup, operation, and maintenance of your Tera Wireless Barcode Scanner, Model 8541733886. Please read this manual thoroughly before using the device to ensure proper functionality and to prevent damage.
The Tera Wireless Barcode Scanner offers versatile connectivity and efficient scanning capabilities for various barcode types, both printed and digital.
2. Produk Lebihview
2.1 Komponen
Paket biasanya mencakup:
- Tera Wireless Barcode Scanner
- Hands-Free Stand
- Dongle USB Nirkabel 2.4GHz
- Pengisian USB/Kabel Data
- Instruksi Manual (dokumen ini)

Image: Tera Wireless Barcode Scanner, showing the scanner unit, flexible stand, 2.4GHz USB dongle, and USB cable.
2.2 Fitur Utama
- 3 Mode Koneksi: Supports Bluetooth, 2.4GHz wireless, and USB 2.0 wired connections.
- Kompatibilitas Luas: Works with POS systems, iOS, Android, Windows, Mac OS, and Linux. Supports Bluetooth HID, SPP, and BLE protocols.
- Pemindaian Cepat dan Akurat: Equipped with an ARM32Bit Cortex CPU and a Japan-manufactured scanner head, achieving decoding speeds up to 500 scans per second.
- Mode Unggah Ganda:
- Mode Unggah Instan: Barcodes are transmitted to your device immediately upon scanning.
- Mode Penyimpanan Offline: Stores up to 50,000 barcodes internally when out of range, allowing for later upload.
- Multi-Language Barcode Support: Capable of scanning barcodes in English, Spanish, German, French, Italian, and Japanese. Ensure your keyboard language matches the selected language for correct input.
- Versatile Barcode Symbologies:
- 1D: UPC-A, UPC-E, EAN-8, EAN-13, Code 128, Code 39, Code 93, Code 11, Interleaved 2 of 5, Matrix 2 of 5, Standard 2 of 5, Coda bar, MSI Plessey, RSS, etc.
- 2D: QR Code, Data Matrix, PDF417, Aztec code, Maxicode, etc.
- Daya tahan: Designed to withstand impacts from drops of up to 1.5 meters (5 feet) onto concrete.
- Daya Tahan Baterai yang Lama: Built-in 2200mAh battery supports approximately 57,000 scans on a full charge, with up to 15 days of standby time.
3. Pengaturan
3.1 Mengisi Daya Pemindai
Before first use, fully charge the scanner. Connect the USB charging cable to the scanner's charging port and to a USB power source (e.g., computer USB port, USB wall adapter). The indicator light will show charging status.

Image: Illustration showing the scanner's 2200mAh battery capacity and its ability to withstand a 1.5-meter drop.
3.2 Mode Koneksi
Pemindai ini mendukung tiga metode koneksi:

Image: Visual representation of the three connection modes: Bluetooth, 2.4G Wireless via USB dongle, and USB Wired connection.
3.2.1 USB Wired Mode (Plug & Play)
- Hubungkan pemindai langsung ke komputer Anda menggunakan kabel USB yang disediakan.
- The computer will typically recognize the device automatically without requiring driver installation.
- Pemindai siap digunakan.

Image: The scanner connected to a laptop, illustrating its plug-and-play functionality and compatibility with various operating systems including Windows, Mac OS, Linux, and Android.
3.2.2 Mode Nirkabel 2.4GHz
- Insert the 2.4GHz USB dongle into an available USB port on your computer or device.
- Turn on the barcode scanner. It should automatically pair with the dongle.
- A successful connection is usually indicated by a specific sound or light on the scanner.
3.2.3 Mode Bluetooth
- Pastikan perangkat Anda (smartphone, tablet, komputer) telah mengaktifkan Bluetooth.
- Put the scanner into Bluetooth pairing mode (refer to the scanner's quick start guide for specific instructions, usually by scanning a special barcode).
- On your device, search for available Bluetooth devices and select "Tera Barcode Scanner" (or similar name).
- Konfirmasikan pemasangan jika diminta.
Catatan: Wireless range varies. Indoors with obstacles, Bluetooth range is approximately 33ft, and 2.4GHz wireless is approximately 98ft. Outdoors in barrier-free environments, Bluetooth range is approximately 65ft, and 2.4GHz wireless is approximately 328ft.
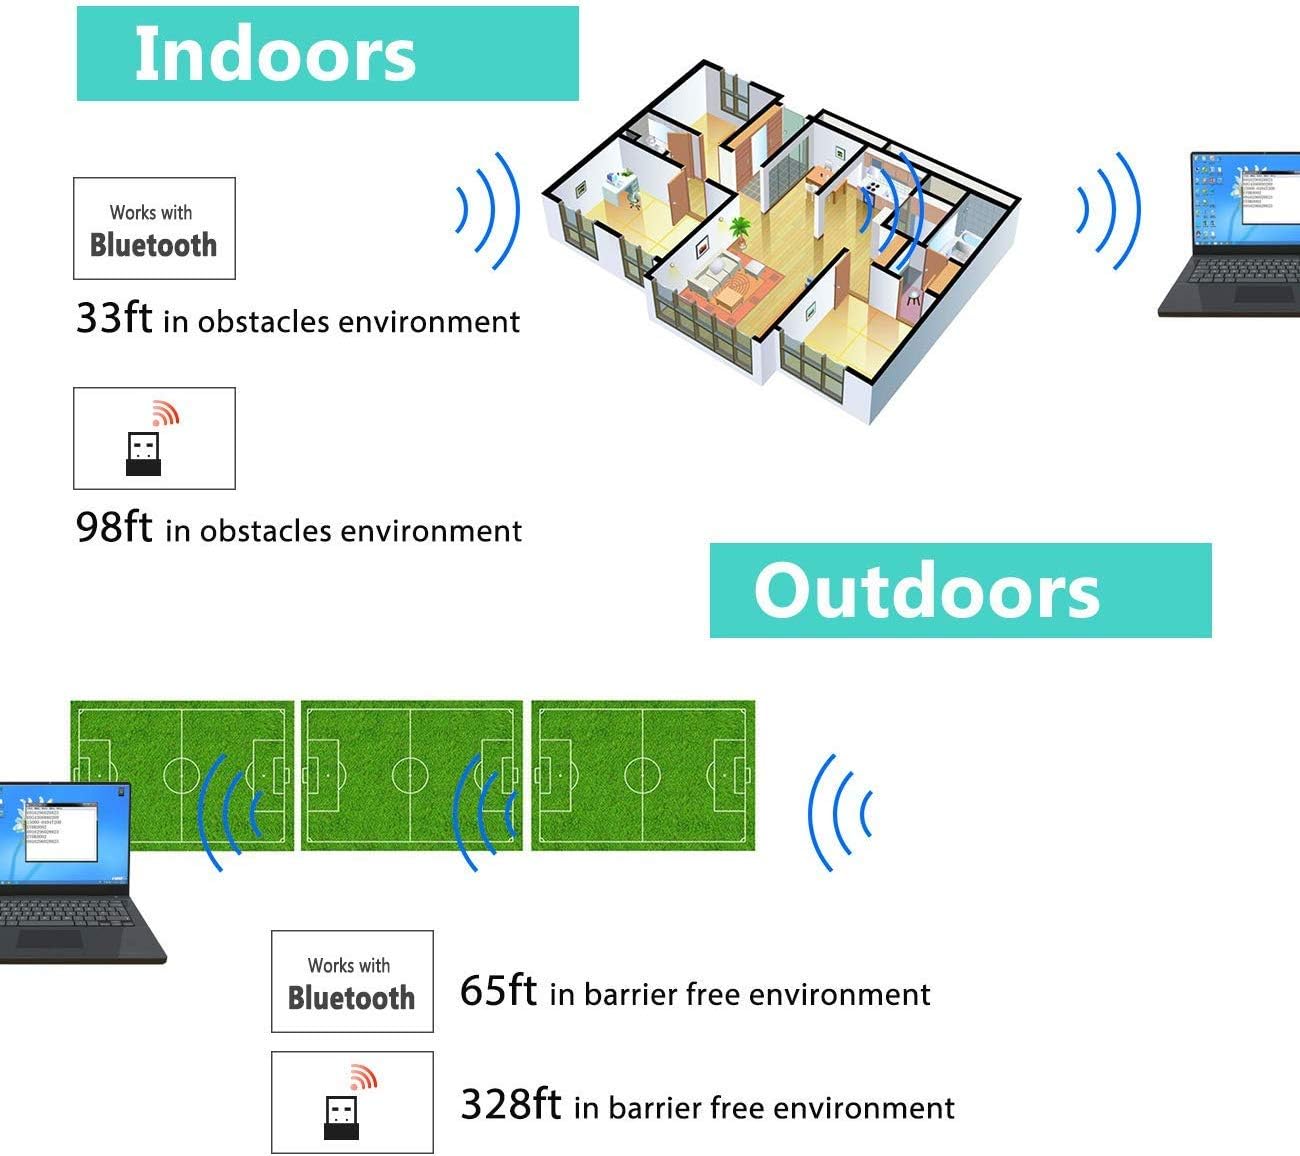
Image: Diagram illustrating the effective wireless range of the scanner in both indoor (with obstacles) and outdoor (barrier-free) environments for Bluetooth and 2.4GHz connections.
4. Petunjuk Pengoperasian
4.1 Memindai Kode Batang
The scanner can read both 1D and 2D barcodes, including QR codes, from printed materials and digital screens.
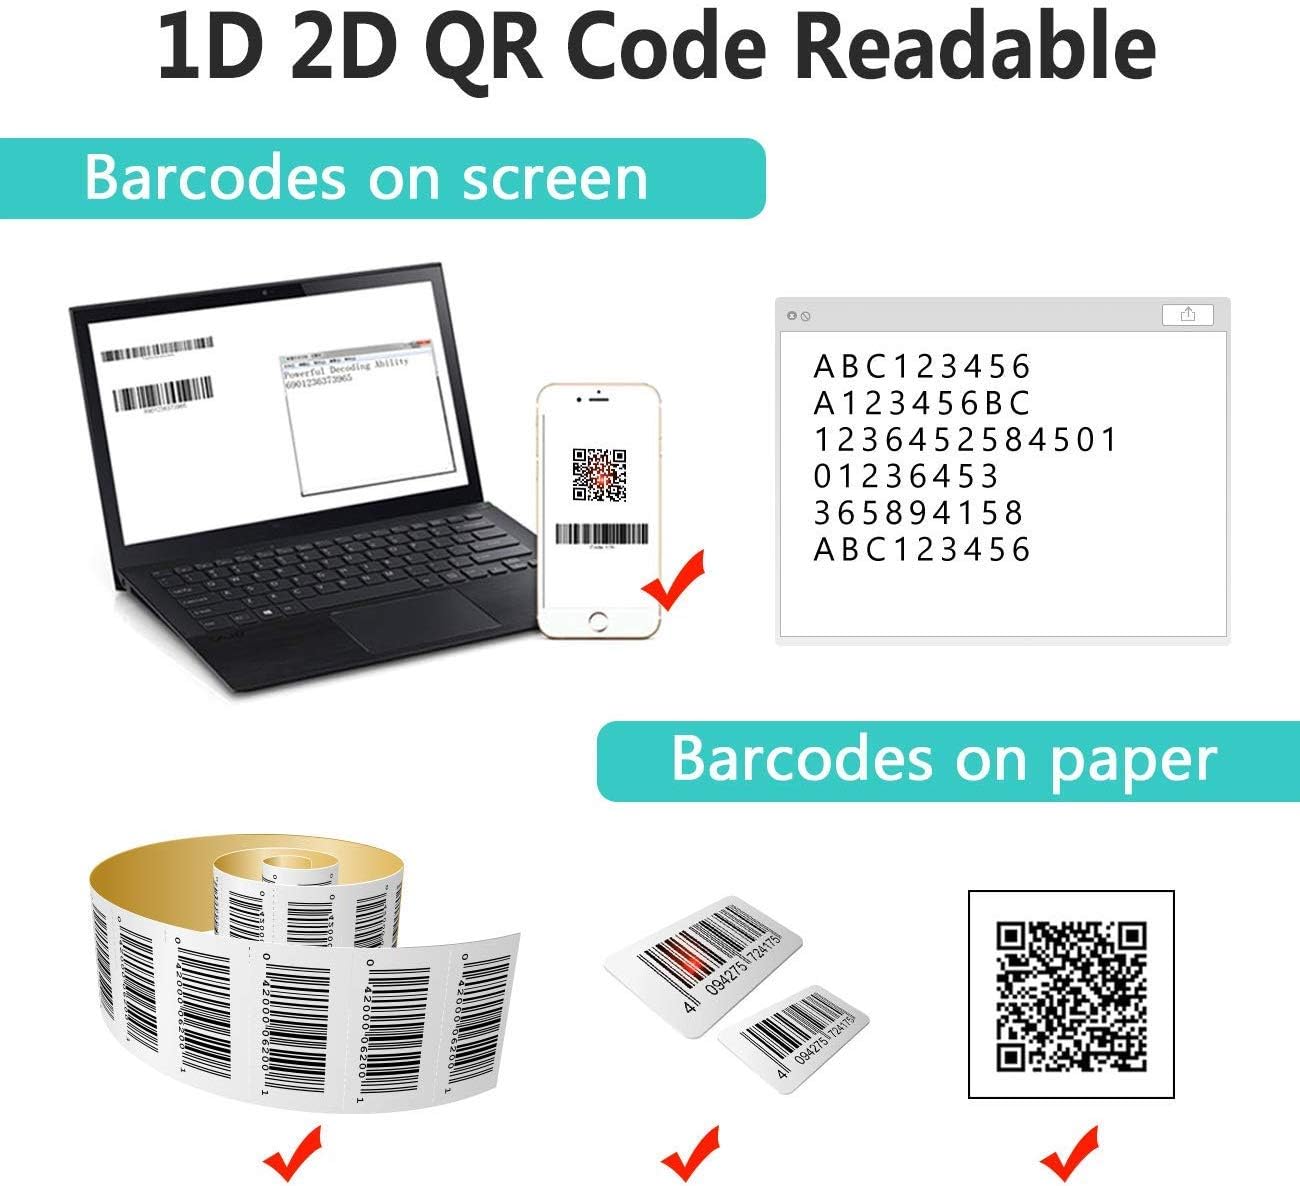
Image: The scanner demonstrating its ability to read 1D and 2D barcodes from both digital screens (laptop, smartphone) and physical printed labels.
Untuk memindai kode batang:
- Point the scanner's window at the barcode.
- Press the trigger button (or allow the sensor to activate in automatic modes).
- A successful scan is indicated by a beep and/or a green light.
4.2 Mode Pemindaian
The scanner supports three primary scanning modes:

Image: The barcode scanner mounted on its stand, highlighting its 360-degree rotation capability and the three available scanning modes: Key Trigger Mode, Sensor Activated Mode, and Continuous Scan Mode.
- Mode Pemicu Kunci: Scan by manually pressing the trigger button for each barcode.
- Sensor Activated Mode: The scanner automatically activates when a barcode is detected in its field of view.
- Mode Pemindaian Berkelanjutan: The scanner continuously emits a scan beam, reading any barcode that passes through it.
Refer to the quick start guide or programming barcodes for instructions on how to switch between these modes.
4.3 Mode Unggah Data
Pemindai ini menawarkan dua metode untuk mengunggah data yang dipindai:
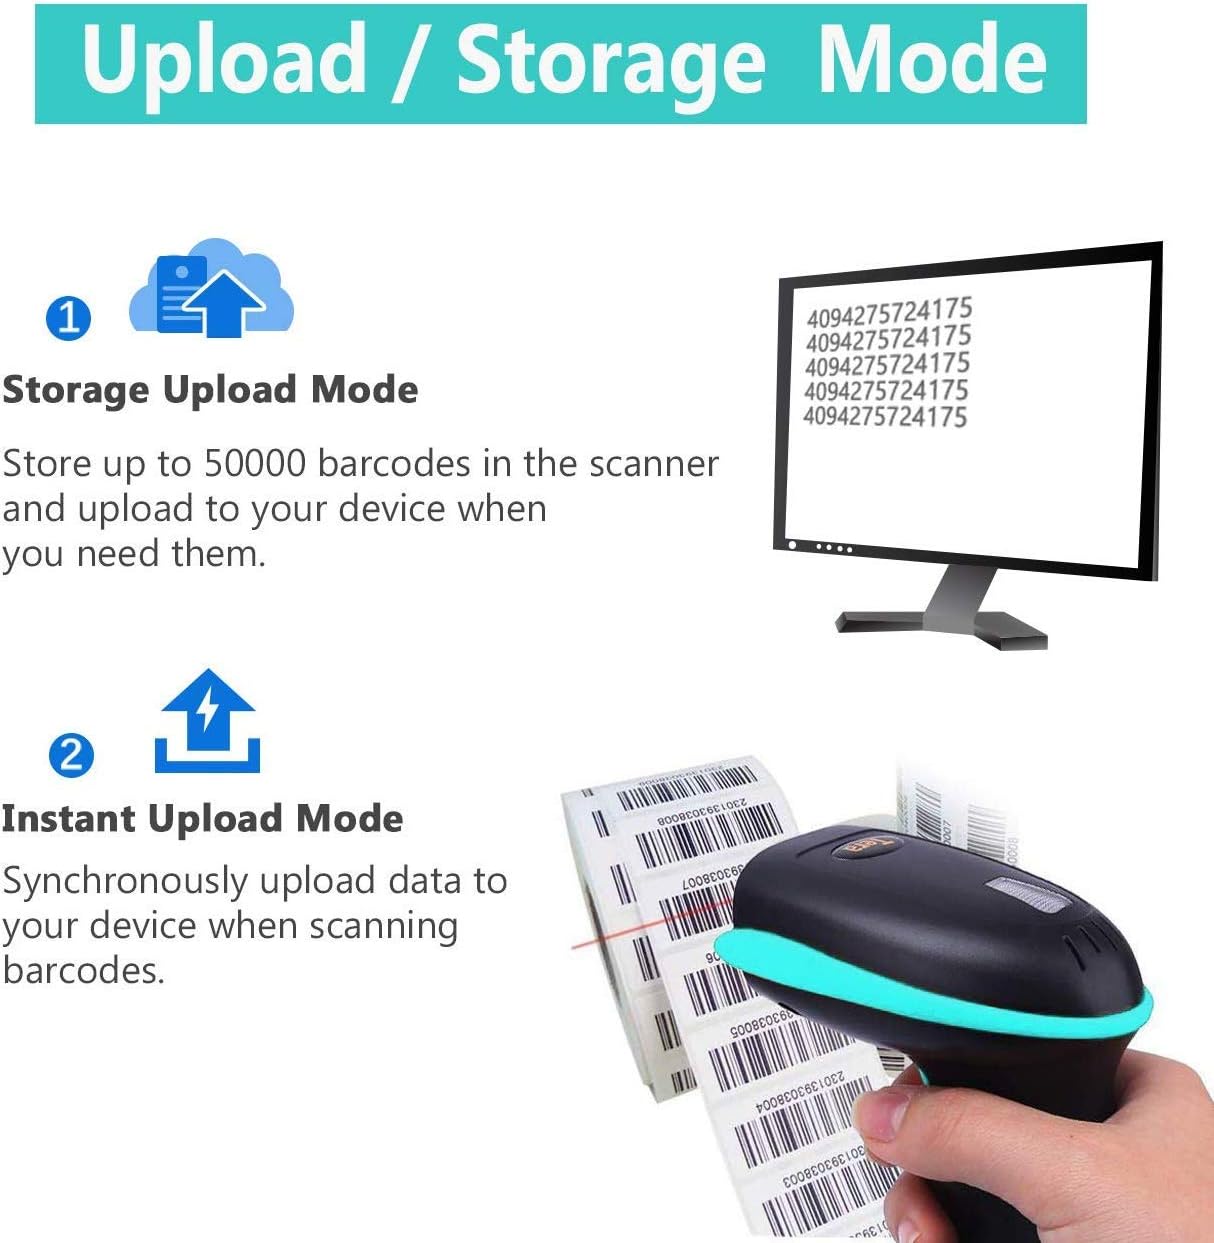
Image: Illustration of the two data upload modes: Storage Upload Mode, where barcodes are stored internally and uploaded later, and Instant Upload Mode, where data is transmitted immediately.
- Mode Unggah Instan: Barcodes are sent to your connected device immediately after scanning. This is suitable for real-time data entry.
- Mode Penyimpanan Offline: If the scanner is out of range or not connected, it will store scanned barcodes internally. Up to 50,000 barcodes can be stored. Once reconnected, you can upload the stored data to your device.
To switch between upload modes, scan the appropriate programming barcode found in the quick start guide.
5. Pemeliharaan
5.1 Pembersihan
- Use a soft, clean cloth slightly dampened with water or a mild cleaning solution to wipe the scanner's exterior.
- Do not use abrasive cleaners, solvents, or excessive liquid, as these can damage the device.
- Keep the scanning window clean and free of dust or smudges to ensure optimal reading performance.
5.2 Perawatan Baterai
- Isi daya pemindai secara teratur, terutama jika akan disimpan dalam jangka waktu yang lama.
- Hindari mengosongkan baterai sepenuhnya terlalu sering, karena hal ini dapat mengurangi masa pakainya.
- Simpan pemindai di tempat yang sejuk dan kering saat tidak digunakan.
5.3 Penyimpanan
When not in use, store the scanner in a safe place to prevent physical damage. The included stand can be used for convenient storage and hands-free operation.
6. Penyelesaian masalah
| Masalah | Kemungkinan Penyebab | Larutan |
|---|---|---|
| Pemindai tidak menyala. | Baterai lemah. | Isi daya pemindai setidaknya selama 2-3 jam. |
| Pemindai tidak dapat membaca kode batang. |
|
|
| No data transmitted to device. |
|
|
| Scanner beeps continuously or behaves erratically. | Configuration error or internal issue. | Perform a factory reset (refer to the quick start guide for the reset barcode). If the issue persists, contact support. |
7. Spesifikasi
- Nomor Model: 8541733886
- Dimensi Produk: 6.1x2.55x3.54 inci
- Berat Barang: 1.05 pon
- Baterai: 1 baterai Lithium Ion (2200mAh)
- Konektivitas: Bluetooth, 2.4GHz Wireless, USB 2.0 Wired
- Perangkat yang Kompatibel: Desktop, Laptop, Smartphone (POS, iOS, Android, Windows, Mac OS, Linux)
- Sumber Daya: Berkabel Listrik (untuk pengisian daya)
- Pabrikan: Tera
- Pertama Tersedia: 7 Mei 2019
8. Garansi dan Dukungan
8.1 Informasi Garansi
For specific warranty details, please refer to the warranty card included with your product or visit the official Tera websitus. Simpan struk pembelian Anda sebagai bukti pembelian untuk klaim garansi.
8.2 Dukungan Pelanggan
If you encounter any issues not covered in this manual or require further assistance, please contact Tera customer support. Contact information can typically be found on the product packaging, the official Tera websitus, atau melalui pengecer Anda.
Saat menghubungi dukungan, harap siapkan nomor model produk (8541733886) dan detail pembelian Anda.


Image: Illustrations representing customer service and technical support teams available to assist users.