1. Pendahuluan
This manual provides essential instructions for the safe and efficient operation of your Lane PMX-402DU Professional Stereo Power Mixer. Please read this manual thoroughly before using the device to ensure proper setup, operation, and maintenance. Retain this manual for future reference.
2. Petunjuk Keselamatan
Untuk mencegah sengatan listrik, kebakaran, atau kerusakan pada unit, harap perhatikan tindakan pencegahan keselamatan berikut:
- Sumber Daya: Hubungkan unit hanya ke tegangan AC yang ditentukan.tage as indicated on the rear panel. Ensure the power cord is securely plugged into a grounded outlet.
- Air dan Kelembaban: Jangan biarkan unit terkena hujan atau kelembapan. Jangan letakkan benda berisi cairan, seperti vas, di atas unit.
- Ventilasi: Ensure adequate ventilation. Do not block ventilation openings. Install the unit in a location with proper airflow to prevent overheating.
- Sumber Panas: Jangan letakkan unit di dekat sumber panas seperti radiator, pemanas, kompor, atau peralatan lainnya (termasuk amppengangkat) yang menghasilkan panas.
- Pelayanan: Jangan mencoba memperbaiki unit ini sendiri. Serahkan semua perbaikan kepada personel servis yang berkualifikasi. Membuka unit ini dapat membuat Anda terpapar tegangan berbahaya.tagatau bahaya lainnya.
- Pembersihan: Cabut unit dari stopkontak sebelum membersihkan. Gunakan hanya kain kering.
- Kelebihan beban: Jangan membebani stopkontak atau kabel ekstensi secara berlebihan karena dapat menimbulkan risiko kebakaran atau sengatan listrik.
PERHATIAN : RISIKO SENGATAN LISTRIK. JANGAN DIBUKA.
Simbol ini menunjukkan adanya vol berbahaya yang tidak berinsulasitage within the product's enclosure that may be of sufficient magnitude to constitute a risk of electric shock.
3. Produk Lebihview
3.1. Front Panel Controls and Connectors
The front panel provides access to all input channels, main output controls, effects, and the graphic equalizer.
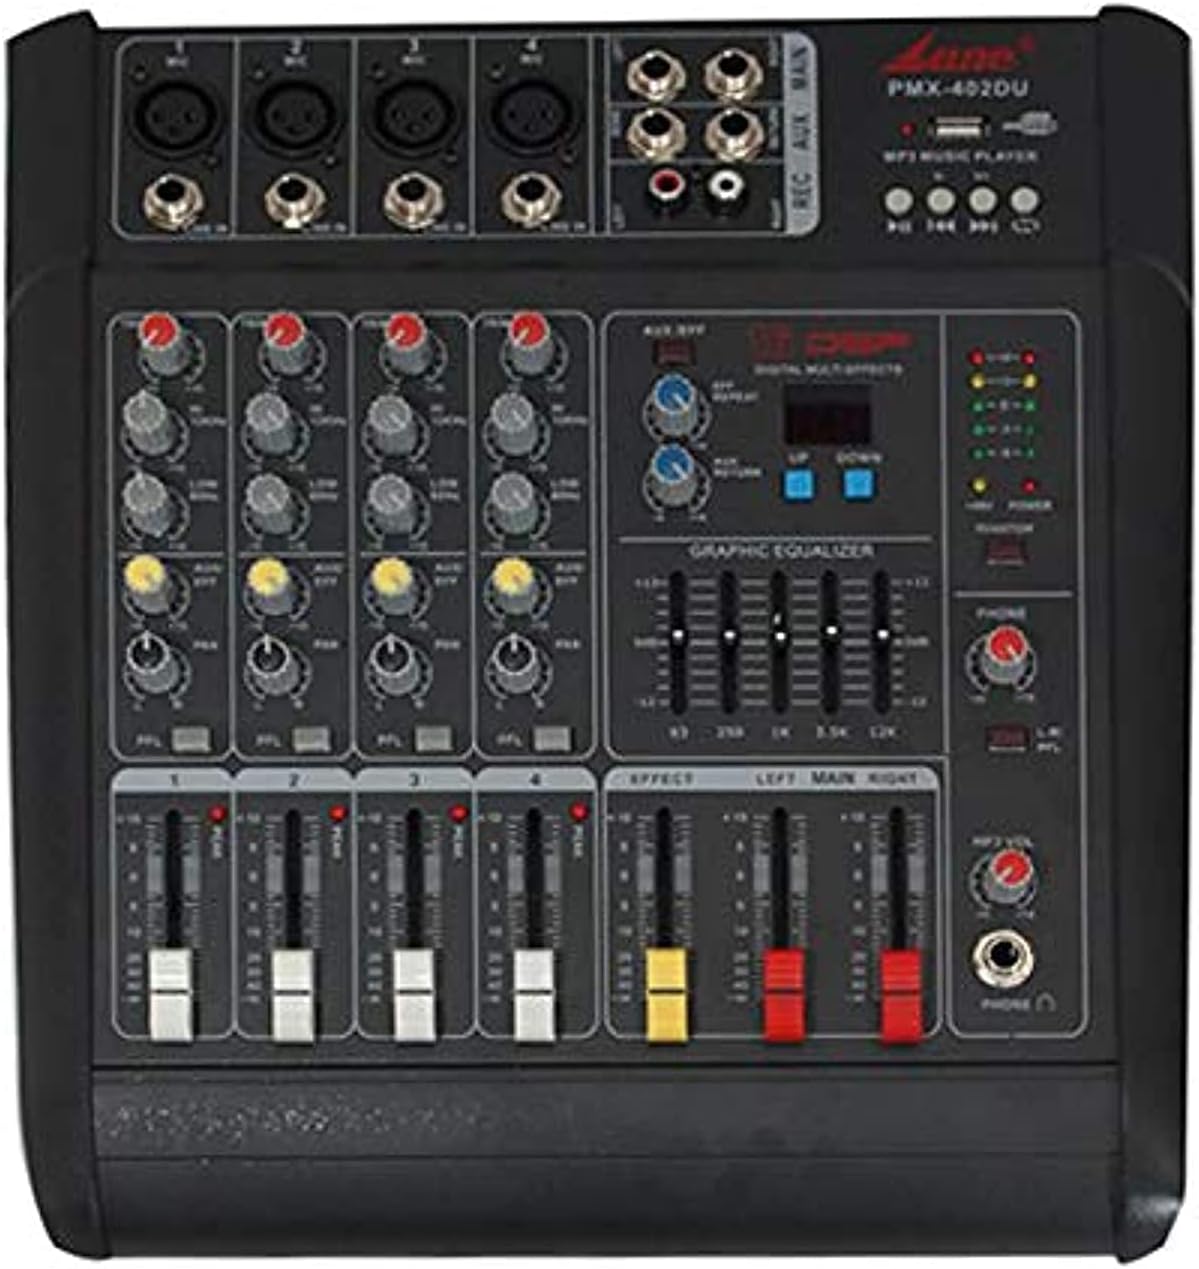
Gambar 3.1: Depan view of the Lane PMX-402DU Professional Stereo Power Mixer. This image displays the mixer's top surface, featuring four input channels with XLR and 1/4-inch jack inputs, gain controls, 3-band EQ, effect send, and channel faders. On the right, there are master controls for effects, a 5-band graphic equalizer, main output faders, and a USB/MP3 player section.
- Input Kombo XLR/TRS: Untuk mikrofon atau instrumen level saluran.
- Kontrol DAPATKAN: Menyesuaikan sensitivitas input untuk setiap saluran.
- EQ TINGGI/SEDANG/RENDAH: 3-band equalizer for tone shaping on each channel.
- EFF Send: Mengontrol jumlah sinyal yang dikirim ke prosesor efek internal.
- Saluran Fader: Adjusts the volume level of each individual channel.
- EFFECT Section: Controls for the built-in digital multi-effects processor.
- GRAPHIC EQUALIZER: 5-band stereo graphic equalizer for main output.
- Penggeser UTAMA: Mengontrol volume keluaran keseluruhan dari mixer.
- Pemutar USB/MP3: Interface for playing audio from USB drives.
- Keluaran Headphone: 1/4-inch jack for monitoring.
3.2. Koneksi Panel Belakang
The rear panel houses the power input and main speaker outputs.

Gambar 3.2: Belakang view of the Lane PMX-402DU Professional Stereo Power Mixer. This image shows the back of the unit, featuring the main power switch, AC input with fuse holder, and two 1/4-inch jack speaker outputs labeled "RIGHT" and "LEFT". A ventilation grille is also visible.
- Saklar daya: Menyalakan atau mematikan unit.
- AC INPUT/FUSE: Power cord connection and fuse holder.
- SPEAKER OUTPUTS (LEFT/RIGHT): 1/4-inch jack outputs for connecting passive speakers.
4. Pengaturan
4.1. Koneksi Daya
- Pastikan saklar POWER mixer dalam posisi MATI.
- Connect the supplied AC power cord to the AC INPUT on the rear panel of the mixer.
- Plug the other end of the power cord into a suitable grounded AC power outlet.
4.2. Koneksi Masukan
Connect your audio sources to the input channels on the front panel.
- Mikrofon: Use XLR cables to connect dynamic microphones to the XLR inputs.
- Instruments/Line-level Devices: Use 1/4-inch TS or TRS cables to connect instruments (e.g., keyboards, guitars with DI boxes) or other line-level devices (e.g., CD players, media players) to the 1/4-inch jack inputs.
4.3. Koneksi Keluaran
Connect your passive speakers to the SPEAKER OUTPUTS on the rear panel.
- Use appropriate speaker cables with 1/4-inch TS connectors.
- Connect the LEFT output to your left speaker and the RIGHT output to your right speaker.
- Ensure the impedance of your speakers matches the mixer's output impedance (4Ω).
5. Petunjuk Pengoperasian
5.1. Menghidupkan/Mematikan
- Before powering on, ensure all channel faders and the MAIN faders are set to their minimum (lowest) positions.
- Putar sakelar POWER pada panel belakang ke posisi ON.
- To power off, first lower all faders, then flip the POWER switch to the OFF position.
5.2. Kontrol Saluran
- MENDAPATKAN: Adjust the GAIN control for each input channel until the signal peak indicator (if present) flashes only occasionally. This sets the optimal input level.
- EQ: Use the HIGH, MID, and LOW controls to shape the tone of each input source.
- EFF Send: Turn the EFF Send knob clockwise to send a portion of the channel's signal to the internal effects processor.
- Saluran Fader: Slowly raise the channel fader to bring the signal into the mix.
5.3. Main Output Control
After setting individual channel levels, slowly raise the MAIN faders (LEFT and RIGHT) to achieve the desired overall output volume.
5.4. Effect Processor
The mixer features a built-in digital multi-effects processor. Use the controls in the EFFECT section to select and adjust the desired effect (e.g., reverb, delay). The EFF Send knobs on individual channels determine how much of each channel's signal is processed.
5.5. Equalizer Grafis
The 5-band graphic equalizer allows for fine-tuning the overall frequency response of the main mix. Adjust the sliders to boost or cut specific frequency bands to suit your acoustic environment or preference.
5.6. USB/MP3 Player
Masukkan flashdisk USB yang berisi audio MP3 files into the USB port. Use the controls in the USB/MP3 Player section to play, pause, skip tracks, and adjust the volume of the playback.
6. Pemeliharaan
- Pembersihan: Disconnect the power before cleaning. Use a soft, dry cloth to wipe the exterior of the mixer. Do not use liquid cleaners or aerosols.
- Penyimpanan: When not in use for extended periods, store the mixer in a cool, dry place, away from direct sunlight and extreme temperatures. Cover the unit to protect it from dust.
- Penggantian Sekring: If the unit does not power on, check the fuse located in the AC INPUT/FUSE holder on the rear panel. Replace with a fuse of the same type and rating only.
7. Penyelesaian masalah
| Masalah | Kemungkinan Penyebab | Larutan |
|---|---|---|
| Tidak ada daya | Kabel daya tidak terhubung; Saklar daya mati; Sekring putus | Check power cord connection; Ensure power switch is ON; Replace fuse with correct type and rating. |
| Tidak ada suara dari speaker | Speaker cables not connected; Main faders down; Channel faders down; GAIN too low; Speakers not powered (if active) | Check speaker connections; Raise MAIN faders; Raise channel faders; Adjust GAIN; Ensure active speakers are powered on. |
| Suara terdistorsi | GAIN too high; Channel fader too high; MAIN faders too high; Incorrect impedance match | Reduce GAIN; Lower channel faders; Lower MAIN faders; Verify speaker impedance (4Ω). |
| No effect sound | EFF Send knob down; Effect level down; Effect not selected | Increase EFF Send on channel; Adjust effect level in EFFECT section; Select an effect program. |
8. Spesifikasi
| Model | PMX-402DU |
| Daya Keluaran | 150W + 150W (pada 4Ω) |
| Konsumsi Daya | 150W |
| Distorsi Harmonik Total (THD) | 0.03% (1kHz full power) |
| Jumlah Saluran | 4 |
| Dimensi (P x L x T) | Ukuran 370x345x175 mm |
| Berat Barang | 11 kg |
| Sumber Daya | Listrik Kabel |
9. Garansi dan Dukungan
For warranty information or technical support, please refer to the documentation provided at the time of purchase or contact your authorized Lane dealer. Keep your proof of purchase for warranty claims.