1. Pendahuluan
This manual provides detailed instructions for the installation, operation, and maintenance of your Edge Audio Xtreme Series EDX5000.1FD-E0 Monoblock Amplifier. The EDX5000.1FD-E0 is a high-performance Class D full-bridge amplifier designed for powerful audio output. Please read this manual thoroughly before attempting installation or operation to ensure proper use and to prevent damage.
1.1 Tindakan pencegahan keselamatan
- Always disconnect the vehicle's battery negative terminal before making any electrical connections.
- Pastikan semua kabel terpasang dan terikat dengan benar untuk mencegah kerusakan atau korsleting.
- Gunakan kabel dengan ukuran yang sesuai untuk sambungan daya dan ground seperti yang ditentukan dalam manual ini.
- Hindari pemasangan amplifier in locations exposed to moisture or excessive heat.
- Konsultasikan dengan pemasang profesional jika Anda tidak yakin tentang bagian mana pun dari proses pemasangan.
2. Isi Paket
Verifikasi bahwa semua item ada dalam paket sebelum melanjutkan instalasi.
- Edge Audio EDX5000.1FD-E0 Monoblock Amppengangkat
- Remote Bass Control Unit
- Wiring for Remote Bass Control
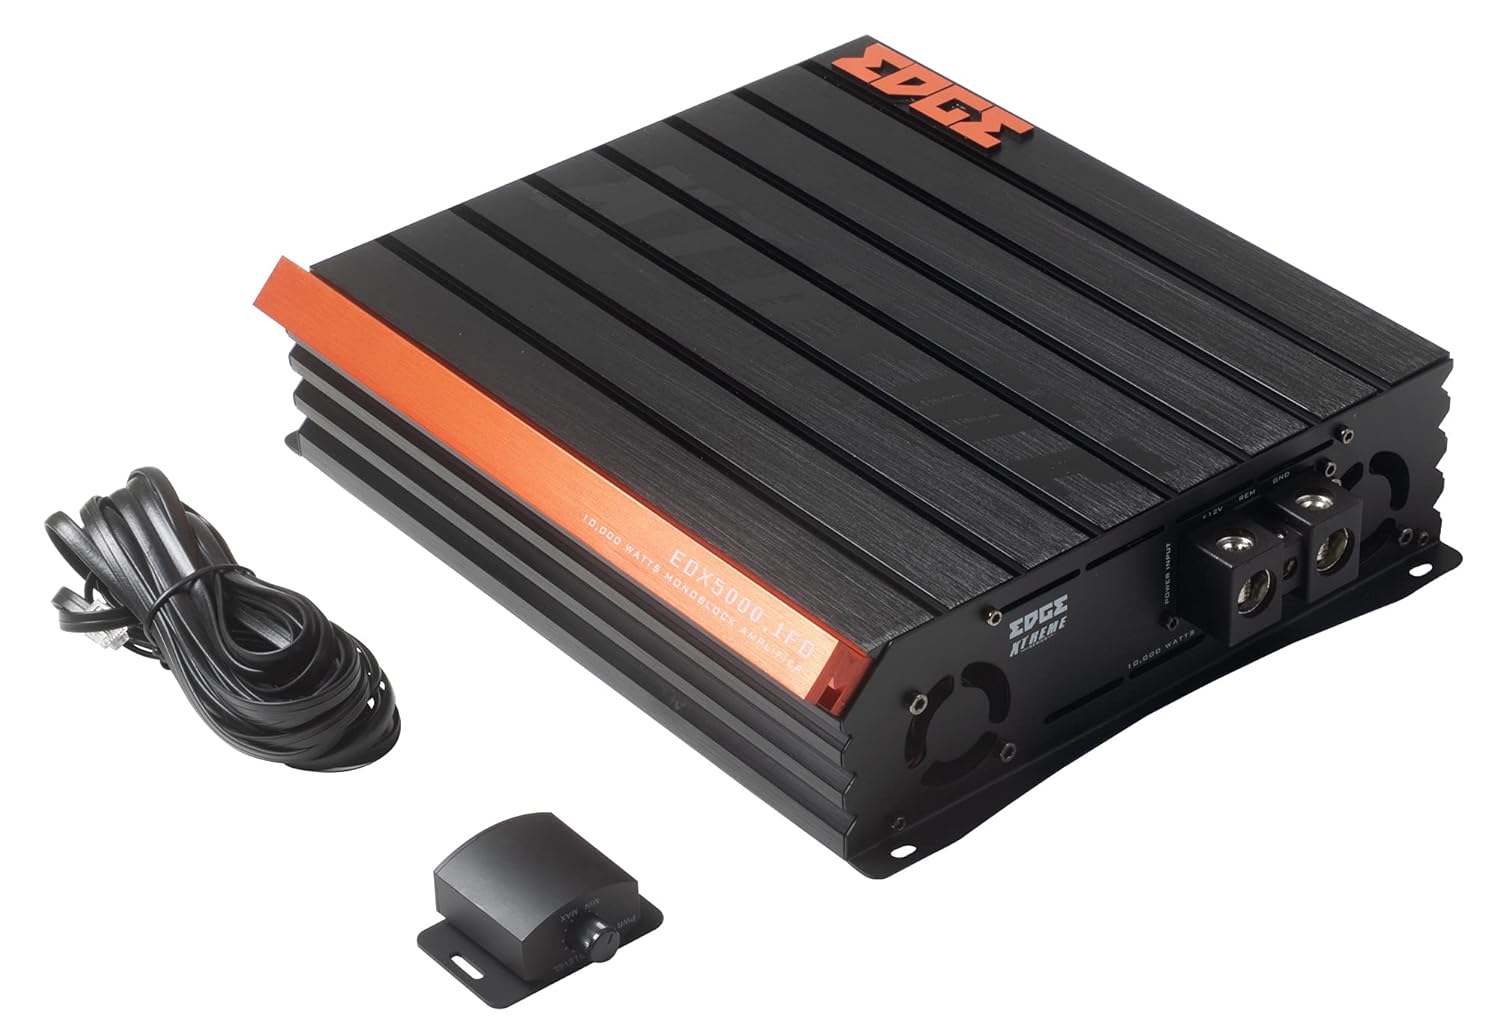
Image 2.1: Contents of the EDX5000.1FD-E0 package, including the amplifier, remote bass control, and connecting cable.

Image 2.2: The retail packaging for the Edge Audio EDX5000.1FD-E0 Monoblock Amppengangkat.
3. Fitur
The Edge Audio Xtreme Series EDX5000.1FD-E0 amplifier incorporates advanced features for optimal audio performance:
- Monoblock power amplifier design for dedicated subwoofer applications.
- Max Power: 10,000 watts.
- Built-in active crossovers (High-Pass Filter and Low-Pass Filter) for precise sound shaping.
- Adjustable Bass Boost circuit for enhanced low-frequency response.
- Ultra-efficient Class D topology for high power output with minimal heat generation.
- Wideband frequency response up to 20kHz.
- Full bridge technology for efficient power delivery.
- Compact footprint for versatile installation options.
- Dimensions (H x W x D): 2.5 x 10.4 x 9.1 inches (64 x 264 x 230mm).

Gambar 3.1: Atas view of the EDX5000.1FD-E0 amppengangkat, pertunjukanasing its compact design and heatsink fins.
4. Pengaturan dan Instalasi
Pemasangan yang tepat sangat penting untuk kinerja dan umur panjang ampIkuti panduan ini dengan saksama.
4.1 Lokasi Pemasangan
Pasang amplifier in a dry, well-ventilated area, away from direct sunlight or heat sources. Ensure sufficient airflow around the amplifier's heatsink. The ampAmplifier ini dirancang untuk pemasangan di permukaan.
4.2 Koneksi Kabel
All wiring should be securely connected and insulated to prevent short circuits. Use high-quality, appropriate gauge wiring.
4.2.1 Koneksi Daya
Hubungkan amplifier to the vehicle's electrical system as follows:
- +12V (Daya): Connect a heavy-gauge power cable (e.g., 4 AWG or larger for 10,000W max power) directly from the positive terminal of the vehicle's battery to the +12V terminal on the ampPenguat. Pasang sekering yang sesuai (tidak termasuk) dalam jarak 18 inci dari baterai.
- GND (Tanah): Hubungkan kabel ground berukuran besar dengan ukuran yang sama seperti kabel daya dari terminal GND pada amplifier to a clean, unpainted metal surface of the vehicle chassis. Ensure a solid electrical connection.
- REM (Pengaktifan Jarak Jauh): Connect a smaller gauge wire (e.g., 18 AWG) from the REM terminal on the ampHubungkan amplifier ke output remote turn-on pada head unit Anda. Kabel ini menyalakan amplifier on and off with your audio system.

Image 4.1: Power input terminals (+12V, REM, GND) on the EDX5000.1FD-E0 amppengangkat.
4.2.2 Koneksi Input Audio
Connect your head unit's RCA outputs to the 'LOW INPUT' RCA jacks on the amppengangkat.
4.2.3 Koneksi Output Speaker
Connect your subwoofer(s) to the speaker output terminals on the amplifier. Ensure correct polarity (+ to + and - to -) for optimal performance. Refer to your subwoofer's specifications for impedance matching.

Image 4.2: Rear panel of the EDX5000.1FD-E0 amplifier, showing low-level inputs, crossover controls, gain, bass boost, and speaker output terminals.
5. Petunjuk Pengoperasian
Setelah terpasang, sesuaikan ampPengaturan amplifier untuk kualitas suara optimal.
5.1 Panel Kontrol Selesaiview
Refer to Image 4.2 for the location of the following controls:
- HPF (Filter Lolos Tinggi): Adjusts the high-pass crossover frequency. For subwoofer applications, this should typically be set to its minimum or off, as a low-pass filter is usually preferred.
- LPF (Filter Lolos Rendah): Adjusts the low-pass crossover frequency (15Hz - 200Hz). This filters out frequencies above the set point, sending only low frequencies to the subwoofer. Set this according to your subwoofer and system requirements, typically between 60Hz and 100Hz.
- MENDAPATKAN: cocok dengan amplifier's input sensitivity to the output level of your head unit. Start with the gain at minimum, then slowly increase it until you hear distortion, then back off slightly. Do not use the gain control as a volume knob.
- PENINGKATAN BASS: Adjusts the level of bass enhancement (0dB - 12dB). Use sparingly to avoid distortion.
- FREQ (Frekuensi Penguatan Bass): Selects the center frequency for the bass boost (35Hz - 70Hz).
- TERPENCIL: Port for connecting the wired remote bass control unit.
5.2 Kontrol Bass Jarak Jauh
The included remote bass control allows for convenient adjustment of the subwoofer output level from the driver's seat. Connect it to the 'REMOTE' port on the amppengangkat.
6. Pemeliharaan
Perawatan rutin membantu memastikan umur panjang dan kinerja mesin Anda. amppengangkat.
- Pembersihan: Bersihkan secara berkala ampBersihkan bagian luar amplifier dengan kain lembut dan kering. Jangan gunakan bahan kimia keras atau pembersih abrasif. Pastikan sirip ventilasi bebas dari debu dan kotoran.
- Pemeriksaan Koneksi: Annually inspect all power, ground, remote, and speaker connections for tightness and corrosion. Loose connections can cause performance issues or damage.
- Lingkungan: Pastikan ampPenguat tetap berada dalam lingkungan yang kering dan stabil, terlindungi dari suhu ekstrem.
7. Penyelesaian masalah
Jika Anda mengalami masalah dengan amplifier, refer to the following common problems and solutions before contacting support.
- Tidak Ada Daya:
- Check the in-line fuse near the battery.
- Verify +12V, GND, and REM connections are secure and receiving power.
- Ensure the remote turn-on wire is connected to a switched 12V source.
- Tidak ada suara:
- Check all RCA input and speaker output connections.
- Verify head unit is powered on and outputting audio.
- Adjust the GAIN control.
- Suara Terdistorsi:
- Reduce the GAIN setting.
- Check speaker wiring for shorts or incorrect polarity.
- Pastikan impedansi speaker sesuai ampspesifikasi lifier.
- Reduce BASS BOOST if active.
- AmpAmplifier Ter overheating:
- Pastikan ventilasi yang memadai di sekitar amppengangkat.
- Check speaker impedance; running too low an impedance can cause overheating.
- Verify power and ground wire gauge is sufficient.
8. Spesifikasi
Technical specifications for the Edge Audio Xtreme Series EDX5000.1FD-E0 Monoblock Amppengangkat:
| Fitur | Spesifikasi |
|---|---|
| Nomor Model | EDX5000.1FD-E0 |
| Merek | TEPIAN |
| AmpJenis pengangkat | Monoblock, Class D, Full Bridge |
| Kekuatan Maksimum | 10,000 Watt |
| Respon Frekuensi | Hingga 20kHz |
| Built-in Crossovers | Active (HPF, LPF) |
| Bass Boost | Adjustable (0-12dB) |
| Frekuensi Peningkatan Bass | Adjustable (35Hz-70Hz) |
| Jil.tage | 230 Volt (Tegangan Operasi)tage Range typically 12-14.4V DC for car audio) |
| Jenis Pemasangan | Pemasangan Permukaan |
| Dimensi Produk (T x L x D) | 2.5 x 10.4 x 9.1 inci (64 x 264 x 230mm) |
| Berat Produk | 6.61 pon |
9. Garansi dan Dukungan
For warranty information or technical support, please refer to the documentation provided at the time of purchase or contact your authorized Edge Audio dealer. Keep your proof of purchase for warranty claims.


