1. Pendahuluan
This manual provides detailed instructions for the installation, operation, and maintenance of the Supermicro X13SEI-F Server Motherboard. This motherboard is designed for high-performance server applications, supporting Intel Xeon processors with an LGA4677 socket and DDR5 memory.
Please read this manual thoroughly before attempting to install or operate the motherboard to ensure proper setup and to prevent damage to the components.
2. Informasi Keselamatan
Perhatikan tindakan pencegahan keselamatan berikut untuk mencegah cedera dan kerusakan pada peralatan:
- Always disconnect the power cord from the power supply before installing or removing any components.
- Gunakan gelang anti-statis saat memegang motherboard dan komponen lainnya untuk mencegah pelepasan muatan elektrostatik (ESD).
- Ensure the installation environment is dry and free from static electricity.
- Jangan biarkan motherboard terkena kelembaban atau suhu ekstrem.
- Pegang motherboard pada bagian tepinya untuk menghindari menyentuh komponen sensitif.
- Refer to the power supply unit's manual for specific safety guidelines related to power connections.
3. Isi Paket
Pastikan semua barang ada dan dalam kondisi baik. Jika ada barang yang rusak atau hilang, hubungi vendor Anda.
- Supermicro X13SEI-F Server Motherboard
- I / O Shield
- Kabel SATA (jumlah dapat bervariasi)
- Quick Reference Guide / User Manual (this document)
- CD/DVD driver atau drive USB (atau petunjuk pengunduhan)
4. Produk Lebihview
The Supermicro X13SEI-F is a high-performance server motherboard featuring the LGA4677 socket, designed to support Intel Xeon Scalable processors. It offers robust memory capabilities with 8 DDR5 DIMM slots, supporting up to 4800MHz memory speed. The board also includes multiple PCIe slots for expansion.
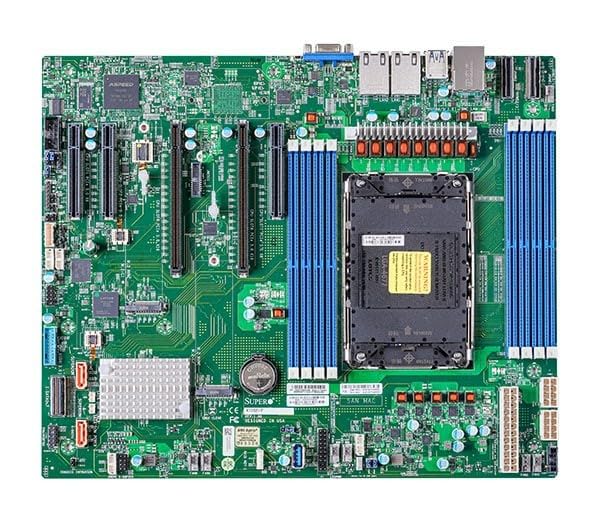
Figure 1: Supermicro X13SEI-F Server Motherboard. This image displays the overall layout of the motherboard, including the CPU socket, DIMM slots, and various connectors.
4.1 Fitur Utama
- Soket CPU: LGA4677 for Intel Xeon Scalable Processors
- Chipset: Intel C621
- Ingatan: 8x DDR5 DIMM slots, up to 4800MHz
- Slot Ekspansi: Multiple PCIe slots (specific configuration depends on model variant)
- Penyimpanan: Support for various storage interfaces (SATA, NVMe - specific details in specifications)
- Jaringan: Integrated LAN controllers
5. Pengaturan dan Instalasi
Before beginning installation, ensure your system case is compatible with the motherboard's form factor and that you have all necessary components.
5.1 CPU Installation (LGA4677)
- Cari soket LGA4677 pada motherboard.
- Carefully open the CPU socket retention mechanism according to the instructions provided with your CPU or motherboard.
- Align the CPU with the socket, ensuring the triangular mark on the CPU matches the mark on the socket. Do not force the CPU into the socket.
- Turunkan CPU perlahan ke dalam soket.
- Close the CPU socket retention mechanism until it locks securely.
- Pasang pendingin CPU sesuai dengan petunjuk pabrikannya.
5.2 Instalasi RAM (DDR5)
- Locate the 8 DDR5 DIMM slots on the motherboard.
- Open the retention clips at both ends of the DIMM slot.
- Sejajarkan takik pada modul memori DDR5 dengan kunci di slot DIMM.
- Insert the memory module firmly into the slot until the retention clips snap into place. Ensure both clips are closed.
- For optimal performance, refer to the motherboard's manual for recommended memory population order.
5.3 Pemasangan Kartu PCIe
- Identify the appropriate PCIe slot for your expansion card (e.g., GPU, RAID card).
- Lepaskan penutup slot ekspansi yang sesuai dari sasis Anda.
- Align the PCIe card with the slot and press down firmly until it is fully seated.
- Secure the card with a screw or retention clip to the chassis.
5.4 Pemasangan Perangkat Penyimpanan
- Drive SATA: Connect SATA data cables from the motherboard's SATA ports to your SATA hard drives or SSDs. Connect power cables from the PSU to the drives.
- NVMe M.2 Drives: Locate the M.2 slots. Insert the M.2 drive at an angle, then push it down and secure it with the provided screw or retention mechanism.
5.5 Koneksi Daya
- Hubungkan konektor daya ATX 24-pin dari catu daya Anda ke soket daya utama pada motherboard.
- Connect the 8-pin (or 4+4 pin) EPS 12V CPU power connector(s) to the corresponding sockets near the CPU.
- Pastikan semua sambungan daya terpasang dengan aman.
5.6 Koneksi Panel Depan
Connect the front panel cables (Power LED, HDD LED, Power Switch, Reset Switch, USB, Audio) from your chassis to the corresponding headers on the motherboard. Refer to the motherboard's silkscreen labels or the detailed manual for exact pin configurations.
6. Petunjuk Pengoperasian
6.1 Boot Pertama
- After completing all hardware installations, connect the monitor, keyboard, and mouse.
- Connect the power cord to the power supply and turn on the power switch on the PSU.
- Press the power button on your chassis.
- The system should power on, and you should see the BIOS/UEFI POST screen.
6.2 Pengaturan BIOS/UEFI
Untuk masuk ke utilitas pengaturan BIOS/UEFI, tekan tombol MENGHAPUS or F2 key repeatedly during the POST process. Within the BIOS/UEFI, you can configure:
- Urutan booting
- Waktu dan tanggal sistem
- CPU and memory settings
- Storage configurations (RAID, AHCI)
- Kontrol kecepatan kipas
- Pengaturan keamanan
Simpan perubahan sebelum keluar dari BIOS/UEFI.
6.3 Instalasi Sistem Operasi
Insert your operating system installation media (USB drive or DVD) and set it as the primary boot device in the BIOS/UEFI. Follow the on-screen instructions to install your preferred operating system. After installation, install all necessary drivers from the Supermicro website or the provided driver media.
7. Pemeliharaan
7.1 Pembersihan
- Regularly clean dust from the motherboard and system components using compressed air.
- Pastikan sistem dimatikan dan dicabut sebelum membersihkan.
- Hindari penggunaan cairan pembersih langsung pada komponen.
7.2 Pembaruan Firmware
Periksa Supermicro secara berkala. website for updated BIOS/UEFI firmware. Firmware updates can improve system stability, performance, and compatibility. Follow the specific instructions provided by Supermicro for updating the firmware to avoid system damage.
8. Penyelesaian masalah
Bagian ini memberikan solusi untuk masalah umum yang mungkin Anda temui.
8.1 Tidak Ada Daya / Tidak Ada POST (Uji Mandiri Daya Hidup)
- Periksa Sambungan Daya: Ensure the 24-pin ATX and 8-pin EPS 12V power connectors are securely seated.
- Verifikasi PSU: Uji unit catu daya (PSU) dengan sistem lain atau penguji PSU.
- Komponen Pemasangan Ulang: Reseat the CPU, RAM modules, and any expansion cards.
- Hapus CMOS: Refer to the motherboard manual for instructions on how to clear the CMOS (Complementary Metal-Oxide-Semiconductor) settings, which can resolve boot issues.
- Konfigurasi Minimum: Try booting with only the CPU, one RAM stick, and the necessary power connections.
8.2 Tidak Ada Output Tampilan
- Koneksi Monitor: Ensure the monitor is properly connected to the graphics output (either integrated or discrete GPU) and is powered on.
- Kartu Grafis: If using a discrete graphics card, ensure it is fully seated in its PCIe slot and has all necessary power connectors from the PSU.
- Grafik Terpadu: If your CPU supports integrated graphics, try connecting the monitor to the motherboard's video output to rule out a discrete GPU issue.
8.3 Sistem Operasi Tidak Dapat Booting
- Urutan Booting: Check the BIOS/UEFI settings to ensure the correct boot device (e.g., SSD, HDD) is selected as the primary boot option.
- Drive Connections: Verify that your storage drives are properly connected (data and power).
- Instalasi Sistem Operasi: If the OS is newly installed, ensure the installation process completed successfully and all drivers are installed.
9. Spesifikasi
| Fitur | Detil |
|---|---|
| Merek | Supermikro |
| Nama Model | MBD-X13SEI-F-B |
| Soket CPU | LGA4677 |
| Prosesor yang Kompatibel | Intel Xeon Scalable |
| Jenis Chipset | Intel C621 |
| Teknologi Memori RAM | DDR5 |
| Kecepatan Memori | Frekuensi 4800 MHz |
| Slot RAM | 8x DDR5 DIMM slots |
| Dimensi Produk (P x L x T) | 16x12x5 inci |
| Berat Barang | 3.19 pon |
| Tanggal Pertama Tersedia | 20 Januari 2023 |
Note: Specifications are subject to change without notice. For the most current information, please refer to the official Supermicro product page.
10. Garansi dan Dukungan Teknis
10.1 Informasi Garansi
Supermicro products are covered by a limited warranty. For detailed warranty terms and conditions, including duration and coverage, please visit the official Supermicro website or consult the warranty card included with your product. Keep your proof of purchase for warranty claims.
10.2 Dukungan Teknis
For technical assistance, driver downloads, BIOS updates, and further product information, please visit the official Supermicro support weblokasi:
https://www.supermicro.com/support
Before contacting support, please have your motherboard model number (MBD-X13SEI-F-B) and serial number ready.