1. Pendahuluan
This manual provides detailed instructions for the installation, operation, and maintenance of the PeakDo Wireless HDMI Transmitter and Receiver P3 S. This device is designed to wirelessly transmit uncompressed 1080P Full HD video and digital audio with zero latency, making it ideal for various applications including gaming, home entertainment, and professional presentations. The P3 S model features a USB-C port on the receiver for compatibility with AR smart glasses and portable monitors, in addition to standard HDMI output.

Figure 1: PeakDo Wireless HDMI Transmitter (left) and Receiver (right).
2. Produk Lebihview
2.1 Fitur Utama
- Wireless AR Smart Glasses Setup: Features a Type-C port on the Receiver for direct connection to AR smart glasses (e.g., XREAL Air, Rokid Max/Air, RayNeo, VITURE One) and portable monitors, enabling cable-free AR experiences.
- Uncompressed FHD Video & Digital Audio: Transmits 1080P Full HD video and digital audio without compression, ensuring high-quality output.
- Zero Latency Transmission: Provides 0 latency for real-time applications such as live sports, synchronized gaming, and interactive meetings.
- Pengoperasian Plug and Play: Requires no Wi-Fi connection or app installation for setup.
- Kompatibilitas Luas: Transmitter (TX) connects to PC, Laptop, Xbox, PlayStation, Nintendo Switch, TV Box. Receiver (RX) connects to TVs, monitors, projectors via HDMI, and AR smart glasses/portable monitors via USB-C.
- Jangkauan Transmisi: Effective wireless transmission up to 100 feet (approximately 30 meters).
2.2 Isi Paket
Harap verifikasi bahwa semua item ada dalam paket:
- PeakDo Wireless HDMI Transmitter (TX)
- PeakDo Wireless HDMI Receiver (RX)
- USB Power Cable(s)
- User Manual (dokumen ini)
3. Petunjuk Penyiapan
3.1 Menghubungkan Pemancar (TX)
- Connect the HDMI end of the Transmitter (TX) to the HDMI output port of your source device (e.g., PC, laptop, game console, TV box).
- Connect the USB power cable to the TX unit and plug the other end into a USB power source (e.g., a USB port on your source device, a USB wall adapter). Ensure the TX receives at least 5V 2A power supply.

Figure 2: Compatible input (TX) and output (RX) devices.
3.2 Menghubungkan Penerima (RX)
- Penting: First, connect the USB power cable to the RX unit and plug the other end into a USB power source (e.g., a USB wall adapter). Ensure the RX receives at least 5V 2A power supply. The RX unit requires sufficient power to function correctly.
- For HDMI displays (TV, Monitor, Projector): Connect an HDMI cable from the HDMI output port of the Receiver (RX) to the HDMI input port of your display device.
- For AR Smart Glasses or Portable Monitors: Connect a USB-C cable from the Type-C port on the Receiver (RX) to the USB-C input port of your AR smart glasses or portable monitor.
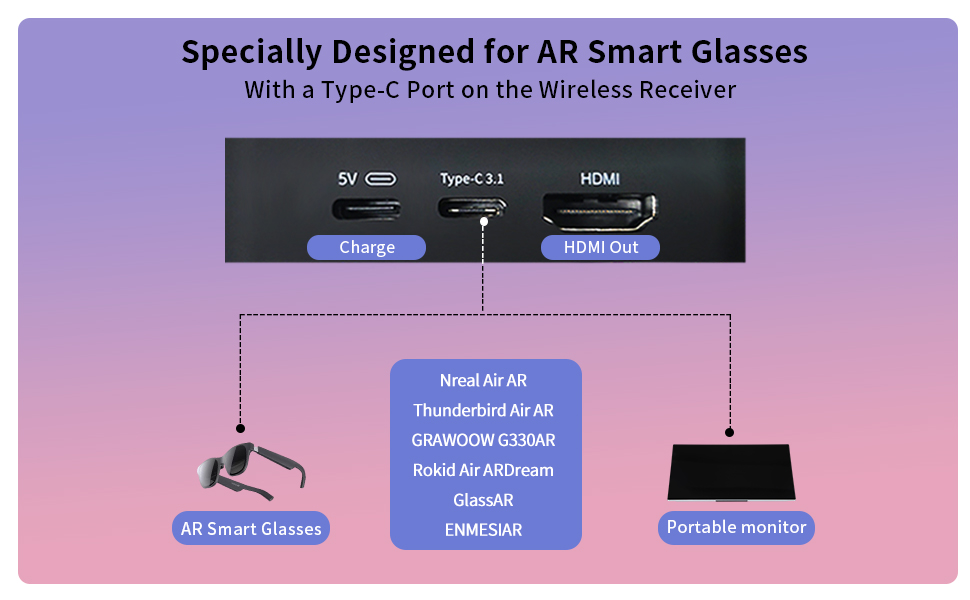
Figure 3: Receiver ports (5V power, Type-C 3.1, HDMI) and AR glasses compatibility.
Catatan: For certain AR glasses like Nreal, you may need to upgrade their firmware for optimal compatibility. Refer to your AR glasses manufacturer's instructions for firmware updates.
4. Petunjuk Pengoperasian
4.1 Menyalakan dan Memasangkan
Once both the Transmitter (TX) and Receiver (RX) units are connected to their respective power sources and devices, they will automatically power on and attempt to pair. The system is designed for plug-and-play operation, requiring no manual pairing steps or software installation.

Figure 4: Plug and Play setup in a meeting environment.
4.2 Skenario Penggunaan
- Permainan: Experience zero-latency gaming on a large screen or through AR glasses.
- Hiburan rumah: Stream movies, TV shows, or other media from your PC or TV box to any display.
- Presentations/Meetings: Share content wirelessly from your laptop to a projector or large monitor in a conference room.
- AR Experiences: Connect directly to compatible AR smart glasses for immersive gaming or productivity.
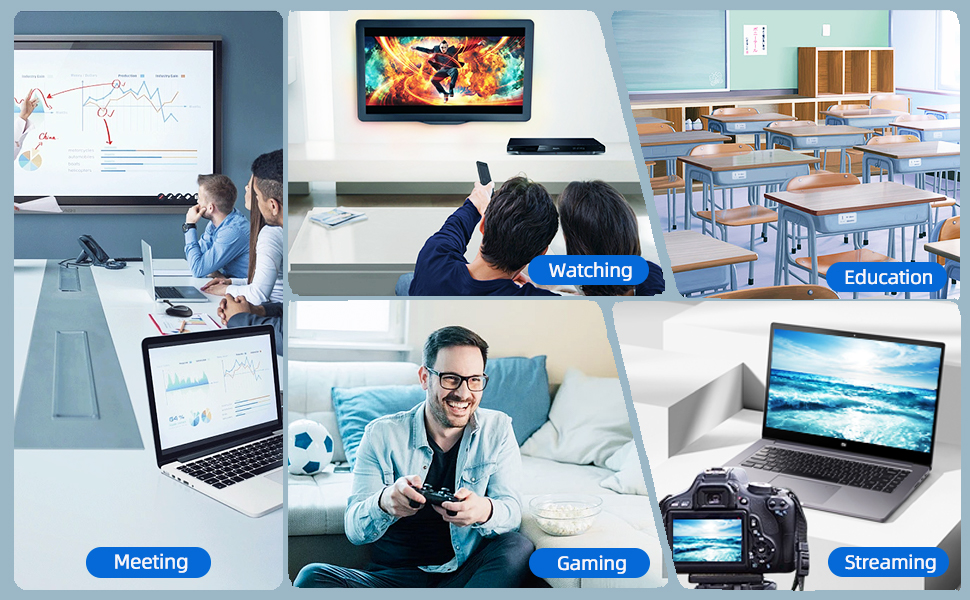
Figure 5: Diverse applications of the PeakDo Wireless HDMI system.

Gambar 6: Contohample of a wireless AR gaming setup.
5. Pemeliharaan
The PeakDo Wireless HDMI Transmitter and Receiver P3 S requires minimal maintenance.
- Pembersihan: Use a soft, dry cloth to clean the exterior of the units. Do not use liquid cleaners or aerosols.
- Penyimpanan: Saat tidak digunakan dalam jangka waktu lama, simpan perangkat di tempat yang sejuk dan kering, jauh dari sinar matahari langsung dan suhu ekstrem.
- Catu Daya: Always ensure both TX and RX units receive adequate power (5V 2A) from a stable power source.
6. Penyelesaian masalah
6.1 Tidak Ada Sinyal / Layar Hitam
- Periksa Daya: Ensure both the Transmitter (TX) and Receiver (RX) units are properly powered. The RX unit specifically requires sufficient power (5V 2A) and should be powered first before connecting the HDMI/USB-C cable to the display.
- Koneksi Kabel: Verify that all HDMI and USB-C cables are securely connected to their respective ports on the devices and displays.
- Output Perangkat Sumber: Confirm that your source device (PC, game console) is outputting video correctly. Try connecting the source device directly to the display with a cable to rule out issues with the source.
- Tampilan Masukan: Ensure your display (TV, monitor, projector, AR glasses) is set to the correct input source (e.g., HDMI 1, USB-C).
- Mulai Ulang Perangkat: Disconnect power from both TX and RX units, then reconnect. Also, restart your source device and display.
6.2 Intermittent Signal / Flickering
- Jarak dan Hambatan: Reduce the distance between the TX and RX units. Ensure there are no significant physical obstructions (walls, large furniture) between them that could interfere with the wireless signal.
- Gangguan: Keep the units away from other wireless devices (e.g., Wi-Fi routers, cordless phones, microwave ovens) that operate on similar frequencies.
- Catu Daya: Ensure stable and sufficient power supply to both units. Fluctuations in power can affect signal stability.
6.3 Tidak Ada Audio
- Pengaturan Audio Sumber: Periksa pengaturan output audio pada perangkat sumber Anda untuk memastikan audio dikirim melalui HDMI.
- Display Audio: Verify that the audio on your display device (TV, monitor, AR glasses) is not muted and the volume is turned up.
- Integritas Kabel: Ensure the HDMI or USB-C cable connecting the RX to the display is not damaged.
6.4 AR Glasses Compatibility Issues
- Pembaruan Firmware: As mentioned in the setup, some AR glasses (e.g., Nreal) may require a firmware update to work correctly with external video sources. Consult your AR glasses manufacturer's support.
- Power to RX: Ensure the RX unit is adequately powered, especially when connecting to power-hungry AR glasses.
- Kabel USB-C: Use a high-quality USB-C cable that supports video transmission.
7. Spesifikasi
| Fitur | Keterangan |
|---|---|
| Nomor Model | Hlm 3 S |
| Pengkodean Video | YUV422 or RGB444 (uncompressed 1080P) |
| Dukungan Resolusi | Hingga 1080P Full HD |
| Latensi | 0 Latensi |
| Teknologi Konektivitas | Wireless (Millimeter Wave) |
| Rentang Transmisi | Hingga 100 kaki (sekitar 30 meter) |
| Compatible Transmitter Devices | PC, Laptop, Xbox, PS4, PS5, Switch, PS3, TV Box, etc. |
| Compatible Receiver Devices | TV, Monitor, Projector (via HDMI); AR Smart Glasses, Portable Monitor (via USB-C) |
| Jumlah Port HDMI | 1 (on Receiver) |
| Jenis Konektor | HDMI, Micro USB (for power), USB-C (on Receiver) |
| Mode Keluaran Audio | Mono (Digital Audio) |
| Konfigurasi Saluran Suara Surround | 2.0 |
| Catu Daya | 5V 2A (for both TX and RX units) |
| Berat Barang | 1.08 pon (sekitar 0.49 kg) |
| Dimensi Paket | 6.73 x 5.83 x 2.48 inci (sekitar 17.1 x 14.8 x 6.3 cm) |
8. Garansi dan Dukungan
For warranty information and technical support, please refer to the official PeakDo websitus web atau hubungi layanan pelanggan mereka secara langsung. Simpan struk pembelian Anda untuk klaim garansi.
- Pabrikan: PuncakDo
- Tanggal Pertama Tersedia: 16 Maret 2023
- Pelangganviews: 3.3 out of 5 stars (based on 6 ratings at time of data extraction)


