1. Pendahuluan
This manual provides detailed instructions for the installation, operation, and maintenance of your GAMEON Midnight I Series Mid Tower Gaming PC Case. Please read this manual thoroughly before beginning installation to ensure proper setup and to maximize the performance and lifespan of your product. Keep this manual for future reference.
2. Informasi Keselamatan
- Always disconnect the power supply from the wall outlet before performing any installation or maintenance inside the PC case.
- Handle the tempered glass panels with care. Tempered glass, while durable, can shatter if dropped or subjected to sharp impacts.
- Avoid exposing the case to extreme temperatures or high humidity.
- Jangan mencoba memodifikasi casing atau komponennya. Modifikasi tanpa izin dapat membatalkan garansi Anda dan menimbulkan risiko keselamatan.
- Jauhkan bagian-bagian kecil dan sekrup dari jangkauan anak-anak.
3. Isi Paket
Harap verifikasi bahwa semua item yang tercantum di bawah ini ada dalam paket Anda:
- GAMEON Midnight I Series Mid Tower Gaming PC Case
- 7 x 120mm ARGB PWM Cooling Fans (pre-installed)
- Accessory Box (containing screws, cable ties, and other mounting hardware)
- ARGB/PWM Fan Controller and Remote Control
- User Manual (dokumen ini)
4. Produk Lebihview
The GAMEON Midnight I Series PC case is designed for optimal cooling and aesthetic appeal, featuring tempered glass panels and pre-installed ARGB PWM fans.

Figure 4.1: Internal layout of the PC case, highlighting the spacious interior for component installation.

Figure 4.2: Rear and top internal view, illustrating fan placement and overall structure.
4.1 ARGB+PWM Case Fans
The case comes with 7 pre-installed 120mm ARGB PWM fans, providing efficient cooling and customizable lighting. The fans are controlled via an included ARGB/PWM controller and remote.

Figure 4.3: ARGB+PWM fan features and fan mounting support. The front supports 360mm water cooling. Fan mounts include 3x120mm for PSU cover, 3x120mm for bottom, 3x120mm for top, and 1x120mm for rear.
4.2 Port I/O Depan
The front panel provides convenient access to essential ports for connectivity.
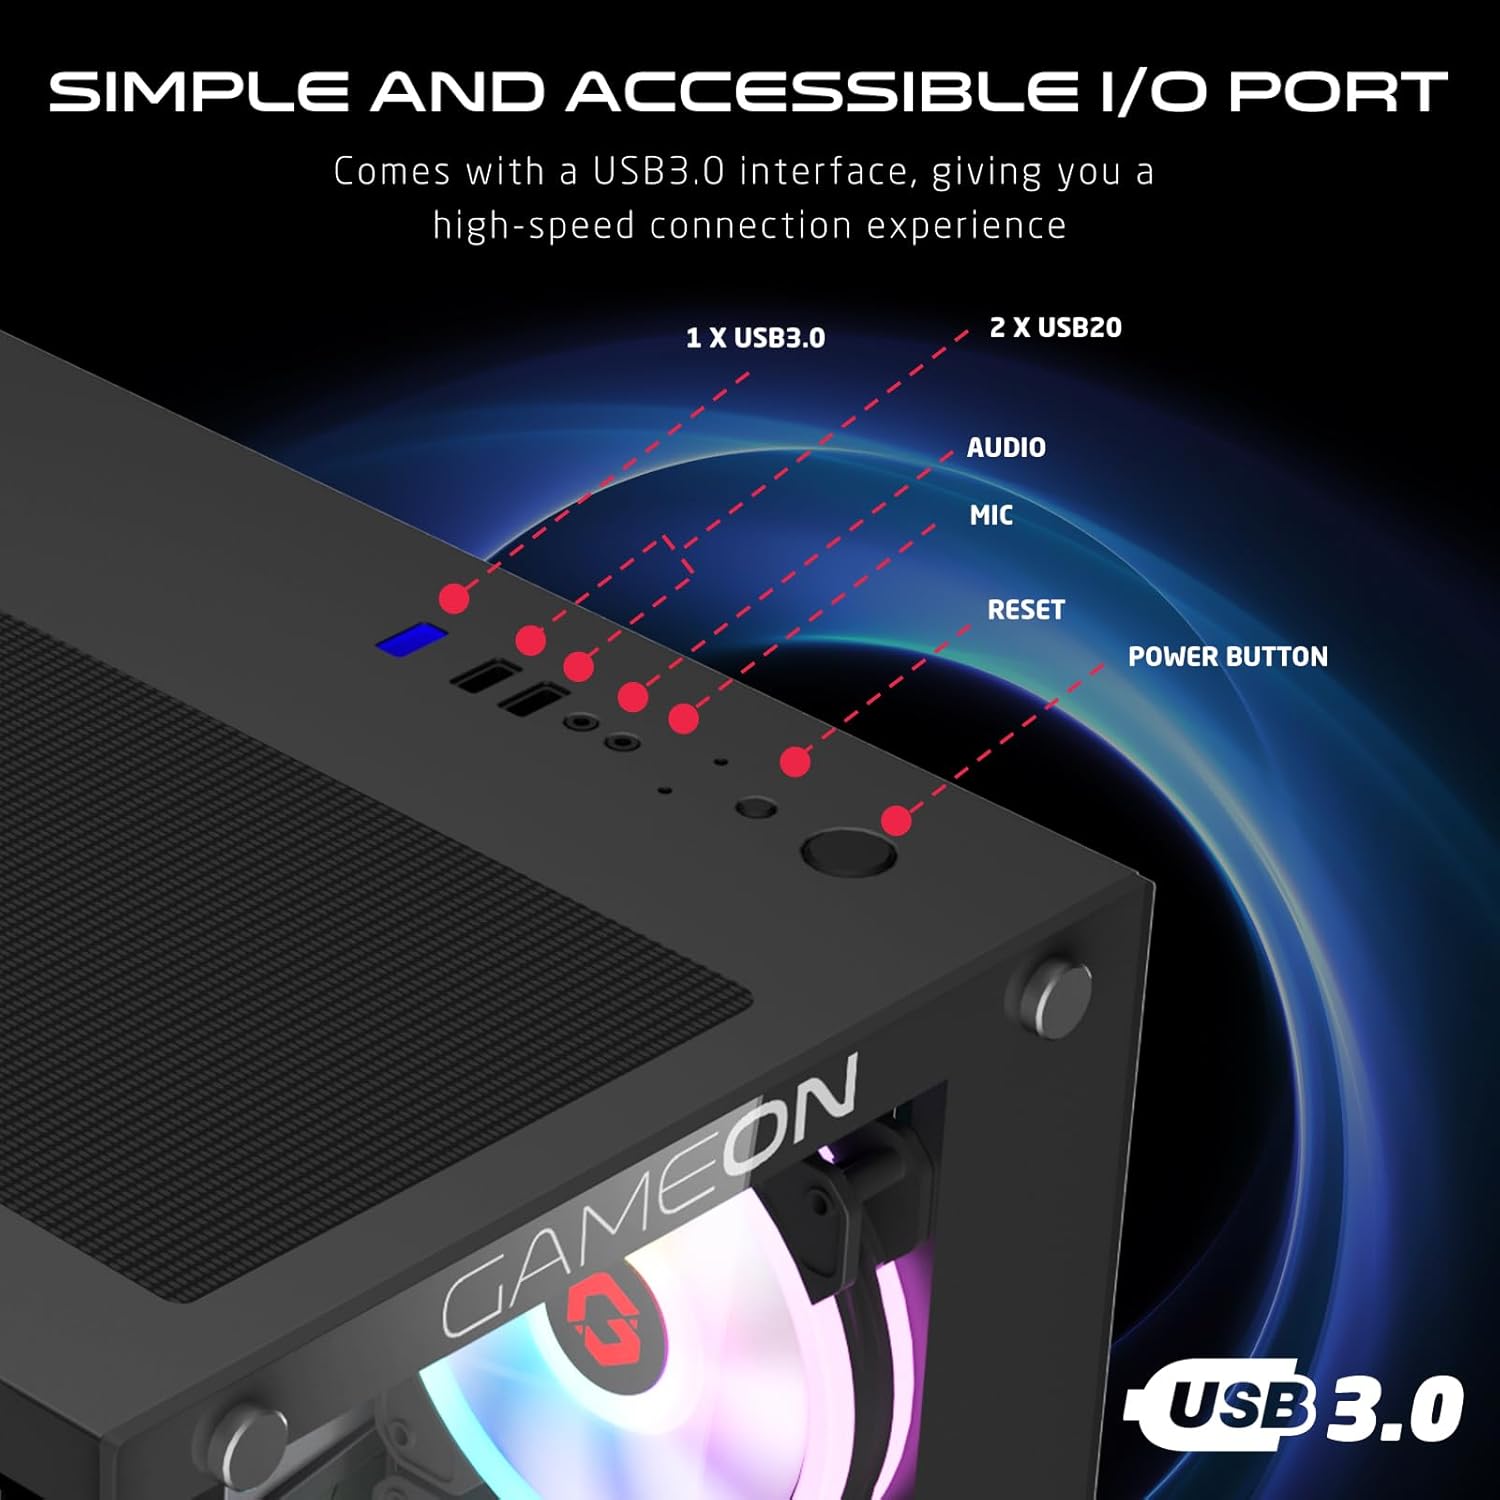
Figure 4.4: Front I/O ports, including 1x USB 3.0, 2x USB 2.0, Audio jack, Microphone jack, Reset button, and Power button.
4.3 Cooling and Construction
The case is designed with an optimized cooling solution, featuring multiple fan mounts and durable tempered glass panels.

Figure 4.5: Optimized cooling solution with massive air intake and exhaust. Features 7 pre-installed fans and durable tempered glass construction.
4.4 Compatibility and Drive Support
The case offers wide compatibility for various motherboard form factors and ample drive bay support.

Figure 4.6: Motherboard compatibility includes ATX, M-ATX, and ITX. Drive bay support for 2x HDD and 2x SSD. Also shown are the front panel header connections.
5. Petunjuk Penyiapan
Follow these steps to install your components into the GAMEON Midnight I Series PC case.
5.1 Menyiapkan Kasus
- Letakkan wadah tersebut di atas permukaan yang datar dan stabil.
- Carefully remove the tempered glass side panel(s) by unscrewing the thumb screws and gently sliding the panel off. Set them aside in a safe place.
- Buang semua bahan kemasan bagian dalam.
5.2 Instalasi Papan Utama
- Pasang pelindung I/O (jika belum terpasang di motherboard Anda) ke lubang belakang casing.
- Align your motherboard with the standoffs inside the case. Ensure the standoffs match your motherboard's form factor (ATX, M-ATX, ITX).
- Kencangkan motherboard dengan sekrup yang disediakan.
5.3 Instalasi Unit Catu Daya (PSU)
- Temukan area pemasangan PSU di bagian belakang bawah casing.
- Slide your PSU into position from the rear of the case.
- Kencangkan PSU dengan sekrup yang disediakan.
5.4 Drive Installation (HDD/SSD)
Casing ini mendukung 2x HDD 3.5 inci dan 2x SSD 2.5 inci.
- For 3.5" HDDs: Locate the drive cage, typically near the PSU shroud. Slide the HDD into the drive bay and secure it with screws.
- For 2.5" SSDs: Mount the SSDs to the designated mounting points, usually on the back of the motherboard tray or within the drive cage, using the provided screws.
5.5 Instalasi Kartu Grafis dan Kartu Ekspansi
- Lepaskan penutup slot PCIe yang diperlukan dari bagian belakang casing.
- Pasang kartu grafis atau kartu ekspansi lainnya ke slot PCIe yang sesuai pada motherboard Anda.
- Kencangkan kartu-kartu tersebut dengan sekrup.
5.6 Manajemen Kabel
Manfaatkan lubang pengarah kabel dan titik pengikat di belakang baki motherboard untuk mengatur kabel. Ini meningkatkan aliran udara dan estetika.
5.7 Connecting Front Panel I/O and Fans
- Connect the front panel cables (Power SW, Reset SW, HDD LED, Power LED, USB 3.0, USB 2.0, HD Audio) to their corresponding headers on your motherboard. Refer to your motherboard manual for header locations.
- Ensure the pre-installed ARGB fans are connected to the included ARGB/PWM controller. Connect the controller to a SATA power connector from your PSU and a 3-pin ARGB header (if available) and a 4-pin PWM header on your motherboard for software control, or use the remote for standalone control.
6. Petunjuk Pengoperasian
6.1 Menghidupkan/Mematikan
- After all components are installed and cables connected, replace the side panels.
- Connect your monitor, keyboard, mouse, and power cable to the PSU.
- Press the Power button on the front panel to turn on your PC.
- To turn off, use the operating system's shutdown function or press and hold the Power button for several seconds.
6.2 Kontrol Kipas ARGB
Kipas ARGB yang sudah terpasang dapat dikontrol dengan dua cara:
- Kontrol Jarak Jauh: Use the included remote to cycle through various lighting effects, adjust brightness, and change fan speed.
- Perangkat Lunak Motherboard: If the ARGB controller is connected to a compatible 3-pin ARGB header on your motherboard, you can synchronize lighting effects with your motherboard's RGB software (e.g., ASUS Aura Sync, MSI Mystic Light Sync, ASRock Polychrome RGB, Gigabyte RGB Fusion).
7. Pemeliharaan
Perawatan rutin membantu memastikan kinerja optimal dan umur pakai yang lebih lama untuk casing PC Anda.
7.1 Pembersihan Filter Debu
The case includes dust filters to prevent dust buildup. It is recommended to clean them every 1-3 months, depending on your environment.
- Locate the dust filters (e.g., top, bottom, front).
- Lepaskan filter dengan hati-hati.
- Clean them using compressed air, a soft brush, or by rinsing with water (ensure they are completely dry before re-installing).
- Re-attach the dust filters.
7.2 Pembersihan Umum
- Gunakan yang lembut, damp Gunakan kain untuk membersihkan permukaan luar casing. Hindari penggunaan pembersih abrasif.
- For tempered glass panels, use a glass cleaner and a microfiber cloth to avoid streaks.
7.3 Pembersihan Kipas
Periodically inspect the fan blades for dust accumulation. Use compressed air to gently clear dust from the fan blades and grilles.
8. Penyelesaian masalah
If you encounter issues with your PC case, refer to the following common problems and solutions.
8.1 Fans Not Spinning or ARGB Not Working
- Periksa Sambungan Daya: Ensure the ARGB/PWM controller is properly connected to a SATA power connector from your PSU.
- Periksa Sambungan Kipas: Verify that all fans are securely connected to the ARGB/PWM controller.
- Baterai Kontrol Jarak Jauh: If using the remote, check if its battery needs replacement.
- Perangkat Lunak Motherboard: If using motherboard software for control, ensure the controller is connected to the correct ARGB header and the software is installed and configured correctly.
- Arah Penggemar: Pastikan kipas angin diposisikan dengan benar untuk aliran udara optimal (masuk/keluar).
8.2 Front I/O Ports Not Functioning
- Periksa Koneksi Motherboard: Ensure all front panel cables (USB 3.0, USB 2.0, HD Audio) are correctly and securely connected to their respective headers on the motherboard. Refer to your motherboard manual.
8.3 PC Tidak Menyala
- Power Button Connection: Verify the Power SW cable from the front panel is correctly connected to the motherboard's front panel header.
- PSU Connection: Pastikan PSU terhubung dengan benar ke stopkontak dan sakelar daya pada PSU berada pada posisi 'ON'.
- Internal Power Cables: Check that all necessary power cables (24-pin ATX, CPU, GPU) are securely connected to the motherboard and components.
9. Spesifikasi
| Fitur | Spesifikasi |
|---|---|
| Nama Model | GO-EMPERORII-M (Midnight I Series) |
| Jenis Kasus | Menara Tengah |
| Bahan | Kaca Tempered |
| Warna | Hitam |
| Dimensi Produk (P x L x T) | Ukuran 44x28x42.7 cm |
| Berat Barang | 6.45 kg |
| Dukungan Motherboard | ATX, Micro ATX, ITX |
| Kipas yang sudah terpasang sebelumnya | 7 x 120mm ARGB PWM Fans |
| Ukuran Kipas | ukuran 120mm |
| Metode Pendinginan | Air, Water (supports up to 360mm radiator in front) |
| Ruang Penggerak | 2 x HDD 3.5 inci, 2 x SSD 2.5 inci |
| Port I / O Depan | 1 x USB 3.0, 2 x USB 2.0, Audio, Mic, Reset, Power |
| Fitur Tambahan | Dust Filters, ARGB Controller with Remote |
10. Garansi dan Dukungan
This product comes with a standard manufacturer's warranty. For specific warranty terms and conditions, please refer to the documentation provided with your purchase or contact GAMEON customer support. For technical assistance or further inquiries, please visit the official GAMEON websitus atau menghubungi saluran dukungan mereka.