1. Pendahuluan
This user manual provides comprehensive instructions for the setup, operation, maintenance, and troubleshooting of your Thomson 27-inch QHD Gaming Monitor (Model: M27QG5Y14). This monitor is designed to deliver a superior visual experience with its QHD resolution, 180Hz refresh rate, and IPS panel technology, making it ideal for gaming and multimedia applications.

Gambar 1.1: Depan view of the Thomson 27-inch QHD Gaming Monitor, showcasinberkat desainnya yang ramping dan area tampilannya.
2. Informasi Keselamatan
Harap baca semua petunjuk keselamatan dengan saksama sebelum menggunakan monitor. Simpan manual ini untuk referensi di masa mendatang.
- Sumber Daya: Gunakan hanya adaptor daya yang disertakan dengan monitor. Pastikan stopkontak terhubung ke ground dengan benar.
- Ventilasi: Jangan menghalangi lubang ventilasi. Berikan ruang yang cukup di sekitar monitor agar aliran udara lancar dan mencegah panas berlebih.
- Cairan dan Kelembaban: Keep the monitor away from water, rain, or excessive moisture. Do not place objects filled with liquids on the monitor.
- Pembersihan: Disconnect the power cable before cleaning. Use a soft, dry cloth. Do not use liquid cleaners or aerosol cleaners.
- Penempatan: Letakkan monitor di permukaan yang stabil dan rata. Hindari meletakkannya di bawah sinar matahari langsung atau di dekat sumber panas.
- Penanganan: Tangani monitor dengan hati-hati. Hindari menjatuhkan atau terkena benturan keras.
- Pelayanan: Jangan mencoba memperbaiki monitor sendiri. Serahkan semua perbaikan kepada teknisi servis yang berkualifikasi.
3. Isi Paket
Pastikan semua barang ada di dalam paket. Jika ada barang yang hilang atau rusak, hubungi pengecer Anda.
- Thomson 27-inch QHD Gaming Monitor
- Dudukan Monitor (Alas dan Leher)
- Adaptor Daya dan Kabel Daya
- Kabel HDMI
- DisplayPort (DP) Cable (may vary by region)
- Kabel USB-B ke USB-A (untuk fungsi hub USB)
- User Manual (dokumen ini)
- Sekrup untuk perakitan dudukan
4. Pengaturan
4.1. Merakit Dudukan Monitor
- Carefully remove the monitor from its packaging and place it face down on a soft, clean surface to prevent scratches.
- Pasang leher penyangga ke panel monitor menggunakan sekrup yang disediakan.
- Attach the stand base to the stand neck and secure it with the designated screw.
- Once assembled, carefully lift the monitor and place it on a stable desk or table.

Image 4.1: Monitor dimensions and stand assembly overview. The monitor measures approximately 61 cm wide, 54 cm high (with stand), and 24 cm deep (with stand).
4.2. Menghubungkan Monitor
Connect the necessary cables to the monitor's input ports. Refer to the image below for port locations.
- Sambungan Daya: Connect the power adapter to the "DC IN" port on the monitor, then plug the power cable into a power outlet.
- Video Input:
- Connect an HDMI cable from your computer's graphics card to an "HDMI 2.1" port on the monitor.
- Alternatively, connect a DisplayPort (DP) cable from your computer's graphics card to a "DP 1.2" port on the monitor.
- Hub USB: To enable the monitor's USB 3.0 ports, connect a USB-B cable from the "USB 3.0 B" port on the monitor to a USB-A port on your computer.
- Keluaran Audio: Connect headphones or external speakers to the "Earphone Plug" (3.5mm audio jack) for audio output.

Image 4.2: Rear panel of the monitor displaying the various input and output ports for connectivity.
4.3. Penyesuaian Ergonomis
Dudukan monitor memungkinkan berbagai penyesuaian untuk mengoptimalkan viewkenyamanan:
- Memiringkan: Adjust the screen's vertical angle (up or down).
- Memutar: Rotate the screen horizontally (left or right).
- Poros: Putar layar 90 derajat untuk mode potret viewing.
- Penyesuaian Ketinggian: Naikkan atau turunkan monitor sesuai ketinggian mata yang Anda inginkan.
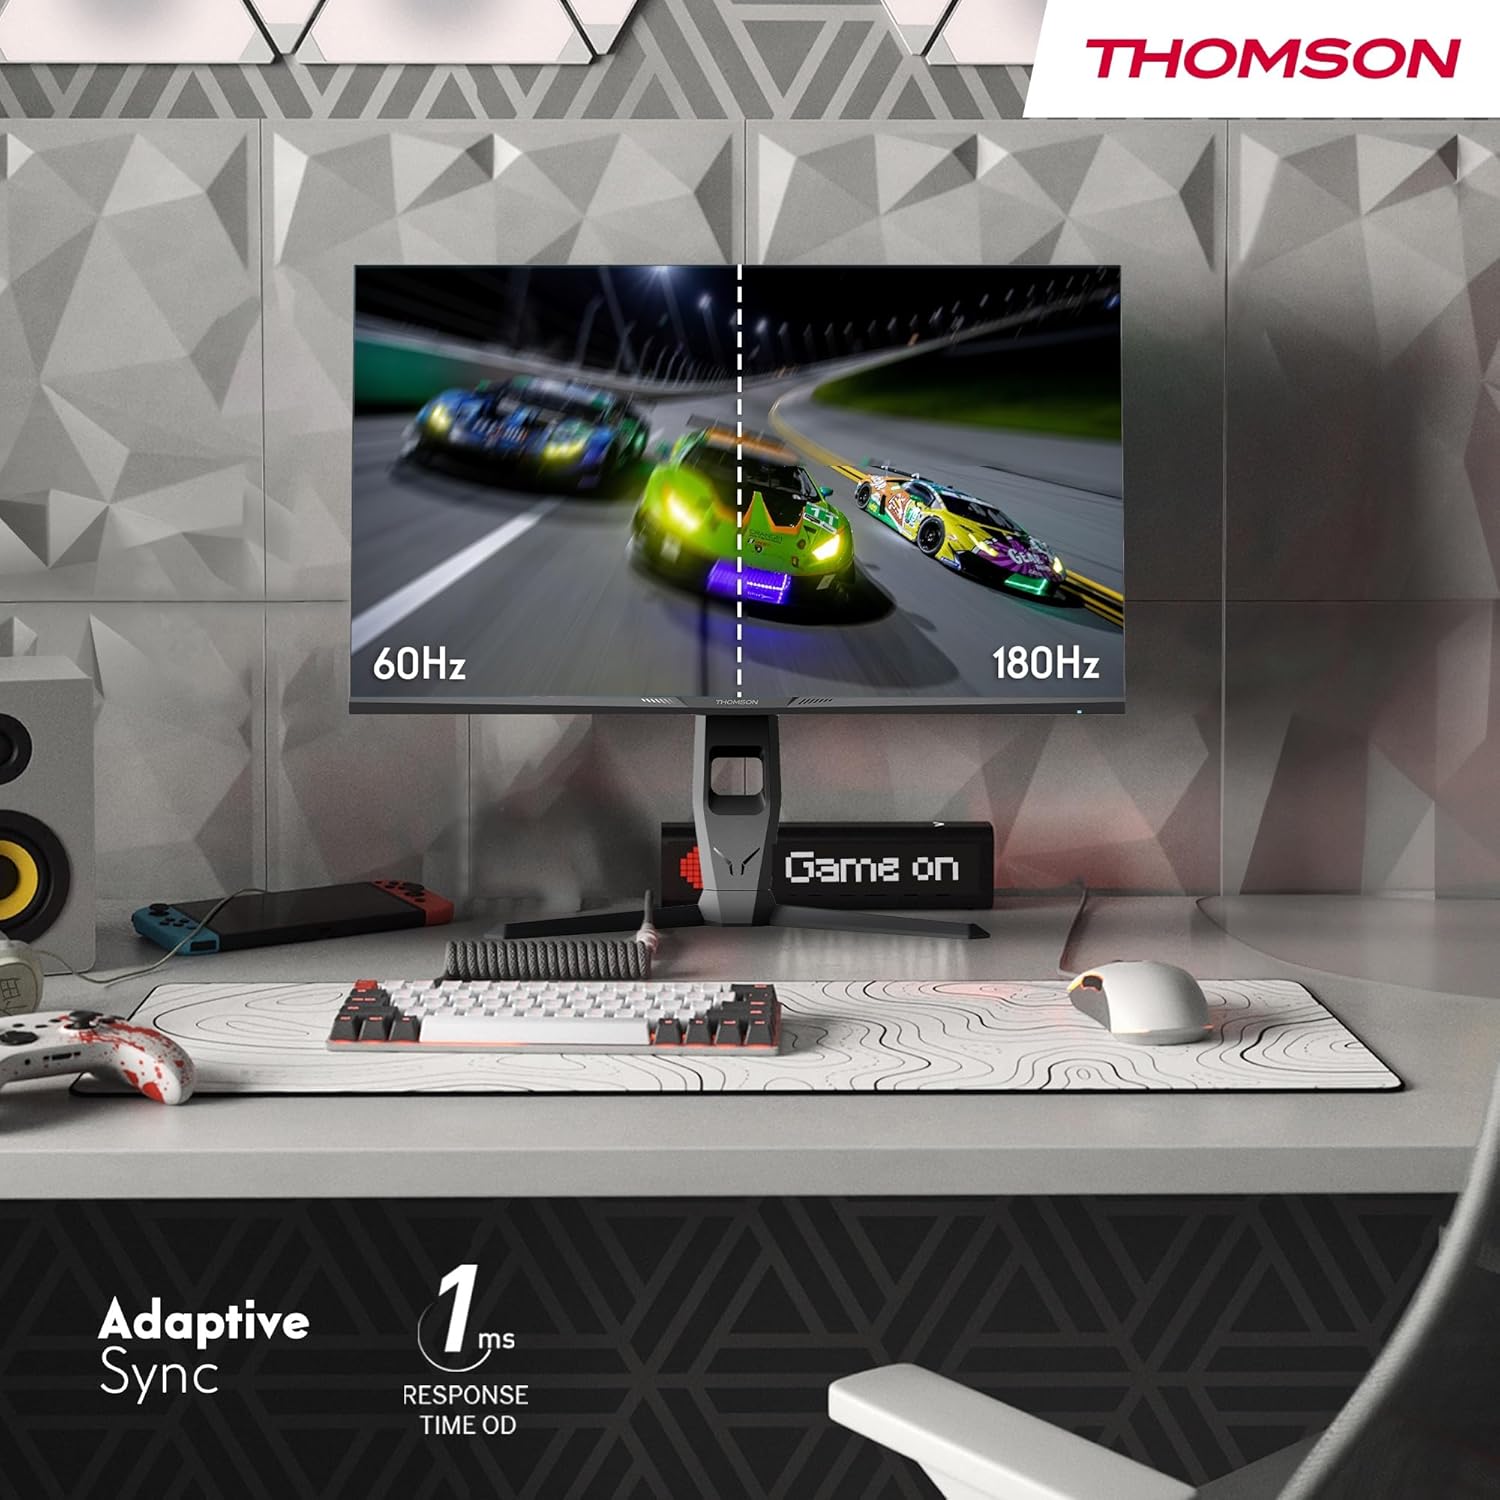
Image 4.3: Demonstrations of the monitor's ergonomic capabilities, including tilt, swivel, and pivot for optimal viewsudut ing.
4.4. Pemasangan VESA
The monitor is compatible with VESA 100x100mm mounting standards. To mount the monitor on a wall or an alternative stand, remove the original stand and attach the VESA-compatible mount (sold separately) using appropriate screws.
5. Petunjuk Pengoperasian
5.1. Daya Hidup/Mati
Tekan tombol daya, yang biasanya terletak di bagian belakang atau bawah monitor, untuk menghidupkan atau mematikannya. Lampu indikator daya akan menyala saat monitor aktif.
5.2. Menu Tampilan di Layar (OSD)
Menu OSD memungkinkan Anda untuk menyesuaikan berbagai pengaturan monitor. Gunakan joystick atau tombol (lokasinya mungkin berbeda) pada monitor untuk menavigasi menu.
- Pengaturan Gambar: Sesuaikan kecerahan, kontras, ketajaman, suhu warna, dan gamma.
- Pengaturan Warna: Fine-tune RGB levels, saturation, and hue.
- Pilih Masukan: Beralih secara manual antara input HDMI dan DisplayPort.
- Suara: Adjust volume for built-in speakers or headphone output.
- Pengaturan OSD: Ubah bahasa OSD, transparansi, dan batas waktu.
- Pengaturan Game: Access features like Adaptive Sync, response time (OD), and crosshair overlays.
5.3. Fitur Permainan
- Kecepatan Penyegaran 180Hz: Provides smoother motion and reduced input lag, especially beneficial for fast-paced games. Ensure your graphics card and cable support this refresh rate.
- Waktu Respons 1ms (OD): Minimizes motion blur and ghosting for clear, crisp images during rapid movements.
- Sinkronisasi Adaptif: Synchronizes the monitor's refresh rate with your graphics card's frame rate, eliminating screen tearing and stuttering. Enable this feature in the OSD menu and your graphics card control panel.

Image 5.1: Visual comparison illustrating the difference between 60Hz and 180Hz refresh rates, highlighting the smoother motion provided by the higher refresh rate, alongside the Adaptive Sync feature.
5.4. Fitur Perawatan Mata
- Teknologi Anti-Flicker: Reduces screen flickering, which can cause eye strain during prolonged use.
- Mode Cahaya Biru Rendah: Filters out harmful blue light emissions to protect your eyes and reduce fatigue. This mode can be activated through the OSD menu.
- Layar Anti-Silau: The matte screen surface minimizes reflections from ambient light, providing clear visuals without distraction.

Image 5.2: Depiction of the monitor's eye comfort features, including an anti-glare screen and technologies like Anti-Flicker and Low Blue Light for reduced eye strain.
5.5. RGB Ambient Lighting
The monitor features integrated RGB ambient lighting on the rear. This lighting can be customized via the OSD menu to enhance your gaming environment or match your setup's aesthetics.
6. Pemeliharaan
6.1. Membersihkan Monitor
- Layar: Usap layar secara perlahan dengan kain lembut bebas serat. Untuk noda membandel, usap layar dengan lembut.ampen the cloth with water or a specialized screen cleaner (ensure it's safe for LCD/IPS panels) and wipe gently. Never spray liquid directly onto the screen.
- Casing: Gunakan kain lembut dan kering untuk membersihkan monitor casing. Hindari penggunaan pembersih atau pelarut yang bersifat abrasif.
- Selalu cabut kabel daya sebelum membersihkan.
6.2. Penyimpanan
Jika menyimpan monitor untuk jangka waktu yang lama, lepaskan semua kabel, kemas kembali dalam kemasan aslinya (jika tersedia), dan simpan di tempat yang sejuk dan kering, terhindar dari sinar matahari langsung dan suhu ekstrem.
7. Penyelesaian masalah
Bagian ini membahas masalah umum yang mungkin Anda temui. Jika masalah berlanjut, hubungi dukungan pelanggan.
| Masalah | Kemungkinan Penyebab | Larutan |
|---|---|---|
| Tidak ada daya | Kabel daya tidak terhubung; Stopkontak rusak; Monitor mati. | Ensure power cable is securely connected. Test the power outlet. Press the monitor's power button. |
| Tidak ada sinyal / Layar kosong | Kabel video tidak terhubung; Input yang dipilih salah; Komputer tidak mengeluarkan sinyal. | Check HDMI/DP cable connections. Select the correct input source via OSD. Ensure computer is on and outputting video. |
| Distorted image / Flickering | Incorrect resolution/refresh rate; Faulty cable; Graphics driver issue. | Set display resolution to 2560x1440 and refresh rate to 180Hz. Try a different video cable. Update graphics drivers. |
| Tidak ada suara dari speaker/headphone | Volume too low; Audio cable not connected; Incorrect audio output selected on PC. | Increase monitor volume via OSD. Ensure headphones/speakers are connected. Select monitor as audio output device in PC settings. |
8. Spesifikasi
Detailed technical specifications for the Thomson M27QG5Y14 monitor.
| Fitur | Spesifikasi |
|---|---|
| Merek | Bahasa Indonesia: Thomson |
| Model | M27QG5Y14 |
| Ukuran Layar | 27 inci |
| Jenis Panel | Bahasa Inggris |
| Resolusi | Resolusi 2560x1440 (QHD) |
| Tingkat Penyegaran | 180Hz |
| Waktu Respon | 1 Millisecond (OD) / 5 Milliseconds (GtG) |
| Kecerahan | 350 Nits |
| Rasio Kontras | 1200:1 |
| Viewsudut ing | 178 Derajat (Horizontal/Vertikal) |
| Gamut Warna | Warna RGB 120% |
| Dukungan HDR | HDR10 (10-bit) |
| Sinkronisasi Adaptif | Ya |
| Konektivitas | 2x HDMI 2.1, 1x DisplayPort 1.2, 1x USB 3.0 Type-B (upstream), 3x USB 3.0 Type-A (downstream), 1x Earphone Plug (3.5mm) |
| Speaker Terintegrasi | Ya (2x2W) |
| Kompatibilitas Pemasangan VESA | Ukuran 100x100mm |
| Dimensi Produk (dengan dudukan) | 61 x 54 x 24 cm (L x T x T) |
| Berat (dengan dudukan) | 7.3 kg |
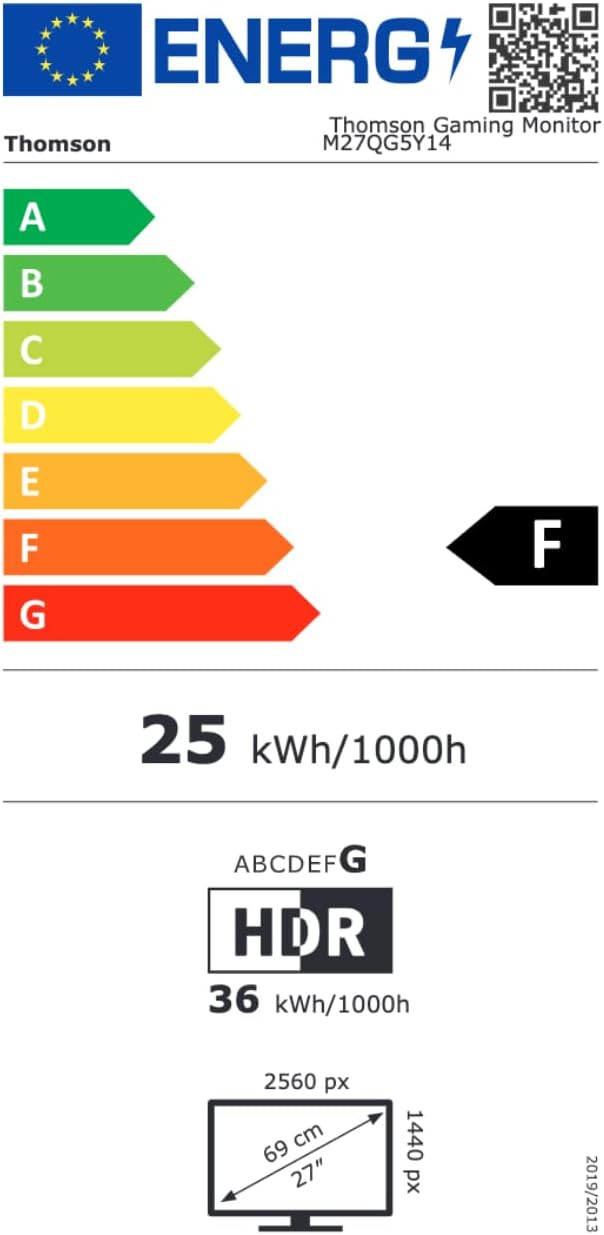
Image 8.1: EU Energy Label for the Thomson M27QG5Y14 monitor. For more details, visit the Basis data EPREL.
9. Garansi dan Dukungan
Thomson products are designed for reliability and performance. This monitor typically comes with a Garansi 3 tahun sejak tanggal pembelian, mencakup cacat produksi. Harap simpan bukti pembelian Anda untuk klaim garansi.
For technical assistance, troubleshooting beyond this manual, or warranty inquiries, please contact Thomson customer support or your local retailer. Refer to the official Thomson webKunjungi situs web kami atau lihat kemasan produk Anda untuk detail kontak spesifik.
You can also visit the official Thomson store on Amazon for more information: Thomson Store.


