1. Pendahuluan
This manual provides detailed instructions for the installation, operation, and maintenance of your GIGABYTE GA-B760M D3HP WIFI6 motherboard. Designed for optimal performance and reliability, this motherboard supports Intel Core 14th, 13th, and 12th generation CPUs and features DDR5 memory support, PCIe 4.0 M.2 connectors, and Wi-Fi 6 connectivity. Please read this manual thoroughly before beginning installation to ensure proper setup and to maximize the lifespan of your product.
2. Fitur Utama
- Dukungan CPU: Compatible with Intel Core 14th, 13th, and 12th generation processors.
- Desain Daya: Features a 4+1+1 phase hybrid digital VRM solution for stable power delivery.
- Ingatan: Supports Dual Channel DDR5 memory with 4 DIMM slots and XMP memory module support.
- Penyimpanan: Equipped with 2 PCIe 4.0 x4 M.2 connectors for high-speed storage.
- Jaringan: Includes GbE LAN and Wi-Fi 6 802.11ax for fast and reliable network connectivity.
3. Pengaturan dan Instalasi
Before installing the motherboard, ensure your system is powered off and disconnected from the power source. Handle the motherboard by its edges to avoid static discharge.
3.1 Tata Letak Papan Utama
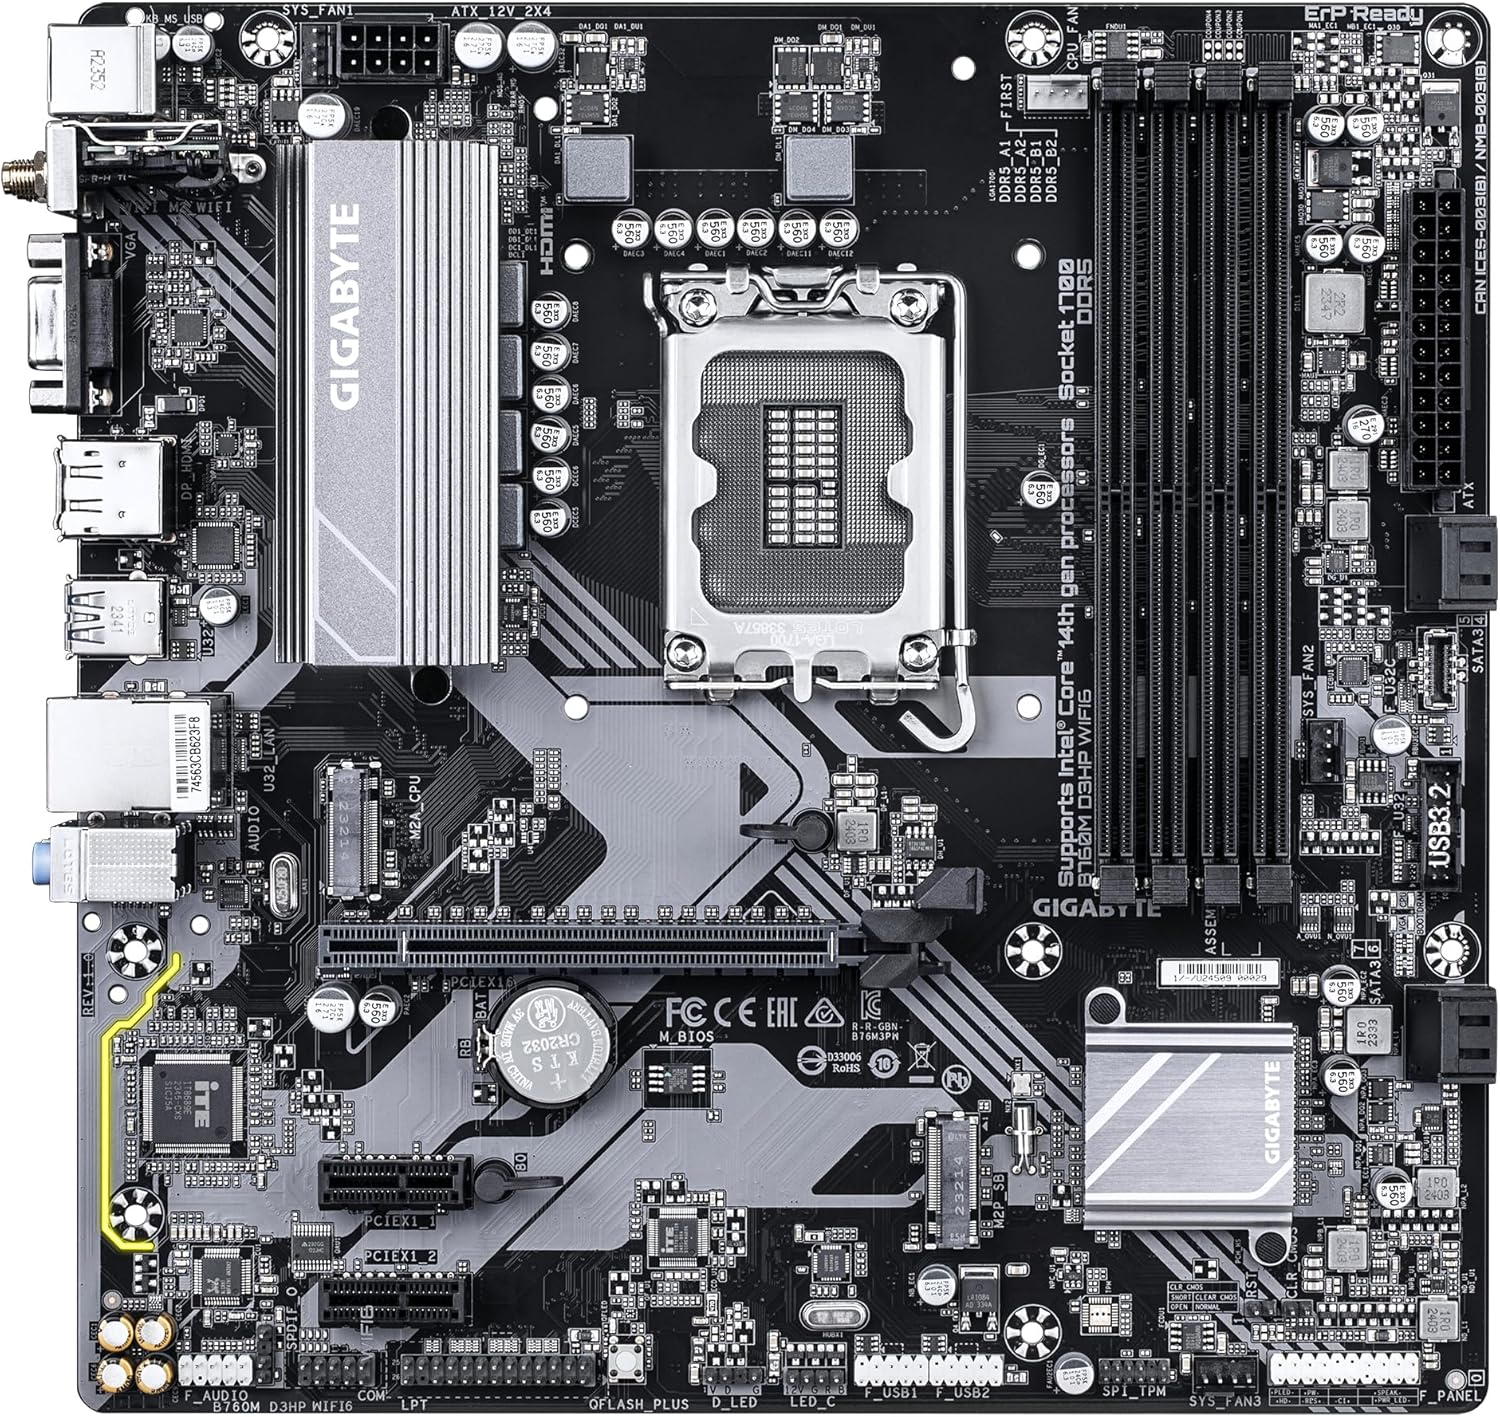
Familiarize yourself with the layout of the motherboard components before proceeding with installation.

Gambar 1: Perintahkan ke bawah view of the GIGABYTE GA-B760M D3HP WIFI6 motherboard, showing the CPU socket, DIMM slots, PCIe slots, and various headers.
Gambar 2: bersudut view of the GIGABYTE GA-B760M D3HP WIFI6 motherboard, highlighting the heatsinks and overall component placement.
3.2 Instalasi CPU
- Temukan soket CPU LGA 1700 pada motherboard.
- Buka tuas soket CPU dan angkat pelat beban.
- Sejajarkan CPU dengan soket dengan hati-hati, pastikan tanda segitiga pada CPU sesuai dengan tanda pada soket. Jangan memaksakan CPU masuk ke dalam soket.
- Turunkan pelat beban dan amankan dengan tuas.
- Oleskan pasta termal ke CPU dan pasang pendingin CPU sesuai petunjuk pabrikan.
3.3 Instalasi Memori (RAM)
- Locate the four DDR5 DIMM slots.
- Buka klip di kedua ujung slot DIMM.
- Sejajarkan takik pada modul memori DDR5 dengan kunci di slot DIMM.
- Masukkan modul memori dengan kuat ke dalam slot hingga klip terkunci pada tempatnya. Pastikan kedua klip tertutup.
- Untuk konfigurasi dual-channel, lihat manual khusus motherboard untuk mengetahui pasangan slot yang direkomendasikan.
3.4 Storage Device Installation (M.2 SSDs and SATA Drives)
- SSD M.2: Locate the M.2 connectors. Remove the M.2 screw/standoff. Insert the M.2 SSD into the slot at a 30-degree angle. Push down the SSD and secure it with the screw/standoff.
- Drive SATA: Hubungkan kabel data SATA dari drive penyimpanan Anda (HDD/SSD) ke port SATA pada motherboard. Hubungkan kabel daya dari catu daya Anda ke drive.
3.5 Koneksi Daya
- Hubungkan konektor daya utama ATX 24-pin dari catu daya Anda ke port yang sesuai pada motherboard.
- Connect the 8-pin ATX 12V CPU power connector to the port near the CPU socket.
3.6 Panel Depan dan Koneksi Perangkat Tambahan
Connect your case's front panel connectors (power button, reset button, USB ports, audio jacks, LED indicators) to the corresponding headers on the motherboard. Refer to the motherboard's detailed manual for exact pin layouts.

Gambar 3: Rear I/O panel of the GIGABYTE GA-B760M D3HP WIFI6 motherboard, showing USB ports, display outputs, audio jacks, Ethernet, and Wi-Fi antenna connectors.
4. Petunjuk Pengoperasian
4.1 Pengaturan BIOS
Upon first boot, you may need to enter the BIOS (Basic Input/Output System) to configure settings such as boot order, date/time, and enable specific features. To enter BIOS, press the MENGHAPUS key repeatedly during startup. The GIGABYTE UEFI BIOS provides an intuitive graphical interface for configuration.
4.2 Instalasi Driver
After installing your operating system, install the necessary drivers for the motherboard's components (chipset, audio, LAN, Wi-Fi, etc.). These drivers are typically provided on a support DVD or can be downloaded from the official GIGABYTE websitus untuk model motherboard spesifik Anda.
5. Pemeliharaan
- Pembersihan: Regularly clean dust from the motherboard and case fans using compressed air. Ensure the system is powered off and unplugged before cleaning.
- Pembaruan BIOS: Periksa GIGABYTE secara berkala website for BIOS updates. BIOS updates can improve system stability, compatibility, and performance. Follow the instructions provided by GIGABYTE carefully when updating the BIOS.
- Pembaruan Driver: Perbarui driver Anda untuk memastikan kinerja optimal dan kompatibilitas dengan perangkat lunak dan perangkat keras baru.
6. Penyelesaian masalah
- Tidak Ada Daya:
- Periksa semua sambungan daya (ATX 24-pin, CPU 8-pin).
- Pastikan catu daya dihidupkan.
- Uji catu daya dengan sistem lain atau alat penguji catu daya.
- Tidak Ada Tampilan:
- Ensure the monitor is connected to the graphics card (or integrated graphics port if no discrete GPU is used).
- Pasang kembali kartu grafis dan modul memori.
- Coba boot dengan hanya satu stik RAM.
- Ketidakstabilan/Kerusakan Sistem:
- Periksa suhu CPU dan GPU.
- Ensure all components are properly seated.
- Jalankan alat diagnostik memori untuk memeriksa kesalahan RAM.
- Update BIOS and drivers.
- Masalah Konektivitas Jaringan:
- For wired LAN, check the Ethernet cable and router connection.
- For Wi-Fi, ensure antennas are securely attached and drivers are installed.
- Verify network settings in the operating system.
7. Spesifikasi
| Fitur | Detil |
|---|---|
| Merek | Bahasa Indonesia: GIGABYTE |
| Nama Model | B760M D3HP WIFI6 |
| Soket CPU | LGA1700 |
| Prosesor yang Kompatibel | Intel Core 14th Gen, Intel Core 13th Gen, Intel Core 12th Gen |
| Jenis Chipset | Intel B760 |
| Teknologi Memori RAM | DDR5 |
| Kecepatan Jam Memori | Frekuensi 5600 MHz |
| Perangkat yang Kompatibel | Personal Computer, Desktop Computer |
| Platform | Jendela 10, Windows 11 |
| Dimensi Produk | 9.61x9.61x1.38 inci |
| Berat Barang | 2.2 pon |
8. Garansi dan Dukungan
Untuk informasi garansi dan dukungan teknis, silakan merujuk ke situs web resmi GIGABYTE websitus web atau hubungi layanan pelanggan GIGABYTE. Simpan bukti pembelian Anda untuk klaim garansi.
GIGABYTE Resmi Weblokasi: www.gigabyte.com