1. Pendahuluan
This manual provides detailed instructions for the setup, operation, and maintenance of your Arducam GMSL2 8MP IMX219 Raspberry Pi Camera Extension Kit. This kit enables long-distance camera connectivity for Raspberry Pi systems, leveraging GMSL2 technology for stable and high-quality video transmission.

Image 1.1: Arducam GMSL2 8MP IMX219 Raspberry Pi Camera Extension Kit, showing the camera module connected via a coaxial cable to the deserializer board.
2. Informasi Keselamatan
- Ensure all connections are secure before powering on the Raspberry Pi.
- Avoid exposing the camera module or boards to extreme temperatures, moisture, or static electricity.
- Handle components with care to prevent damage to delicate connectors and circuits.
- Do not attempt to modify the hardware beyond the intended assembly.
3. Isi Paket
Verifikasi bahwa semua item yang tercantum di bawah ini ada dalam paket Anda:
- 1 x Arducam GMSL2 Rx board (Deserializer board)
- 1 x Arducam GMSL2 camera Tx board (Serializer board)
- 1 x 1m Kabel Koaksial RF Fakra Z Female ke Female
- 1 x Arducam IMX219 Camera Module (8MP)
- 1 x Kabel FPC 22-22pin 40mm
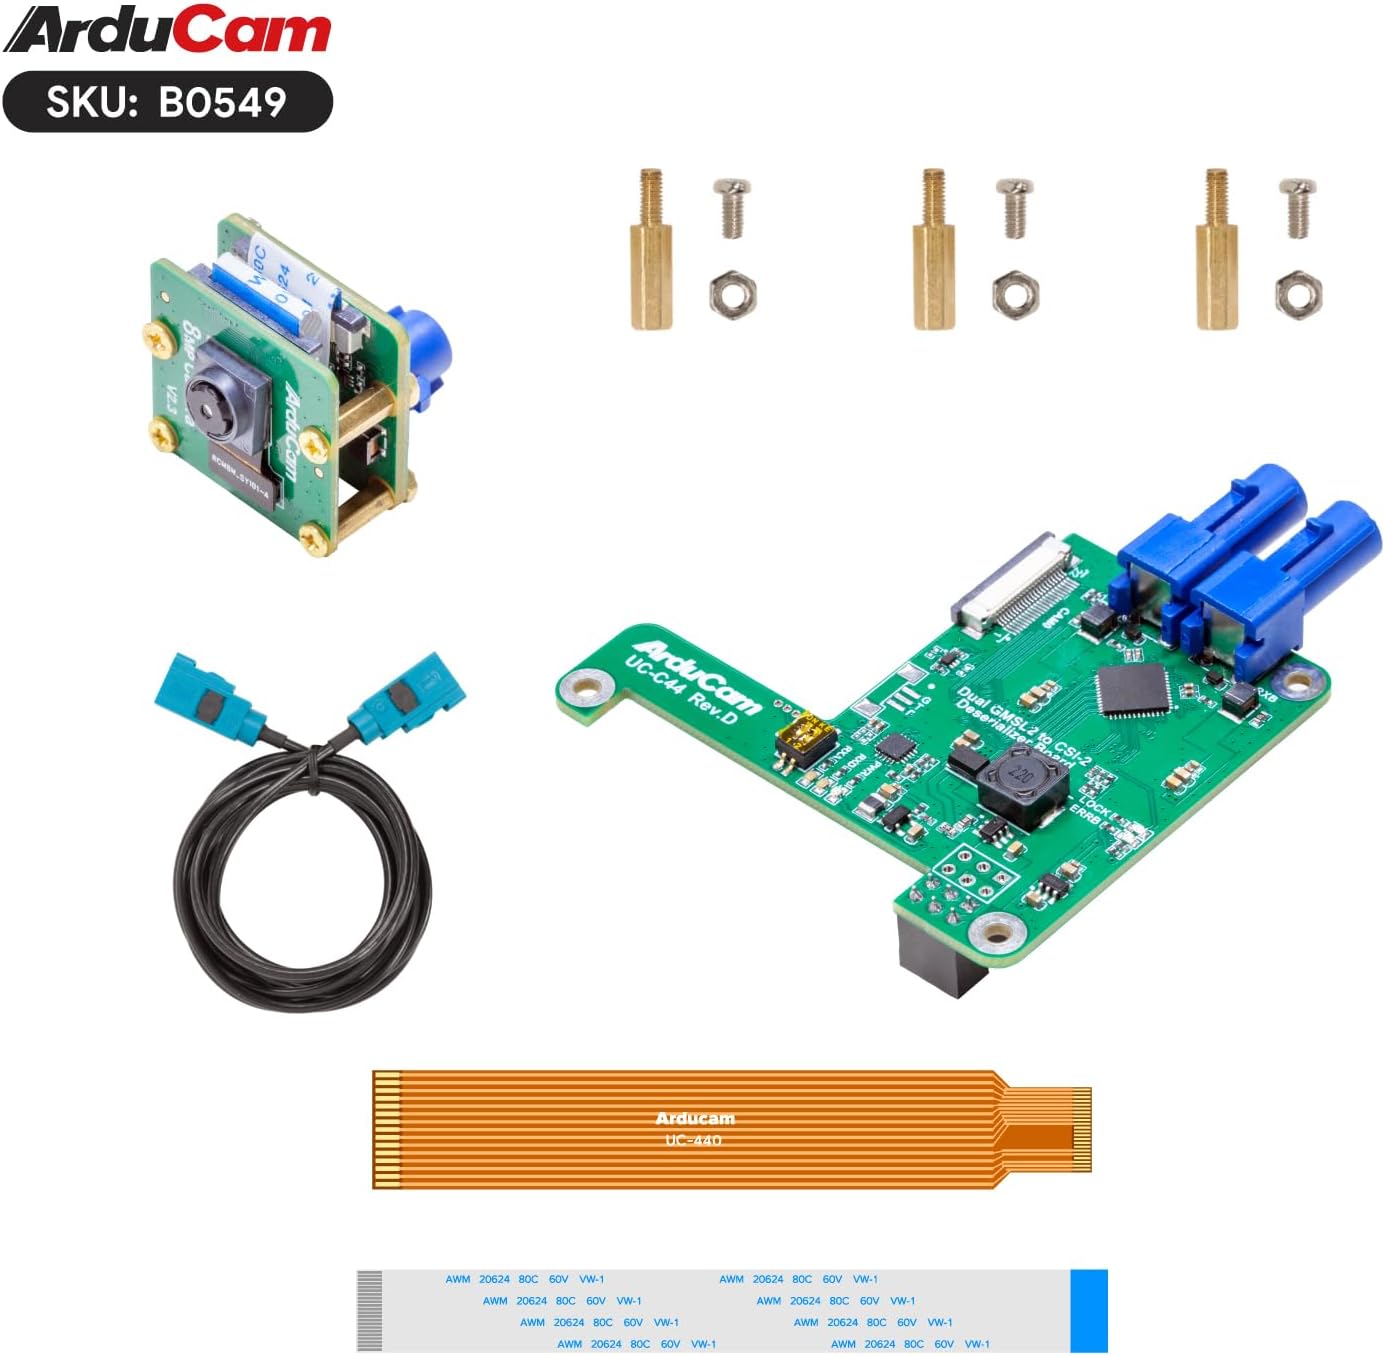
Image 3.1: All components included in the Arducam GMSL2 8MP IMX219 Raspberry Pi Camera Extension Kit.
4. Petunjuk Penyiapan
Follow these steps to assemble and connect your camera extension kit to a Raspberry Pi.
4.1 Hardware Assembly
- Attach IMX219 Camera Module to Tx Board: Carefully connect the 8MP IMX219 camera module to the Arducam GMSL2 camera Tx (Serializer) board. Ensure the ribbon cable is inserted correctly and the latch is secured.
- Connect Fakra Coaxial Cable: Connect one end of the 1m Fakra Z coaxial cable to the Tx board and the other end to the Rx (Deserializer) board. Ensure the connectors click into place securely.
- Mount Rx Board to Raspberry Pi: Attach the Arducam GMSL2 Rx board to your Raspberry Pi (compatible with Pi 4B and Pi 5). Use the provided stand-offs and screws to secure the board to the Raspberry Pi's mounting holes.
- Connect FPC Cable: Connect the 40mm 22-22pin FPC cable from the Rx board to the CSI-2 camera port on your Raspberry Pi. Note that the white cable is typically for Pi 5 and the bronze/orange cable for Pi 4. Ensure the cable is inserted with the contacts facing the correct direction and the connector latch is closed.
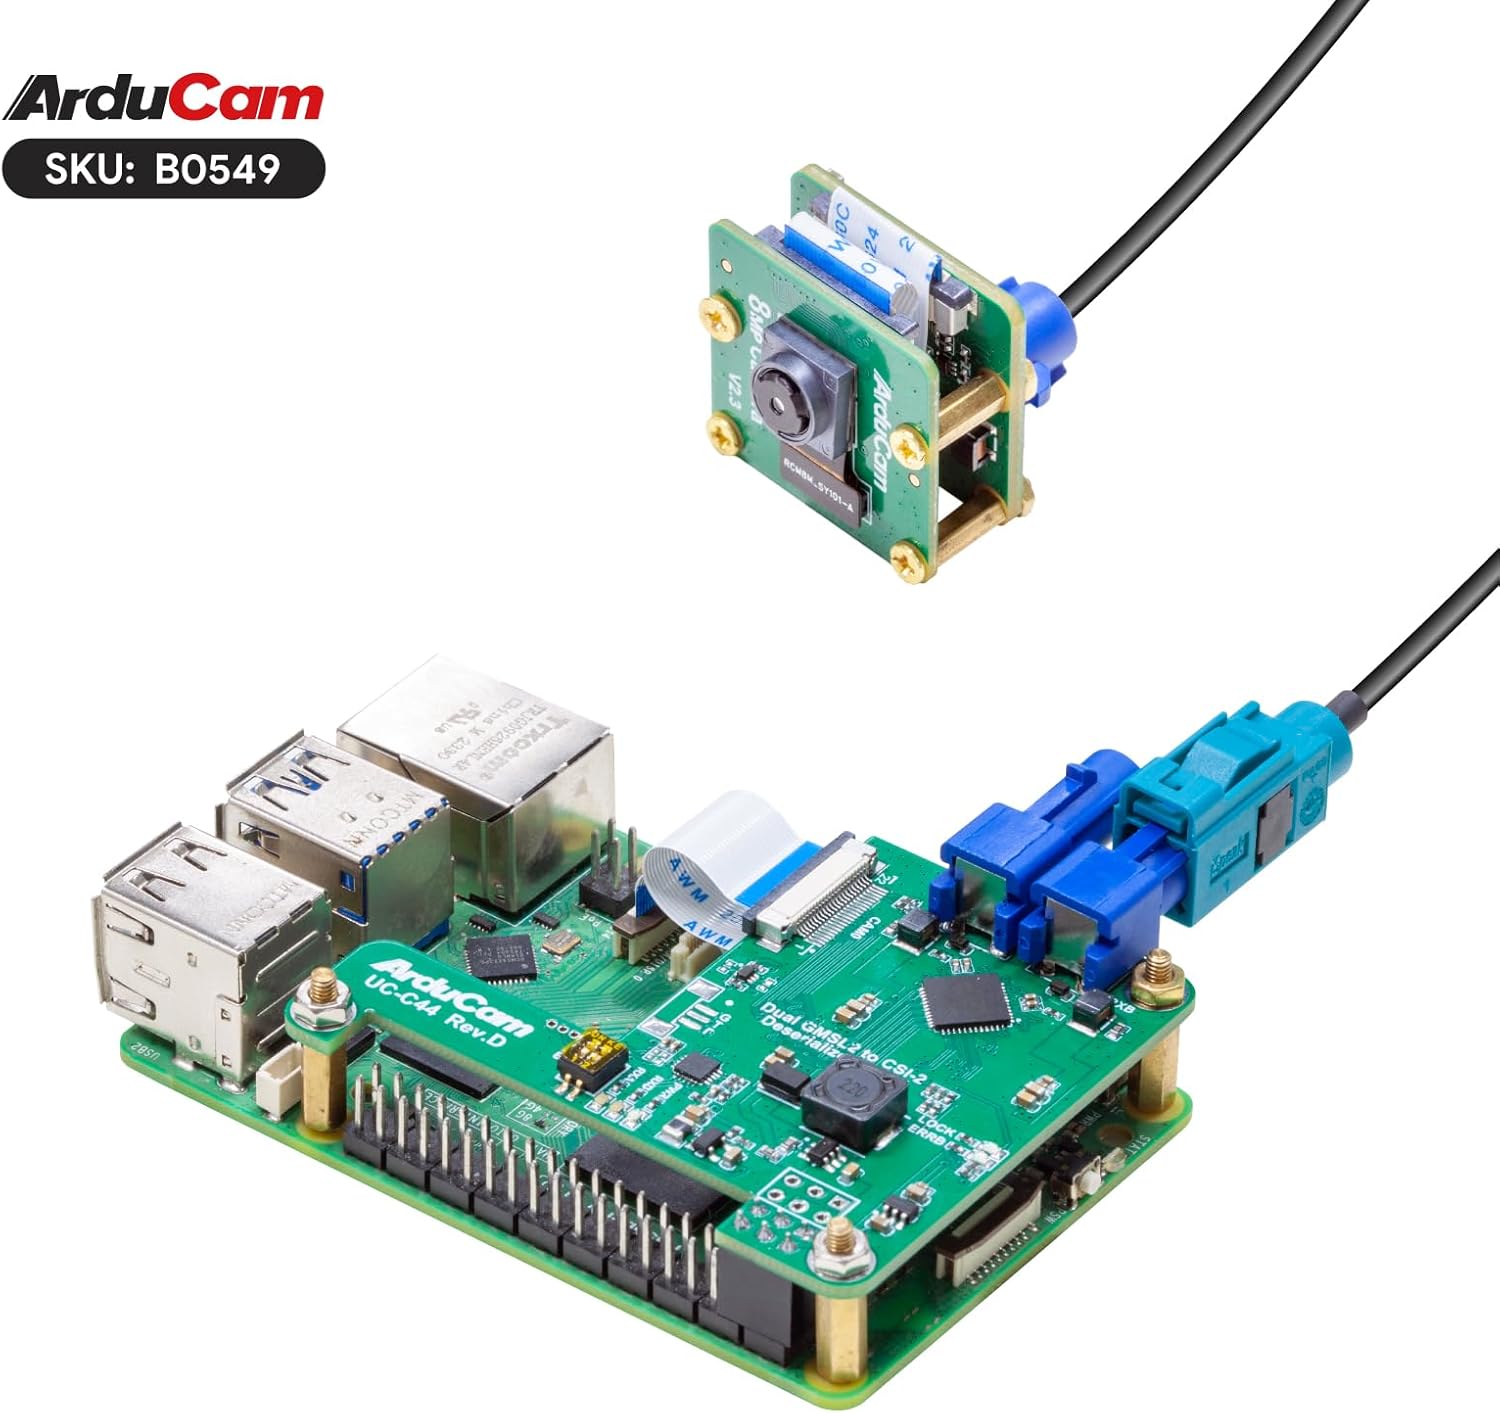
Image 4.1: The Arducam GMSL2 Rx board securely mounted onto a Raspberry Pi, with the FPC cable connected.

Image 4.2: Complete assembly of the Arducam GMSL2 camera extension kit with the camera module, coaxial cable, and Rx board connected to a Raspberry Pi.

Image 4.3: Visual representation of the kit's compatibility with Raspberry Pi 4B and Raspberry Pi 5 models.

Image 4.4: The kit supports up to 15 meters extension, though the included coaxial cable is 1 meter in length.
4.2 Konfigurasi Perangkat Lunak
After hardware assembly, configure your Raspberry Pi OS to recognize and utilize the camera. This typically involves enabling the camera interface and using libcamera peralatan.
- Perbarui sistem operasi Raspberry Pi: Ensure your Raspberry Pi OS is up to date by running:
sudo apt update && sudo apt full-upgrade -y - Aktifkan Antarmuka Kamera: Use the Raspberry Pi configuration tool:
Navigasi ke Opsi Antarmuka > Kamera and enable it. Reboot your Raspberry Pi if prompted.sudo raspi-config - Verify Camera Detection: After reboot, you can check if the camera is detected using
libcamera-still:
You should see your IMX219 camera listed.libcamera-still --list-cameras
5. Petunjuk Pengoperasian
This section covers basic commands for operating your Arducam GMSL2 camera with Raspberry Pi.
5.1 Mengambil Gambar Diam
To capture a still image, use the libcamera-still memerintah:
libcamera-still -o image.jpgThis command will capture an image and save it as image.jpg di direktori Anda saat ini.
For a preview window and autofocus, you can use:
libcamera-still -t 0 --autofocus --keypressThis command will open a preview window, enable autofocus, and wait for a key press to capture an image. Press 'q' to quit the preview.
5.2 Merekam Video
To record video, use the libcamera-vid memerintah:
libcamera-vid -t 10000 -o video.h264This command will record video for 10 seconds (10000 milliseconds) and save it as video.h264.
5.3 Pra Langsungview
For a continuous live preview without saving, use libcamera-still with a long timeout and no output file:
libcamera-still -t 0Press 'q' to quit the preview.
5.4 Video Demonstrasi
Watch this video for a visual demonstration of the Arducam GMSL2 camera extension kit in operation, including setup and image capture exampsedikit.
Video 5.1: Demonstration of the Arducam Cable Extension Kit, showcasing its use with a Raspberry Pi for long-distance imaging and command-line operation.
6. Pemeliharaan
- Keep the camera lens clean using a soft, lint-free cloth. Avoid abrasive materials.
- Simpan perlengkapan ini di tempat yang kering dan bebas debu saat tidak digunakan.
- Regularly check cable connections for looseness or damage.
- Ensure proper ventilation for the Raspberry Pi and camera boards during operation to prevent overheating.
7. Penyelesaian masalah
- Kamera Tidak Terdeteksi:
- Verify all ribbon and coaxial cable connections are secure and correctly oriented.
- Ensure the camera interface is enabled in
raspi-config. - Check if the Raspberry Pi OS is updated to the latest version.
- Confirm the FPC cable type matches your Raspberry Pi model (white for Pi 5, bronze for Pi 4).
- Poor Image Quality / No Signal:
- Inspect the Fakra coaxial cable for kinks or damage.
- Pastikan lensa kamera bersih dan bebas dari halangan.
- Check the power supply to the Raspberry Pi; insufficient power can affect camera performance.
- Masalah Fokus Otomatis:
- Pastikan pencahayaan di lingkungan tersebut memadai.
- Try manually focusing if the
libcameracommand supports it, or restart the application.
8. Spesifikasi
| Fitur | Detil |
|---|---|
| Merek | Arducam |
| Nama Model | B0549 |
| Sensor | Kamera IMX8 219MP |
| Teknologi | GMSL2 (Gigabit Multimedia Serial Link 2) |
| Jarak Perpanjangan Maksimum | Up to 15 meters (with appropriate cable) |
| Panjang Kabel Termasuk | 1 meter Fakra Z Coaxial Cable |
| Kesesuaian | Raspberry Pi Camera V2 compatible, supports Raspberry Pi 4B, Raspberry Pi 5 |
| Resolusi Pengambilan Video | 1080p |
| Teknologi Sensor Foto | Bahasa Indonesia: CMOS |
| Panjang Fokus Maksimum | 3 Milimeter |
| Bukaan Maksimum | 2 kaki |
| Format Pengambilan Video | H.264, JPEG |
| Berat Barang | 1.76 ons |
| Dimensi Paket | 4.06x2.99x1.65 inci |
9. Informasi Garansi
For detailed warranty information regarding your Arducam GMSL2 8MP IMX219 Raspberry Pi Camera Extension Kit, please refer to the official Arducam website or contact their customer support directly. Warranty terms and conditions may vary by region and purchase location.
10. Dukungan
If you encounter any issues or require further assistance, please visit the Arducam official support page or contact their technical support team. You can often find drivers, documentation, and community forums on their weblokasi.
Arducam Official Weblokasi: www.arducam.com