1. Petunjuk Keselamatan Penting
Please read all instructions before using this sewing machine. This machine is intended for household use only.
DANGER - To reduce the risk of electric shock:
- Peralatan listrik jangan pernah ditinggalkan tanpa pengawasan saat masih terpasang di stopkontak.
- Selalu cabut steker alat ini dari stopkontak segera setelah digunakan dan sebelum dibersihkan.
- Selalu cabut sebelum re-lamping. Ganti bohlam dengan tipe yang sama dengan daya 15 watt (area 110-120V) atau 15 watt (area 220-240V).
WARNING - To reduce the risk of burns, fire, electric shock, or injury to persons:
- Jangan biarkan untuk digunakan sebagai mainan. Diperlukan perhatian khusus saat alat ini digunakan oleh atau di dekat anak-anak.
- Gunakan alat ini hanya untuk penggunaan yang dimaksudkan seperti yang dijelaskan dalam panduan ini. Gunakan hanya alat tambahan yang direkomendasikan oleh pabrikan sebagaimana tercantum dalam panduan ini.
- Jangan sekali-kali mengoperasikan alat ini jika kabel atau stekernya rusak, tidak berfungsi dengan benar, terjatuh atau rusak, atau terjatuh ke dalam air. Kembalikan alat ke dealer resmi atau pusat layanan terdekat untuk pemeriksaan, perbaikan, penyetelan kelistrikan atau mekanis.
- Jangan sekali-kali mengoperasikan alat dengan lubang udara yang tersumbat. Jaga lubang ventilasi mesin jahit dan pengontrol kaki bebas dari tumpukan serat, debu, dan kain lepas.
- Jauhkan jari dari semua bagian yang bergerak. Perawatan khusus diperlukan di sekitar jarum mesin jahit.
- Selalu gunakan pelat jarum yang tepat. Pelat yang salah dapat menyebabkan jarum patah.
- Jangan gunakan jarum yang bengkok.
- Jangan menarik atau mendorong kain saat menjahit. Hal ini dapat membelokkan jarum dan menyebabkannya patah.
- Always unplug sewing machine off ("O") when making any adjustments in the needle area, such as threading needle, changing needle, threading bobbin, or changing presser foot, and the like.
- Selalu cabut mesin jahit dari stopkontak saat melepas penutup, melumasi, atau saat melakukan penyesuaian servis pengguna lain yang disebutkan dalam instruksi manual.
- Jangan sekali-kali menjatuhkan atau memasukkan benda apa pun ke dalam celah mana pun.
- Jangan gunakan di luar ruangan.
- Jangan operasikan di tempat yang menggunakan produk semprotan aerosol atau di mana oksigen sedang diberikan.
- To disconnect, turn all controls to the off ("O") position, then remove plug from outlet.
- Jangan mencabut dengan menarik kabelnya. Untuk mencabut, pegang stekernya, bukan kabelnya.
- Tingkat tekanan suara dalam kondisi pengoperasian normal adalah 75dB(A).
- Always turn off the machine or unplug when the machine is not operating properly.
- Jangan pernah meletakkan apa pun di atas pengontrol kaki.
- If the supply cord to the foot controller is damaged, it must be replaced by the manufacturer or its service agent or a similar qualified person in order to avoid a hazard.
- Peralatan ini tidak ditujukan untuk digunakan oleh orang (termasuk anak-anak) dengan keterbatasan fisik, sensorik, atau mental, atau kurang pengalaman dan pengetahuan, kecuali mereka telah diberi pengawasan atau petunjuk mengenai penggunaan peralatan oleh orang yang bertanggung jawab atas keselamatan mereka.
- Anak-anak harus diawasi untuk memastikan mereka tidak bermain-main dengan peralatan tersebut.
SIMPAN PETUNJUK INI
Image: Important Safety Instructions page from the Singer 2250 manual, detailing electrical and general safety warnings.
2. Pengaturan
2.1 Aksesoris
The Singer 2250 sewing machine comes with a set of standard accessories and supports various optional accessories for different sewing tasks.
- Aksesori Standar: All purpose foot, Button sewing foot, Zipper foot, Screwdriver, Seam ripper/brush, Pack of needles, Bobbin (3), Darning plate, Spool holder.
- Optional Accessories (not supplied with machine, available from SINGER® retailers): Edge/quilting guide, Zipper foot, Straight stitch foot, Overcasting foot, Hemmer foot, Blind hem foot, Satin stitch foot, Cording/embroidery foot, Second spool pin, Spool pin felt.
2.2 Menggulung Bobbin
- Place thread and corresponding spool holder onto the spool pin.
- Snap the thread into the thread guide.
- Wind the thread counterclockwise around the bobbin winder tension disc.
- Thread the bobbin as illustrated and place it on the spindle.
- Push the bobbin spindle to the right.
- Hold the thread end.
- Step on the foot control pedal to begin winding.
- Cut the thread once the bobbin is full.
- Push the bobbin spindle to the left and remove the wound bobbin.
Harap Dicatat: When the bobbin winder spindle is in the "bobbin winding" position, the machine will not sew and the hand wheel will not turn. To start sewing, push the bobbin winder spindle to the left (sewing position).

Image: Manual page illustrating standard and optional accessories, and a step-by-step guide for winding the bobbin.
2.3 Connecting to Power Source
Ensure the machine's power switch is in the "O" (off) position. Insert the machine plug into the electrical outlet. Always use a grounded outlet.
2.4 Raising the Presser Foot Lifter
The presser foot lifter is located at the back of the needle bar area. Lift it to raise the presser foot for placing fabric, and lower it to hold the fabric in place for sewing.
3. Operasi
3.1 Choosing Your Pattern
The Singer 2250 features a Pattern Selector Dial to choose various stitch patterns.
- Stitches indicated in black on the diagram correspond to the Pattern Selector Dial.
- For patterns indicated with the "S" color, turn the Pattern Selector Dial to "S", then use the Stitch Length Dial to adjust the desired stitch length.
- The Pattern Selector Dial can be turned in either direction.
3.2 Stitch Length Dial
The Stitch Length Dial controls the length of straight stitches and the density of zig-zag stitches.
- For Straight Stitching: Turn the Pattern Selector Dial to the straight stitch symbol. The stitch length increases as the dial approaches "4". Use longer stitches for heavier fabrics and thicker needles, shorter stitches for lighter fabrics and finer needles.
- For Zig-Zag Stitching: Turn the Pattern Selector Dial to "~~~ ". The density of zig-zag stitches increases as the setting of the stitch length dial approaches "0". Dense zig-zag stitches are known as satin stitches.

Image: Manual page detailing how to choose stitch patterns and adjust stitch length for various sewing applications.
3.3 Memasang Benang pada Mesin
Proper threading is crucial for smooth sewing. Follow these general steps:
- Letakkan gulungan benang pada pin gulungan.
- Arahkan benang melalui pemandu benang bagian atas.
- Lewatkan benang melalui cakram penegang.
- Bring the thread up through the take-up lever.
- Arahkan benang ke bawah melalui pemandu benang pada batang jarum.
- Masukkan benang ke dalam jarum dari depan ke belakang.
- Raise the bobbin thread by turning the handwheel towards you, catching the bobbin thread with the needle thread.
- Pull both threads under the presser foot and towards the back.
3.4 Sewing on Buttons
To sew buttons using your Singer 2250:
- Pasang pelat darning.
- Change the all-purpose foot to the button sewing tool.
- Position the fabric and button under the foot.
- Lower the button to the desired position and lower the foot.
- Set the Pattern Selector Dial on "---" and sew a few securing stitches.
- Select one of the two narrow zig-zag patterns (between 0.5 and 1.5) and sew through both holes of the button. Turn the handwheel to check needle clearance.
- Slowly sew the button with about 10 stitches.
- Select pattern "---" again and sew a few securing stitches.
- If a shank is required, place a darning needle on top of the button and sew.
- For buttons with 4 holes, sew through the front two holes first, then sew backwards and then sew through the back two holes.
3.5 Installing the Removable Extension Table
The removable extension table provides a larger work surface and also serves as an accessory box.
- Untuk Menginstal: Hold the removable extension table horizontally and push it in the direction of the arrow until it clicks into place.
- Untuk Menghapus: Pull the extension table towards the left.
- The inside of the removable extension table can be used as an accessory box. To open, flip the cover down.
4. Pemeliharaan
4.1 Darning Plate
The darning plate is used for specific tasks like darning or free-hand embroidery.
- Instalasi: Install the darning plate as illustrated in the manual.
- Pemindahan: Untuk menjahit normal, lepaskan pelat penusuk.
- For free-motion sewing, a darning/embroidery foot (optional accessory) is recommended.
4.2 Inserting & Changing Needles
Regularly change your needle, especially if sewing problems occur. Use SINGER® Brand Needles for best results.
- Turn the power switch to off ("O").
- Kendurkan jarum clamp sekrup.
- Insert the new needle with the flat side of the shaft facing the back, pushing it up as far as it will go.
- Kencangkan jarum clamp sekrup.
Perhatian: Needles must be in perfect condition. Problems can occur with bent needles, damaged points, or blunt needles.
4.3 Changing the Bulb
To change the light bulb, ensure the machine is unplugged. Replace the bulb with the same type rated 15 watts (110-120V area) or 15 watts (220-240V area).
4.4 Pembersihan
Regularly clean the lint and dust from the bobbin case area and feed dogs using the provided brush. Ensure the machine is unplugged before cleaning.
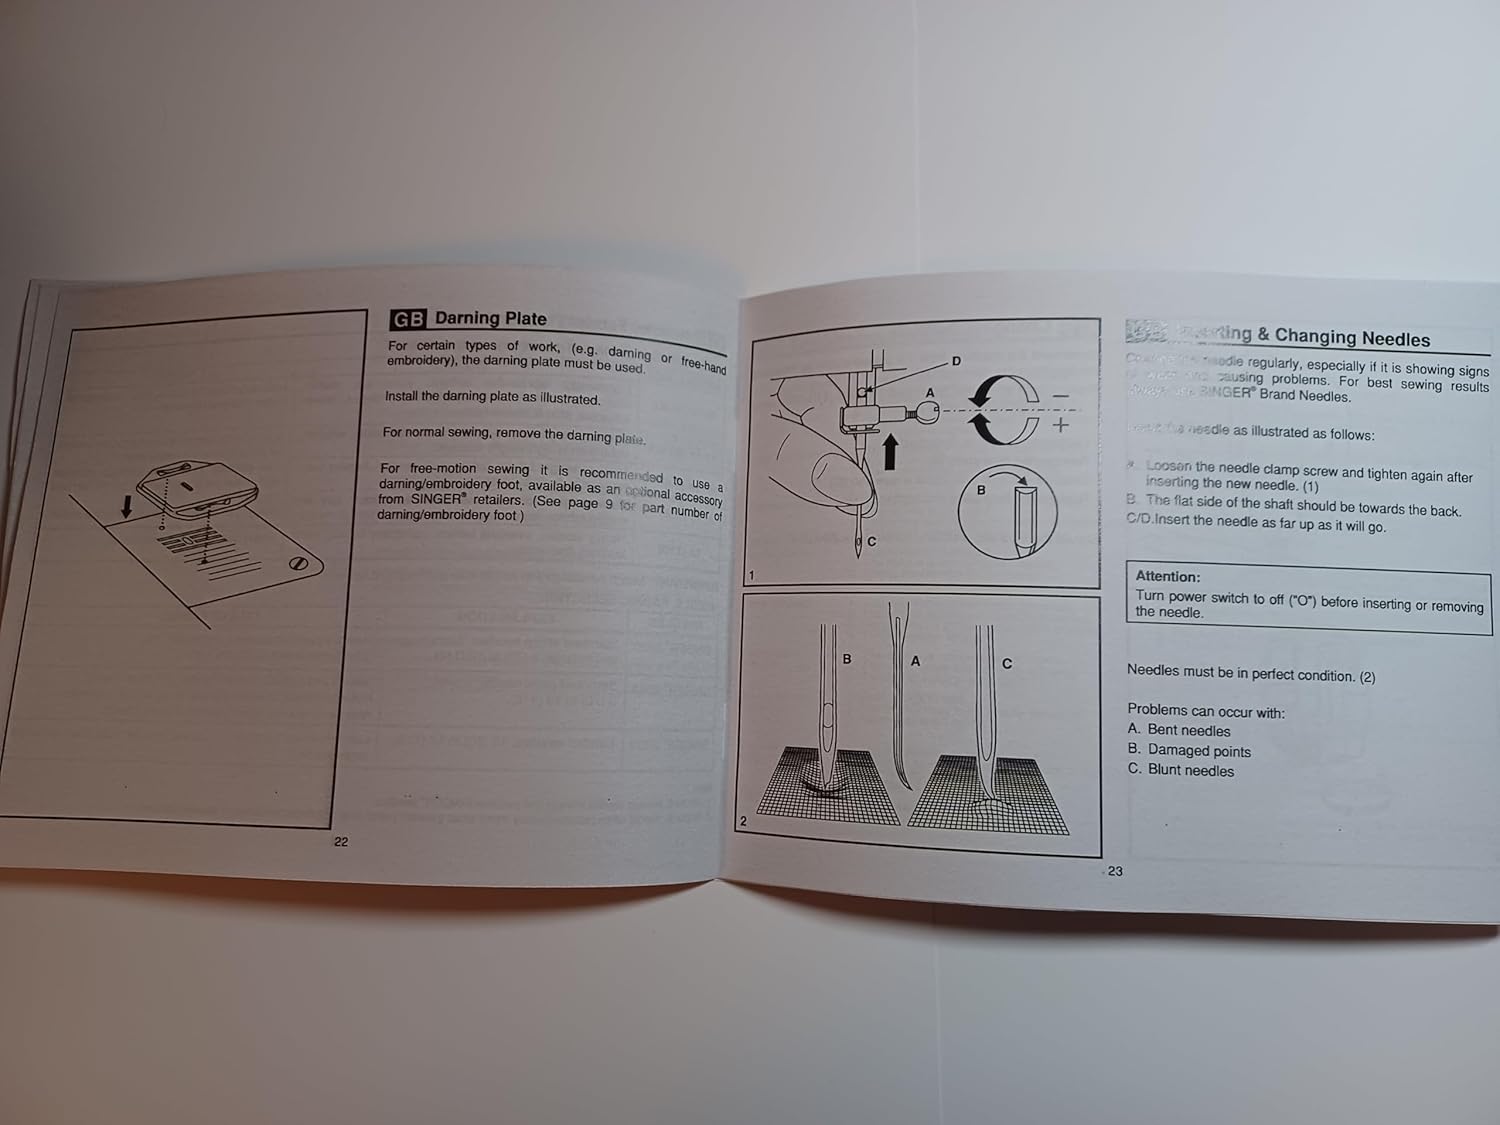
Image: Manual page illustrating procedures for sewing on buttons, installing the extension table, using the darning plate, and changing needles.
5. Penyelesaian masalah
If you encounter issues with your Singer 2250, refer to the following common problems and solutions:
- Jahitan yang Dilewatkan: Ensure the needle is inserted correctly, not bent, and is the appropriate size for the fabric and thread. Re-thread the machine.
- Pemutusan Benang: Check for correct threading, proper tension, a bent or blunt needle, or burrs on the needle plate or bobbin case.
- Kerutan pada Kain: Adjust tension settings, use the correct needle size, or ensure the presser foot pressure is appropriate for the fabric.
- Mesin Tidak Mengumpankan Kain: Check if the feed dogs are raised. Ensure the presser foot is lowered.
- Operasi Bising: Clean and lubricate the machine as per maintenance instructions. Check for loose parts or a bent needle.
For persistent problems, contact an authorized Singer service center.
6. Spesifikasi
| Dimensi Produk | 8.5x5.5x0.1 inci |
| Berat Barang | 3 ons |
| Nomor Model | SINGER 2250 Manual |
| Pabrikan | TabSynth Design (for reproduction manual) |
| ASIN | B0G19M5M63 |
7. Garansi dan Dukungan
This instruction manual is a reproduction for the Singer 2250 Sewing Machine. For warranty information regarding your Singer 2250 sewing machine, please refer to the original documentation provided with your machine or contact Singer customer support directly.
For support related to the operation or maintenance of your Singer 2250, please consult this manual. If further assistance is needed, contact an authorized Singer service center or your local Singer dealer.


