1. Pendahuluan
The ASUS ROG Raikiri II is a versatile tri-mode gaming controller designed for use with Xbox Series X|S, PC, and the ROG Ally. It offers flexible connectivity options including wired USB-C, low-latency 2.4GHz RF, and Bluetooth. Key features include anti-drift TMR joysticks, dual-mode triggers, micro-switch buttons for tactile feedback, and a long-lasting battery. This manual provides essential information for setting up, operating, and maintaining your controller.

Image 1.1: The ASUS ROG Raikiri II Xbox Wireless Gaming Controller.
2. Isi Paket
Verifikasi bahwa semua item ada dalam paket Anda:
- ROG Raikiri II Wireless Gaming Controller
- Kabel USB-C ke USB-A
- 2.4GHz RF Dongle
- Portable Protective Charging Case
- Charging Stand with Feet
- Extra High-Profile Joystick Caps (2)
- Panduan Memulai Cepat (dokumen ini)

Image 2.1: Included accessories: portable case, charging stand, and two detachable joystick caps.
3. Pengaturan
3.1 Pengisian Awal
Before first use, fully charge the controller. Connect the USB-C cable to the controller and the USB-A end to a power source (e.g., PC, USB wall adapter). The LED indicator will show charging status.
3.2 Konektivitas Tiga Mode
The ROG Raikiri II supports three connection modes:
- USB-C berkabel: Connect the controller directly to your device using the provided USB-C cable. This mode is compatible with Xbox Series X|S, PC, and ROG Ally.
- 2.4GHz RF Wireless: Insert the 2.4GHz RF dongle into an available USB port on your PC, Xbox Series X|S, or ROG Ally. The controller will automatically pair. This mode offers ultra-low latency.
- Bluetooth dapat digunakan untuk berbagai keperluan, seperti: For Bluetooth connectivity, ensure your device has Bluetooth enabled. Put the controller into Bluetooth pairing mode (refer to the controller's specific button combination for pairing, usually a dedicated Bluetooth button or a combination of buttons). Select the controller from your device's Bluetooth settings to pair. This mode is compatible with PC and ROG Ally.
Note: Xbox consoles support USB-C and 2.4GHz RF connectivity only.

Image 3.1: Tri-mode connectivity options for the ROG Raikiri II controller.
4. Mengoperasikan Pengontrol
4.1 Joystick TMR
The controller features anti-drift TMR (Tunnel Magnetoresistance) joysticks, providing enhanced accuracy and reduced power consumption compared to traditional Hall Effect joysticks. These joysticks are designed for long-term reliability and precision.
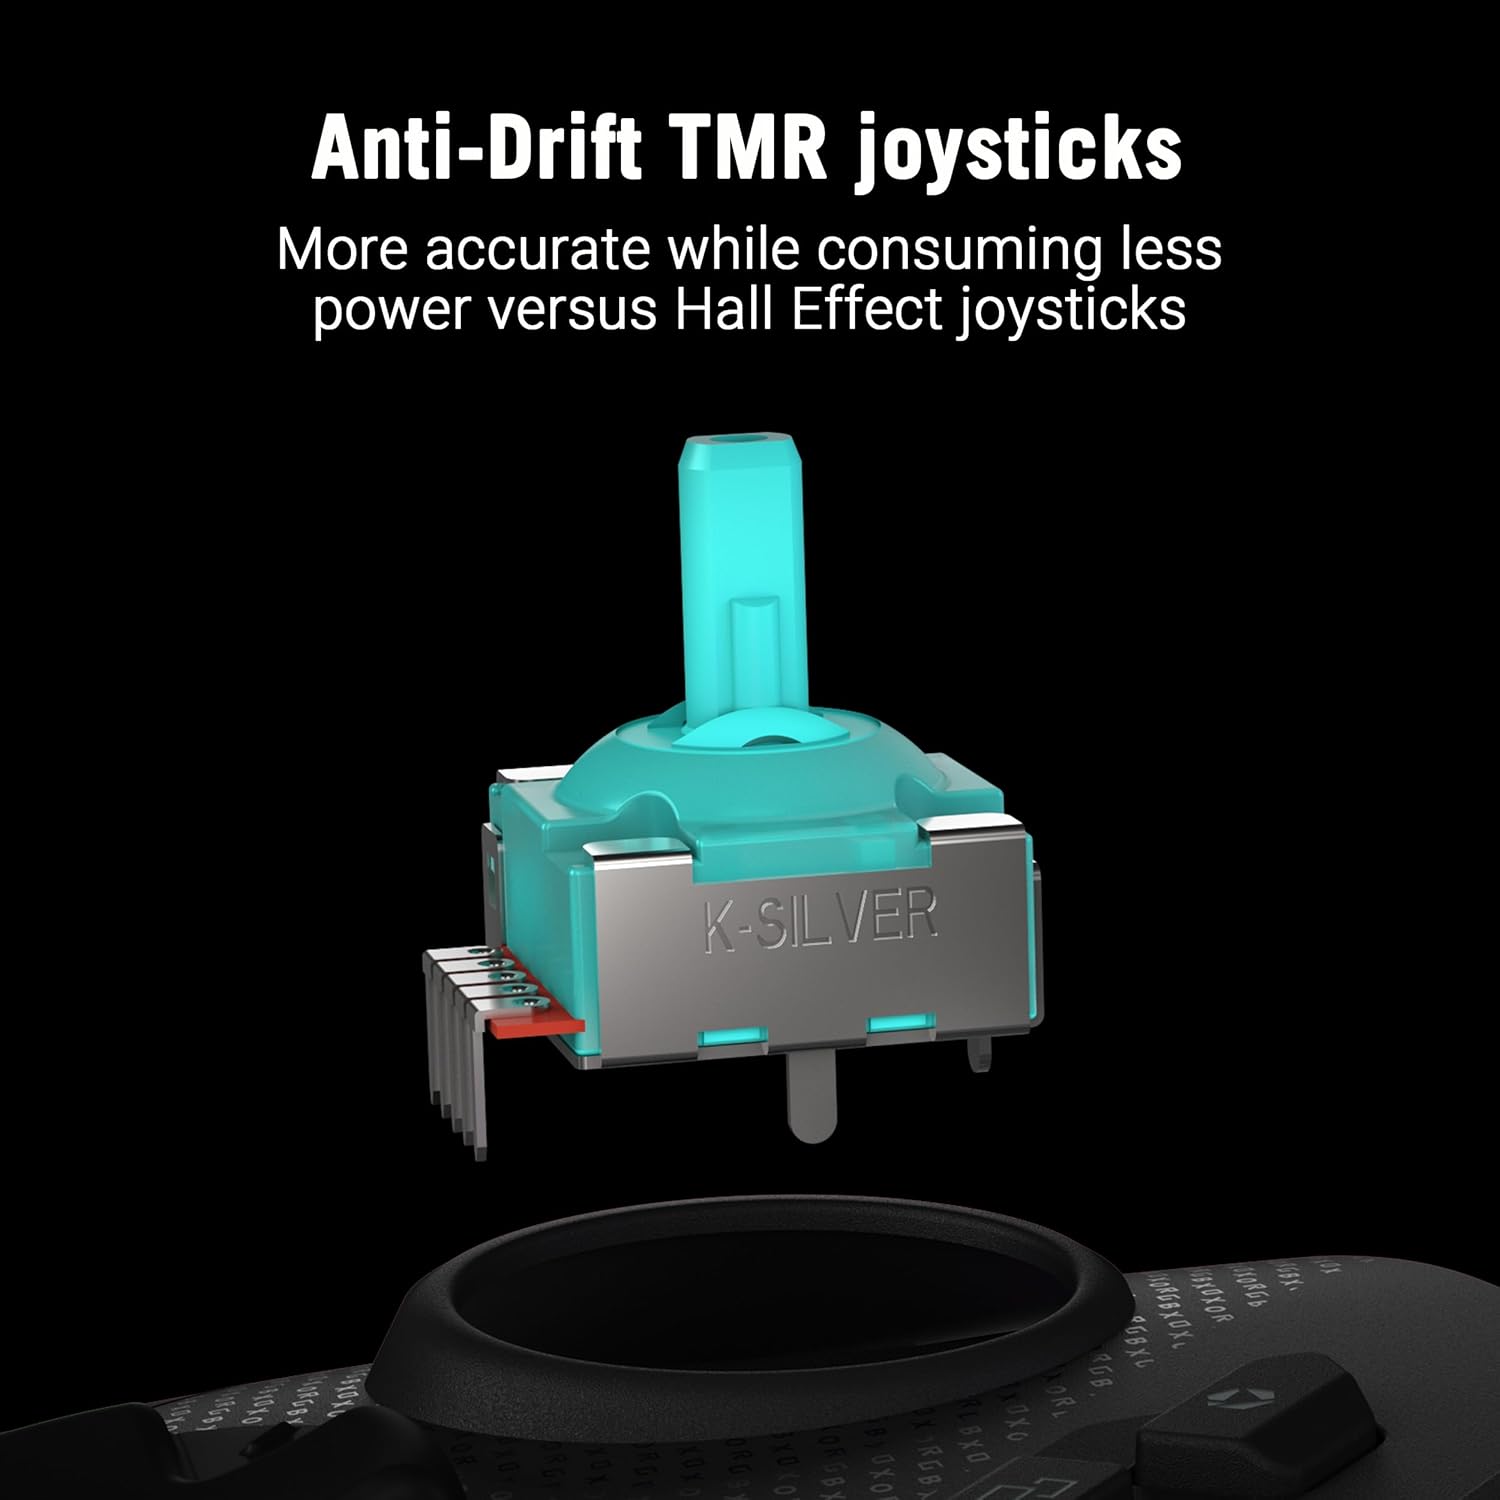
Gambar 4.1: Detail view of an anti-drift TMR joystick module.
4.2 Dual-Mode Triggers
The triggers offer dual-mode functionality, allowing you to switch between short-travel micro-switch actuation and full-travel TMR sensor actuation. This provides flexibility for different game genres, such as quick shots in FPS games or precise acceleration control in racing games.

Image 4.2: The dual-mode triggers can be switched between short micro-switch and full TMR sensor modes.
4.3 Micro-Switch Buttons
The D-Pad, ABXY buttons, rear buttons, and bumpers utilize micro-switches for instant actuation and crisp, tactile feedback, ensuring every command is registered precisely.
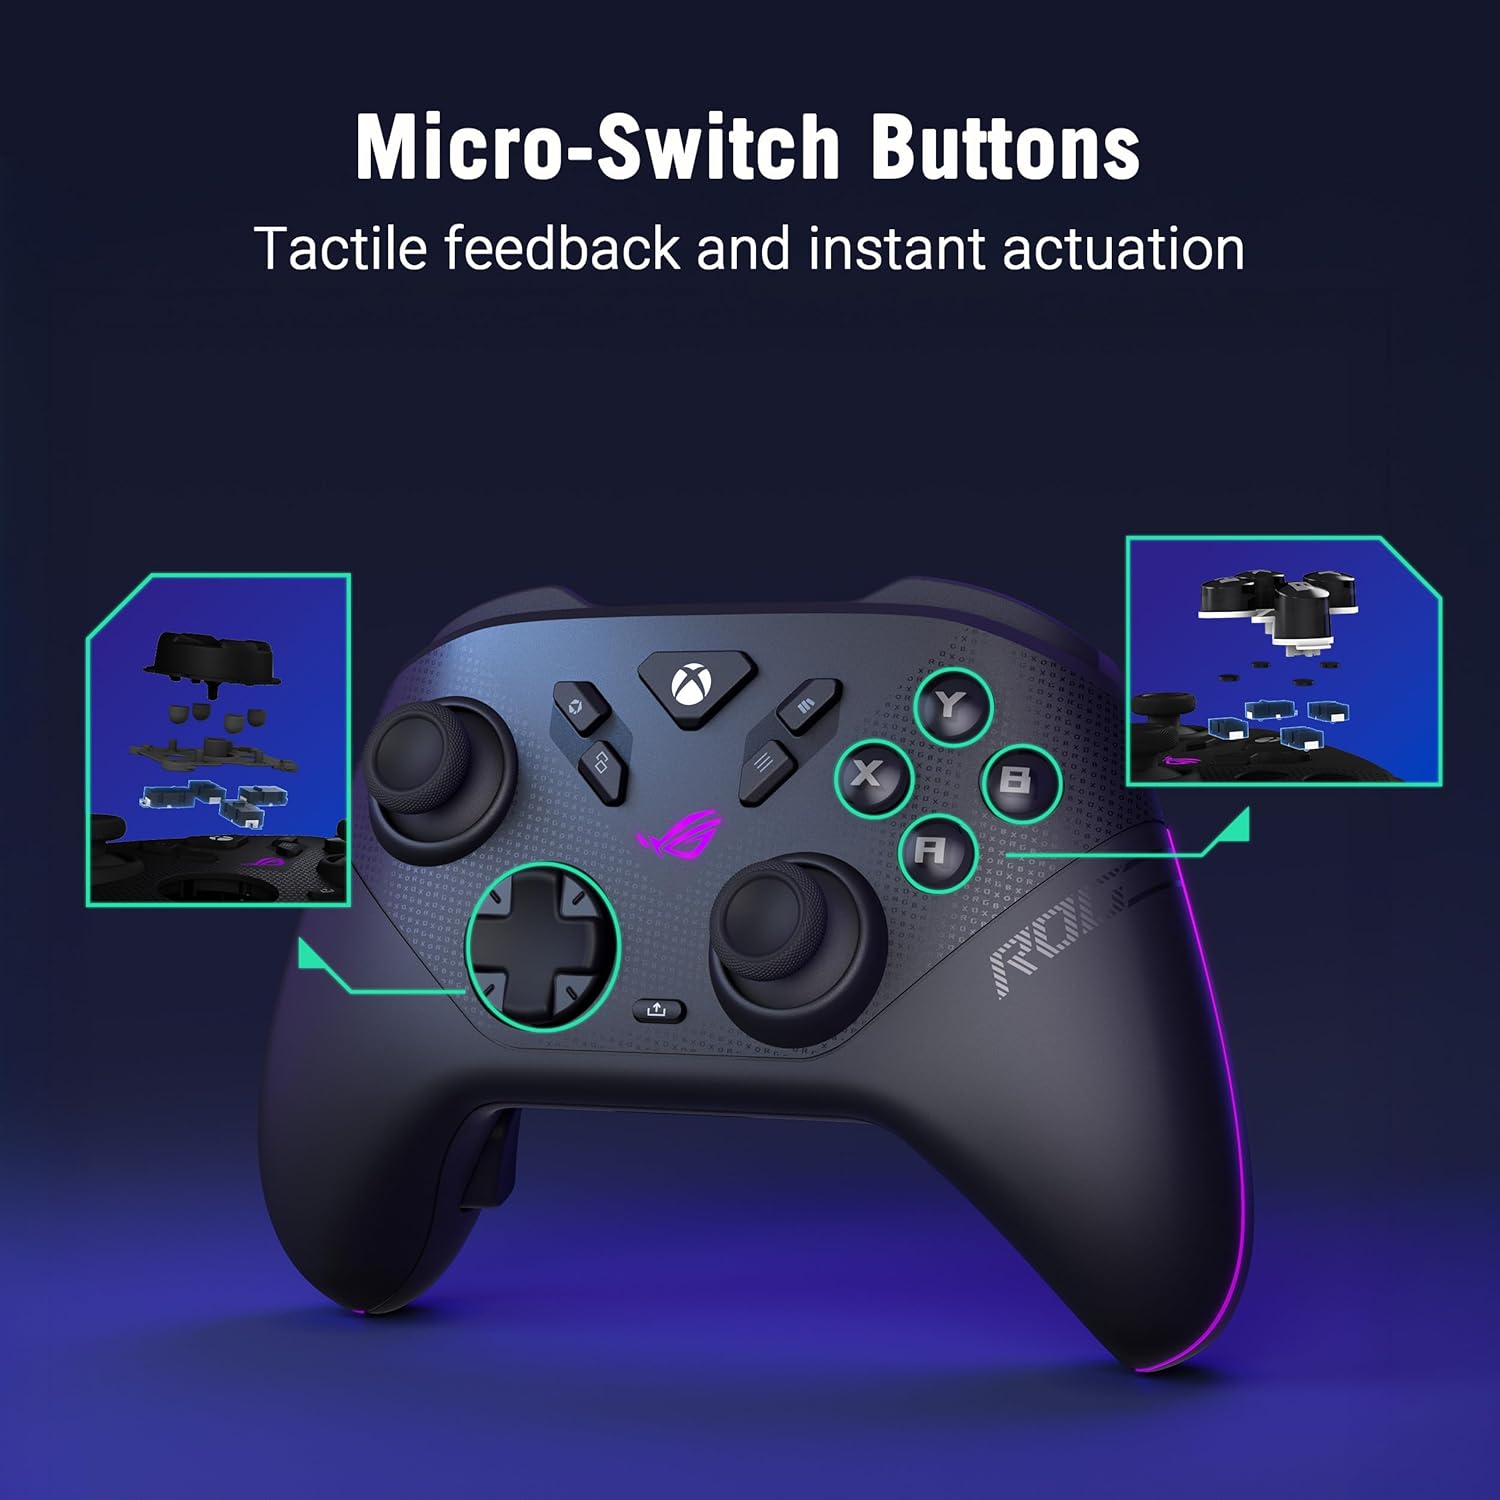
Gambar 4.3: Internal view highlighting the micro-switch buttons for tactile feedback.
4.4 Programmable Rear Buttons
The controller features four fully programmable rear buttons. These can be customized to perform various functions, allowing for advanced control and personalized gameplay. Refer to the web-based configuration tool for programming instructions.

Image 4.4: The four programmable rear buttons on the underside of the controller.
4.5 Web-Based Configuration (Gear Link)
Customize your controller settings, including button mapping, joystick dead zones, trigger sensitivity, and vibration intensity, using the web-based Gear Link configuration tool. Access this tool via a compatible web browser (e.g., Google Chrome, Microsoft Edge) on your PC. No software downloads are required.

Gambar 4.5: The web-based Gear Link interface for controller customization.
5. Pemeliharaan
5.1 Pembersihan
Untuk membersihkan kontroler, gunakan kain lembut dan kering. Untuk kotoran yang membandel, gunakan kain yang sedikit kering.ampBasahi kain dengan air. Hindari penggunaan bahan kimia keras, pelarut, atau bahan abrasif, karena dapat merusak lapisan permukaan dan komponen internal pengontrol.
5.2 Perawatan Baterai
The controller features an integrated rechargeable battery providing up to 50 hours of wireless play (with RGB, audio, and vibration off). To prolong battery life:
- Hindari mengosongkan baterai sepenuhnya secara sering.
- Simpan pengontrol di tempat yang sejuk dan kering saat tidak digunakan.
- Jika disimpan dalam jangka waktu lama, isi daya baterai hingga sekitar 50% kapasitas.

Image 5.1: The controller on its charging stand, highlighting its extended battery life.
5.3 Penyimpanan
Use the provided portable protective charging case to store the controller and its accessories when traveling or not in use. This protects the controller from dust, scratches, and impacts.

Image 5.2: The controller fits securely within its protective travel case.
6. Penyelesaian masalah
6.1 Pengontrol Tidak Terhubung
- wired: Ensure the USB-C cable is securely connected to both the controller and your device. Try a different USB port or cable.
- RF 2.4GHz: Verify the RF dongle is fully inserted into a USB port. Ensure the controller is powered on and within range. Re-pair if necessary by pressing the pairing button on the dongle and controller.
- Bluetooth dapat digunakan untuk berbagai keperluan, seperti: Confirm Bluetooth is enabled on your device. Put the controller into pairing mode and select it from your device's Bluetooth list. Ensure no other devices are interfering with the Bluetooth signal.
6.2 Web-Based Configuration (Gear Link) Issues
- Pastikan Anda menggunakan yang kompatibel web browser such as Google Chrome or Microsoft Edge.
- Pastikan koneksi internet Anda stabil.
- Clear your browser's cache and cookies, or try accessing Gear Link in an incognito/private browsing window.
- Ensure JavaScript is enabled in your browser settings for the Gear Link weblokasi.
6.3 Stick Drift or Clicking Noise
- While TMR joysticks are designed to prevent drift, minor clicking noises can sometimes occur. If performance is affected, ensure the joystick caps are properly seated.
- If you experience significant stick drift or unresponsive movement, try recalibrating the joysticks through the Gear Link web antarmuka.
6.4 Firmware Update Failures
- Ensure the controller is connected via USB-C to your PC during firmware updates.
- Maintain a stable internet connection.
- Nonaktifkan sementara perangkat lunak antivirus atau firewall apa pun yang mungkin mengganggu proses pembaruan.
- If an update fails, restart your PC and the controller, then attempt the update again.
7. Spesifikasi
| Fitur | Detil |
|---|---|
| Merek | ASUS |
| Model | ROG Raikiri II |
| Konektivitas | USB-C, 2.4GHz RF, Bluetooth |
| Kesesuaian | Xbox Series X|S, PC, ROG Ally |
| Tuas kendali | Anti-Drift TMR |
| Pemicu | Dual-Mode (Micro-Switch / TMR Sensor) |
| Tombol | Micro-Switch D-Pad, ABXY, Rear Buttons, Bumpers |
| Tombol yang Dapat Diprogram | 4 Rear Buttons |
| Tingkat Polling | 1000Hz (PC mode with ROG SpeedNova) |
| Daya Tahan Baterai | Up to 50 hours (2.4GHz wireless, RGB/audio/vibration off) |
| Warna | Hitam |
| Berat Barang | 9.6 ons |
| Ukuran | 6.1x4.1x2.6 inci |
| UPC | 199291150201 |
8. Informasi Garansi
The ASUS ROG Raikiri II Wireless Gaming Controller comes with a Garansi terbatas 1 tahun Terhitung sejak tanggal pembelian. Garansi ini mencakup cacat produksi dan pengerjaan dalam penggunaan normal. Garansi ini tidak mencakup kerusakan yang disebabkan oleh penyalahgunaan, kecelakaan, modifikasi tanpa izin, atau bencana alam. Harap simpan bukti pembelian Anda untuk klaim garansi.
9. Dukungan
For further assistance, technical support, or to download the latest drivers and firmware updates, please visit the official ASUS support webAnda dapat menemukan FAQ terperinci dan informasi kontak untuk layanan pelanggan di situs tersebut.
Dukungan ASUS Weblokasi: www.asus.com/dukungan/


